Vodič za uporabnike

Categories - One Answer (Drop-Down Menu) (Question Type)

By using the 'Categories - one answer (Dropdown)' question type, respondents are given the option to choose one answer from a number of possible answers (categories). The answers are presented as a drop-down list instead of buttons. It is advisable to consider the possibility that we have not foreseen all possible answers, and to add an 'Other' category to the question if necessary, but for this question type, it is not possible for the 'Other' answer to be a semi-open type where respondents could write their own answers.

Related content

Registration Form

A registration form is a type of survey that incorporates one or more variables. You can include only an email address, or it can incorporate other variables in which you are interested.

You can create a registration form by clicking the 'Create survey' option. A new window will appear, where you can enter the name of the registration form, select the 'Form' questionnaire type, and click 'Next'.

Variables can be added in two ways:

1. Insert the desired question types and edit them. If you want to have the variables 'name' and 'email', first select the 'Text' question type and write 'Name' into the text question. For the email, navigate the mouse to the menu on the left and click 'Add question' , where all the available question types are listed. Under the category 'Standard input', select the 'E-mail' option.

  • If you wish to use the two variables later in notifications, you must define them as system variables. This can be done in the individual question editor, in the 'Advanced' tab, where you select the category 'System variable';
  • You should also rename the variables in the same tab, under the category 'Variable'; enter 'Name' under 'Variable name' for the first variable, and 'Email' under 'Variable name' for the second variable, so that the system will automatically detect the variables for notifications.

2. To the right of the question editor, you will find the option of Alerts from responses quick settings, where you select the recipients of the notifications. You can choose between the authors of the survey, additional recipients and respondents.

If you select a respondent, the variable 'E-mail' is entered into the form, which is by default a system variable and can be used for notifications without further settings.

You can add the other variables in the same way as with a standard survey. If you wish to use them in notifications, you must define them as system variables.

Notifications are only available to users with 2KA and 3KA payable package

System variables

Each variable that you wish to include in the notification message must be defined as a system variable. In the question editor of each question, in the 'Advanced' tab, you can select the option 'System variable'.

Enter #variable_name# into the notification message.

Example: The participants must select a date in the registration form. The date variable is named Q1 in the question editor. you should enter in the message, for example: “you have chosen the date #Q1# for the workshop.”

If the registration form is to be embedded on a website, we recommend that you select the 'Embed' design, which can be selected in the 'EDIT' – 'Design' tab.

Insight into the registration database

The 1KA system enables you a quick insight into the registration database. If you are a 3KA private package user you can also create a URL link to the database and forward it to selected individuals. The list can also be exported in PDF, MS Word and Excel formats, as well as printed if you are a user with 2KA or 3KA payable package user.


Some of the functionalities described are only available for users of the 2KA and 3KA packages for individuals, and for users of the business packages for groups.


Related content

Double Grid Table (Question Type)

This question type allows respondents to select two criteria, located in the head of the table, against which respondents rate the items or topics located on the left-hand side in table rows. A double table is the most convenient way to display questions where different topics have the same possible answers.

An example of such a question could be satisfaction with a website. For example, we can get an insight into user satisfaction with design and usability for several different websites at the same time.

Related content

Accessibility of Surveys for People With Special Needs

We strive to make the online surveys created in the 1KA tool as easy as possible to complete, and also accessible to respondents with special needs.

The questions in the survey are adjusted so that the respondent can move between individual questions using the tab key.

The respondent can move between the individual answers in the question using the arrow keys.

Confirming the answer can be done by pressing the space bar.

EXCEPTIONS:

Date question type: move to the date question with the tab key and confirm the calendar icon by pressing the space bar to open the calendar. You can scroll through the calendar by holding down the CTRL key and an arrow key. Confirm the selected date with the enter key.

Specific question types cannot be customized for keyboard answering by default:

  • drag and drop layout (single-answer, multiple-choice, table)
  • image hotspot layout (single-answer, multiple-choice, table)
  • location and different layouts of the location question (Google map)
  • heat map
  • sorting layout (moving and shifting categories)

If you want the questionnaire to be fully accessible this way, we recommend that you use other layouts for these questions instead.

Adding Editorial Access on 1KA.arnes.si

As on www.1KA.si, you can also assign editorial access to the survey to other users on 1KA.arnes.si. General instructions on how to grant access to the survey to another user that apply to all 1KA installations and domains are described here.

When adding editors to the survey on 1KA.arnes.si, keep in mind that you can only grant access to users who have the option of accessing AAI services, which allows them to log in to 1KA.arnes.si.

Users with administrator status can grant access to the survey to users who haven't registered on 1KA.arnes.si yet, which will then receive a notification of the granted access to the email address provided by the administrator. Please note that if the user to whom you have granted access to the survey does not have an AAI identity, they will not be able to log in to 1KA.Arnes.si.

If you want to give a non-AAI user access to the survey, you can provide the user with:


File Upload

In the 'EDIT' - 'Questionnaire' tab, you can also insert the question type 'File upload' in your survey, where the respondent can upload their file to the survey. Open the menu on the left side or click on the "Add question" button at the bottom of the questionnaire, then select 'File upload' from the 'All Question Types' drop-down under 'Standard Input'. Enter the text of the question and adjust the settings if you wish.

Additional restrictions for respondents when uploading a file:

  • the maximum allowed size of a file uploaded by the respondent is 16 MB;
  • allowed file types are: "jpeg", "jpg", "png", "gif", "pdf", "doc", "docx", "xls", "xlsx", "ppt", "pptx", "zip", "rar", "rds", "rdata", "rmd", "qmd";
  • a maximum of 4 input fields is allowed in an individual question, i.e. a maximum of 4 files that the respondent can upload for one question.

The respondent can remove the file they uploaded and upload another or leave it blank. In analysis and data, the file is saved as a link (URL) to the file. The survey editor has the option to edit the link (delete or replace it).

Related content

Organization of Virtual Domain Users

Manager status

The main person in charge of the virtual domain is automatically given the status of a manager, who receives login details (e.g. a temporary password) from the 1KA administration immediately after the virtual domain is set up, to the e-mail address provided in the request.

By default, an organisation has one manager. In this case, the organisation can also opt for a generic name (e.g. manager@company.com or info@company.com), which greatly simplifies adjustments in case of a change of the person in charge.

In principle, there can be several managers, but this must be ordered separately and technically arranged with the 1KA administration. Additional managers are charged according to the current price list. The manager also has the responsibility to ensure that all surveys are carried out within limitations, in accordance with ethical standards and in compliance with the contract and the law. In the case of a large number of managers, all of them should take this responsibility, but in such a case it is recommended that one manager is the main manager and has access to the other managers.

Managers can add new users to a virtual domain. Each normal user of a virtual domain is therefore assigned to a specific manager. Additional users cannot register themselves in your virtual domain.

If there are several managers, they may or may not be mutually assigned to each other. If a manager is not assigned to anyone, this means that no one else has access to the surveys of that manager. Any change of access can only be made by 1KA administration on the basis of a formal request from the organisation, which must also comply with the applicable privacy legislation of the responding organisation. 1KA administration can only access surveys for the purposes of user assistance with the express permission of the author of the specific survey.

A manager has access to all surveys of a user (or manager) assigned to that manager. However, it is important to note that this access cannot be abused, because every survey author or user can see all accesses, insights and changes made by anyone (author, co-authors, managers, administrators) to their survey.


Access to individual surveys

Each manager has access to the entire profile of their assigned users and thus to all the user's surveys. The manager's administrative access to users should not be confused with users' access to edit a specific survey. Each user (not only the manager) can independently add any user of the virtual domain as a co-editor. In this case, a user is only granted access to that individual survey.


Controlling access to surveys

In the 'EDIT' - 'Archive' - 'Track changes' tab, the user and manager can see all instances of access to the survey: both insights and any changes to the questionnaire (who, when, what). The archive also includes any accesses and interventions made by the 1KA administration or Helpdesk.


Adding a new user

In the 'Users' - 'Add users' tab, there is a window for adding users, which will be assigned to you as their manager. Here the manager enters the user's e-mail, first name, last name and password. Both the manager and the user are notified by e-mail that a corresponding account has been created on the virtual domain:


Overview of users

Managers can see their assigned users in the 'Users' - 'My users' tab.

The manager can also see all the surveys of their assigned users in the survey overview in the 'My Surveys' tab. By clicking on the 'Filter' button, you can choose to display all surveys, or to display only your own surveys.

By clicking on edit (pencil) icon next to a user, the manager can see the full list of surveys for that user and their profile.

Here, the manager also has the option of editing the user's information (e.g. changing the password). In the user's survey list, the manager can change the user's permissions for each survey by clicking on the survey.


Adding an existing user to the overview

If a user is already registered to a virtual domain, you cannot assign them to your overview as a manager. In this case, please contact us at enklikanketa@gmail.com and we will manually assign the user to you.


Removing a user from your overview

A manager can remove a user in the 'Users' - 'My Users' tab. Clicking on the 'pencil' icon next to the user will open a pop-up window where the user can be removed:

After removing a user from the overview of a specific manager, the user will be removed from the corresponding virtual domain, but their surveys will still be visible to the manager in the 'My Surveys' tab.


Related content

Facebook or Google Login Troubleshooting

If you have problems logging in with your Facebook or Gmail account (e.g. login does not work), you can log in to www.1KA.si using the normal login.

In the E-mail field, please enter the e-mail address you are using for the Facebook or Gmail account with which you registered on www.1KA.si. Then click on the 'Did you forget your password?' option. You will receive a new password at the email address you entered. You can change the password yourself later in your profile.

If you do not receive an email with your new password, please wait a few minutes and check your spam.


Sending Invitations via 1KA's SMTP E-mail System or via a Gmail User Account (Server)

Gmail SMTP can be used by any user with a Gmail account, but there are some limitations, especially on the number of emails sent per day. More information is available here.

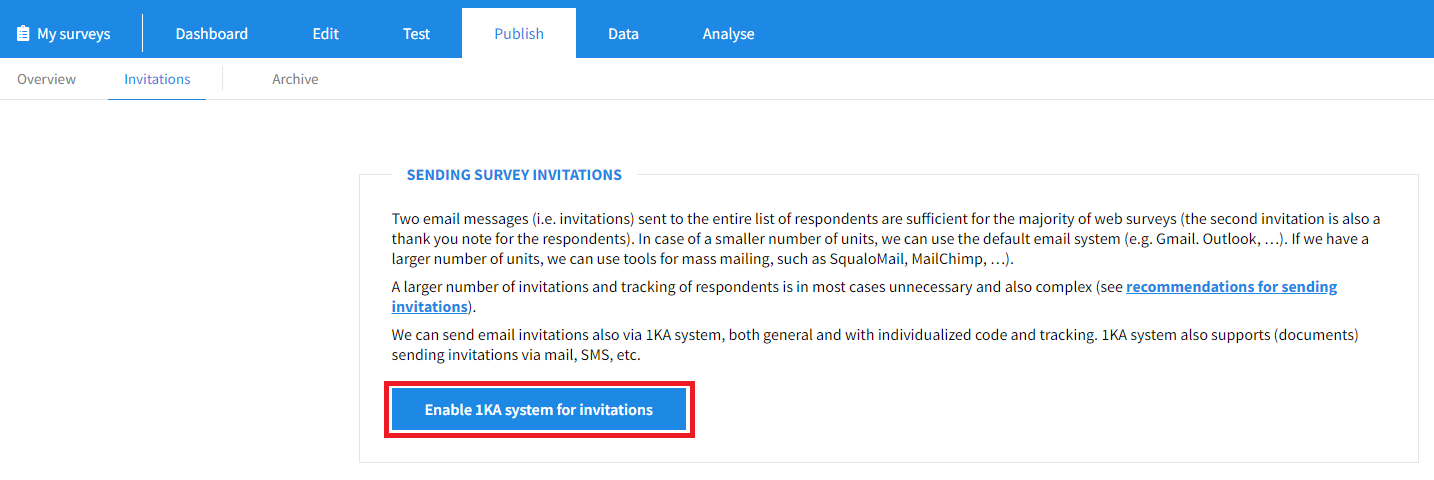
In the 'PUBLISH' – 'Invitations', you first need to enable the system by clicking on the 'Enable 1KA system for invitations' button:

Doing so opens the '1 - Settings' step, where you can edit 'General invitations settings' and 'Settings for Email Server'

To send email invitations via the SMTP settings of your Gmail email address, please follow the instructions below:

  • Sign in to your Google account and check your settings:
    • Make sure you have your IMAP access turned on:
      • Open Gmail on your computer.
      • Click the settings icon in the upper right corner → Show all settings.
      • Click the Forward tab, then on POP/IMAP.
      • In the 'IMAP access' section, select 'Enable IMAP'.
      • Click 'Save changes'.
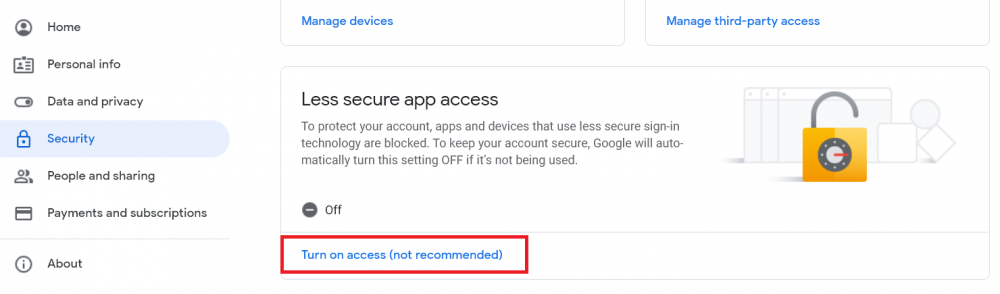
    • Allow access for less secure applications. Open your Google account and from the menu on the left, select the Security tab → Access for less secure applications → Turn on access:
  • Turn on 2-step verification:
    • Open your Google account.
    • In the navigation panel choose Security.
    • Under 'Sign in to Google', select 2-step verification → Get started.
    • Follow the instructions on the screen.
  • Create a password to access the application:
    • Open your Google account.
    • Select Security.
    • Under 'Sign in to Google', select 'App passwords'. You may need to sign up.
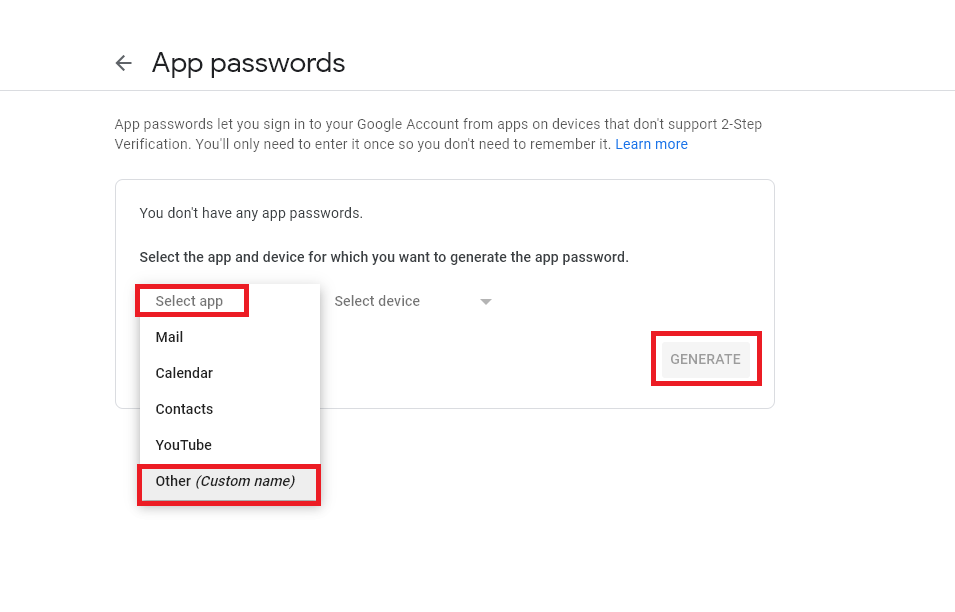
    • At the bottom, select: 'Select app' and then enter the application, select 'Other' → name as desired (e.g. 1KA) → Generate.
    • Follow the instructions to enter the password to access the application. The password to access the application is a 16-digit code in the yellow bar on the device.
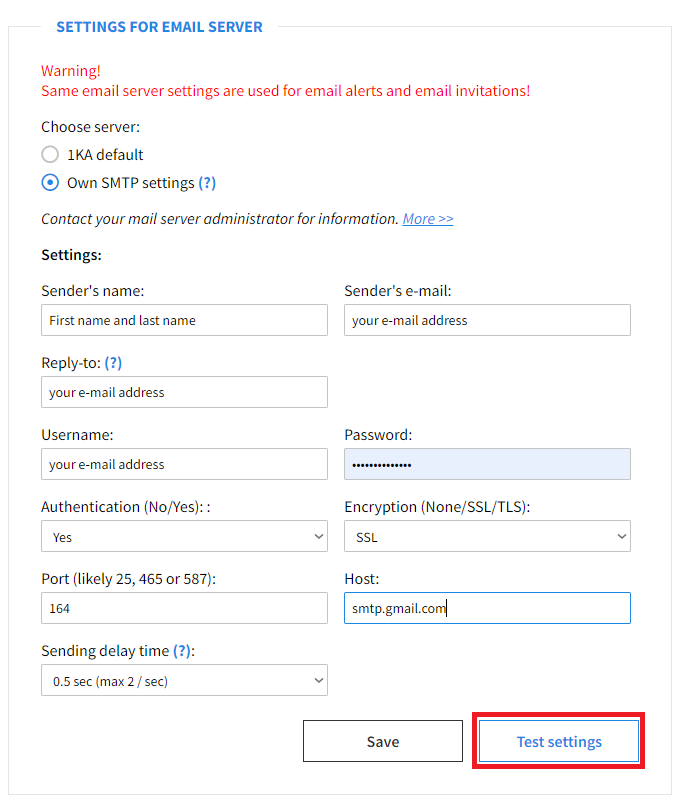
  • In the 'PUBLISH' - 'Invitations' - 'Settings' tab - 'Settings for Email Server' you must enter the following information:
    • Sender's name: name and surname
    • Sender's email: your email address
    • Reply-to: your email address
    • Username: your email address
    • Password: 16-digit code you set as the application access password (Step: Create application access password)
    • Authentication (No/Yes): Yes
    • Encryption (None/SSL/TLS): SSL
    • Port: 465
    • Host: smtp.gmail.com
  • Click 'Test settings' below. You will receive a test message to your email address:


  • If the test is successful, then Save the settings.


Keep in mind that Gmail is constantly updating its settings. These instructions for setting up invitations via the Gmail server were last tested in September 2023, so we advise you to check the current settings in Gmail's documentation before sending invitations.

1KA system for sending invitations at 1KA.arnes.si

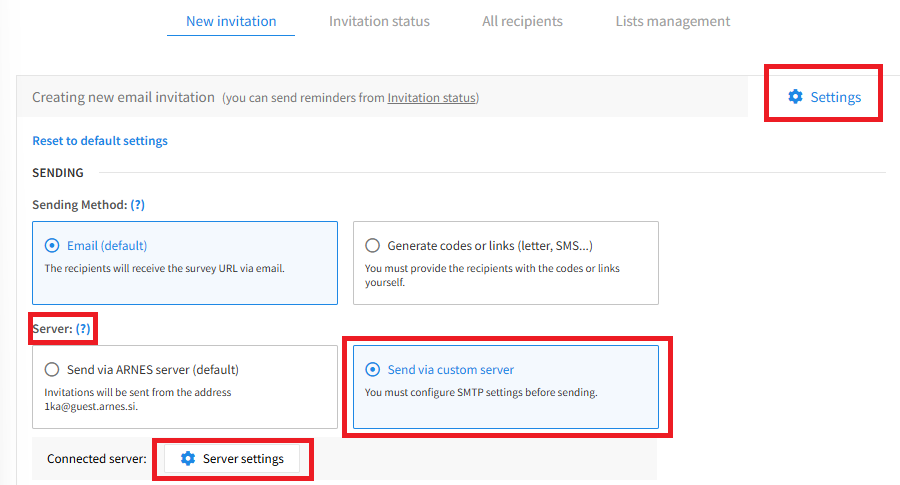
On 1KA.arnes.si, there is a new, redesigned interface for sending email invitations. If you want to activate the use of the 1KA system for sending invitations, you need to enable the system in the 'PUBLISH' - 'Invitations' tab by clicking on the 'Enable 1KA system for invitations' button. In the 'PUBLISH' - 'Invitations' - 'Settings' tab, you can edit the general settings of the invitations and the settings of the email server. When setting up the server, select 'Send via custom server' and then click on the 'Server settings' button.

After clicking on the 'Server Settings' button, you will be taken to the window, where you can enter the same information as above.


The functionality is available for users of the 3KA package for individuals, and for users of the business packages for groups.


Related content

1KA is free to use for basic users