
Vprašalnik

Zavihek 'VPRAŠALNIK' omogoča:


1. Dodajanje vprašanj

Na voljo je 28 tipov vprašanj. Dodate lahko tudi tudi standardne spremenljivke za demografijo. V osnovnih in naprednih opcijah posameznega vprašanja lahko nastavite postavitev, ime, opombe, omejitve znakov, vidnost vprašanja, vrednosti odgovorov, uvrstitev vprašanja med sistemske spremenljivke, ki jih lahko uporabite pri obveščanju in pošiljanju email vabil itd.


2. Urejanje vprašalnika

Urejate lahko strukturo vprašalnika s pogoji, zankami, bloki, kalkulacijami in prelomi strani. Prav tako lahko urejate celotni vprašalnik v skrčenem pogledu, kar je priporočljivo predvsem pri obširnih in kompleksnih vprašalnikih. S pomočjo slovarja (glossary) lahko vprašanjem in odgovorom dodate tudi definicije, ki se respondentu prikažejo ob pomiku miške nad besedo.   


3. Arhiviranje vprašalnika

Mogoča je izdelava arhivskih verzij vprašalnika in restavriranje iz arhivskih datotek. Vprašalnik lahko tudi kopirate, brišete (nepovratno, razen s pomočjo administratorja) in izvozite v PDF ali RTF (Word) obliki.


4. Dodatno urejanje in preverjanje vprašalnika

Mogoče je izvajanje ponavljajočih se popravkov s klikom na ikono 'poišči in zamenjaj', dodajanje preloma strani med vsa vprašanja, preverjanje pravilnosti postavljenih pogojev (kot pomoč pri odpravljanju morebitnih napak), preštevilčenje vseh vprašanj (s tem rešimo problem podvajanja imen spremenljivk) ter razprtje oz. skrčenje vseh pogojev, blokov in zank s klikom na ikoni 'odpri vse' oz. 'zapri vse'.


5. Knjižnica vprašanj in anket

Dostopate lahko do javne knjižnice, iz katere lahko kopirate vprašanja in ankete, ter do osebne knjižnice, v katero vprašanja in ankete lahko dodajate ali pa jih iz nje kopirate.


<< Nazaj na UREJANJE

Registration Form

A registration form is a type of survey that incorporates one or more variables. You can include only an email address, or it can incorporate other variables in which you are interested.

You can create a registration form by clicking the 'Create survey' option. A new window will appear, where you can enter the name of the registration form, select the 'Form' questionnaire type, and click 'Next'.

Variables can be added in two ways:

1. Insert the desired question types and edit them. If you want to have the variables 'name' and 'email', first select the 'Text' question type and write 'Name' into the text question. For the email, navigate the mouse to the menu on the left and click 'Add question' , where all the available question types are listed. Under the category 'Standard input', select the 'E-mail' option.

  • If you wish to use the two variables later in notifications, you must define them as system variables. This can be done in the individual question editor, in the 'Advanced' tab, where you select the category 'System variable';
  • You should also rename the variables in the same tab, under the category 'Variable'; enter 'Name' under 'Variable name' for the first variable, and 'Email' under 'Variable name' for the second variable, so that the system will automatically detect the variables for notifications.

2. To the right of the question editor, you will find the option of Alerts from responses quick settings, where you select the recipients of the notifications. You can choose between the authors of the survey, additional recipients and respondents.

If you select a respondent, the variable 'E-mail' is entered into the form, which is by default a system variable and can be used for notifications without further settings.

You can add the other variables in the same way as with a standard survey. If you wish to use them in notifications, you must define them as system variables.

Notifications are only available to users with 2KA and 3KA payable package

System variables

Each variable that you wish to include in the notification message must be defined as a system variable. In the question editor of each question, in the 'Advanced' tab, you can select the option 'System variable'.

Enter #variable_name# into the notification message.

Example: The participants must select a date in the registration form. The date variable is named Q1 in the question editor. you should enter in the message, for example: “you have chosen the date #Q1# for the workshop.”

If the registration form is to be embedded on a website, we recommend that you select the 'Embed' design, which can be selected in the 'EDIT' – 'Design' tab.

Insight into the registration database

The 1KA system enables you a quick insight into the registration database. If you are a 3KA private package user you can also create a URL link to the database and forward it to selected individuals. The list can also be exported in PDF, MS Word and Excel formats, as well as printed if you are a user with 2KA or 3KA payable package user.


Some of the functionalities described are only available for users of the 2KA and 3KA packages for individuals, and for users of the business packages for groups.

Related content

Additional Settings for the Introduction and Conclusion

In the 'EDIT' - 'Questionnaire' tab, you will find the 'Introduction' and 'Thank you' (conclusion) questions preset as a special introduction question type with generic text that you can edit and change.

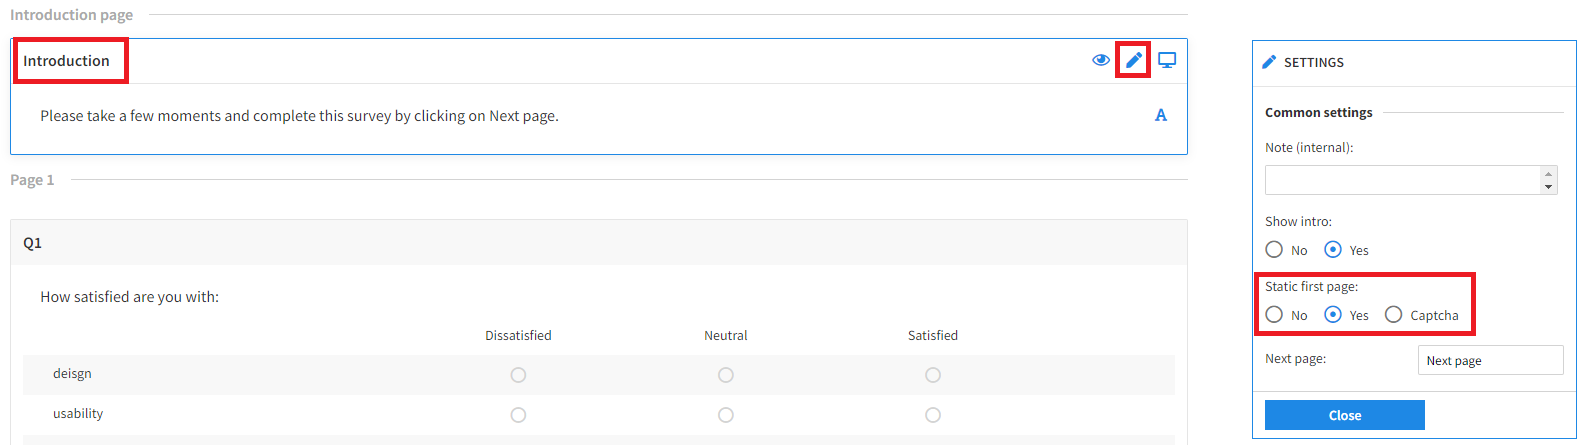
The 'Introduction' can easily be hidden by clicking on the eye icon, or by clicking on the pencil icon to open the editor with additional settings:

Example of a survey with hidden introduction >>

The 'Thank you' page can also be hidden by clicking on the eye icon, or by clicking on the pencil icon to open the editor with additional settings:

  • Basic:
    • add an internal note;
    • show thank you page;
    • display the link for later editing More >>
    • show a link through which the respondent can export the questionnaire with his answers in PDF;
    • edit survey deactivation note More >>
  • Advanced:
    • display and edit the text of  'Previous Page' and 'End' buttons;
    • specify what happens at the end of the survey.

Example of a survey with hidden conclusion >>

As mentioned above, under the 'Close survey instead of link' option you can specify what happens when a respondent clicks on the 'End' button:

  • 'Close survey': the browser window will redirect to the 1KA website after survey completion - it is already preset Example of a survey >>
  • 'Recursive': once the respondent finishes the survey, the same survey will reopen again for answering or input Example of a survey >>
  • 'Jump to link': a window opens where you can enter the URL of the website you wish to redirect the respondent to after the survey Example of a survey >>

Additional options of 'Jump to Link':

Different parameters can be inserted into the URL address to which the respondents are redirected. Possible parameters are listed below:

  • Respondent's ID;
  • Respondent's status;
  • Respondent's recnum;
  • Value of any question in the survey: in this case, the question must be systemic so that a parameter can be added into the URL address as 'data piping' (eg. https://www.1ka.si?q1=#QUESTION_NAME#)


Related content

Electronic Signature

In the questionnaire, you can include the 'Electronic Signature' question type, which you can find among all question types on the left side of the screen. An electronic signature can be used for registrations, logins, confirmations, etc.

The question is displayed to the respondent in two parts - the first part is a field where the respondent signs their name graphically, and the second part is a 'Signature of' field where the respondent types in their name. It is advisable to remind respondents to fill in all fields.

The signature is recorded in the survey data in two parts: graphically (as a link to an image of the signature) and as text (what the respondent entered in the 'Signature of' field).

An example of an electronic signature survey >>


The functionality is available for users of the 2KA and 3KA packages for individuals, and for users of the business packages for groups.


Related content

Text (Question Type)

This question type is used to enter a short text message, but it can also be set to accept longer texts. This is an open question type, which is more demanding for analysis later on.

When editing the field, there are several settings available through which the text input field can be adjusted:

  • The field can be different widths and sizes (from 1 to 30 lines).
  • You can also set the maximum number of characters that the respondents can enter as an answer (0 to 9999 characters).
  • Up to 4 input fields can be shown.

Example:

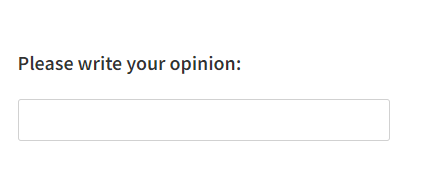
Text - question type

Related content

Random Display of Survey Questions (Randomization)

Random display of survey questions (randomization) is particularly useful for creating quizzes, tests, etc., where you want answers, questions or blocks of questions to appear in a different order to respondents. There are three options for this:

  1. Random sorting of answers within a question;
  2. Random sorting of questions within a block;
  3. Random sorting of blocks in a multi-block questionnaire.

1. Random sorting of answers within a question

If you want the answers to a particular question to appear in random order, the procedure is as follows:

  • in the 'EDIT' - 'Questionnaire' tab, click on the toolbar of the question (the grey bar where the question name is located) for which you want to randomise the answers;
  • in the question editor that appears on the right, select 'Random' under 'Order categories'.

When respondents click on the survey, the answers to this question will be displayed in a different order each time: Example of a question with random sorting of answers >>

By using paradata, it is possible to track the order of questions a particular respondent was exposed to. This data is accessed in the 'DATA' - 'Browse' tab, where under '+ Show columns', you can tick the option 'Respondent paradata'. For each respondent, you can see in what order their answers were displayed.

  • Numbers in each line indicate the order in which the answers were shown to a particular respondent.

2. Random sorting of questions within a block

If we want the questions to appear in a random order within a block of questions:

  • move the questions into a block;
  • then click on the "pencil" button on the right side of the block to navigate to the block settings;
  • under the option 'Randomize block content' select 'Questions'.

Such a block must not contain page breaks.

We also have the additional option of setting the number of questions displayed. You can set to show all questions or just a part of them, e.g. a random 5 from a block of 10 questions. For more information and other detailed instructions on how to structure the questionnaire into blocks, see the Manual >>

3. Random sorting of blocks in a multi-block questionnaire

If you want a questionnaire with several blocks of questions to show these blocks randomly to the respondent, follow the procedure below:

  • move questions to the desired blocks;
  • create another main block in which we place all the blocks which we want to randomize;
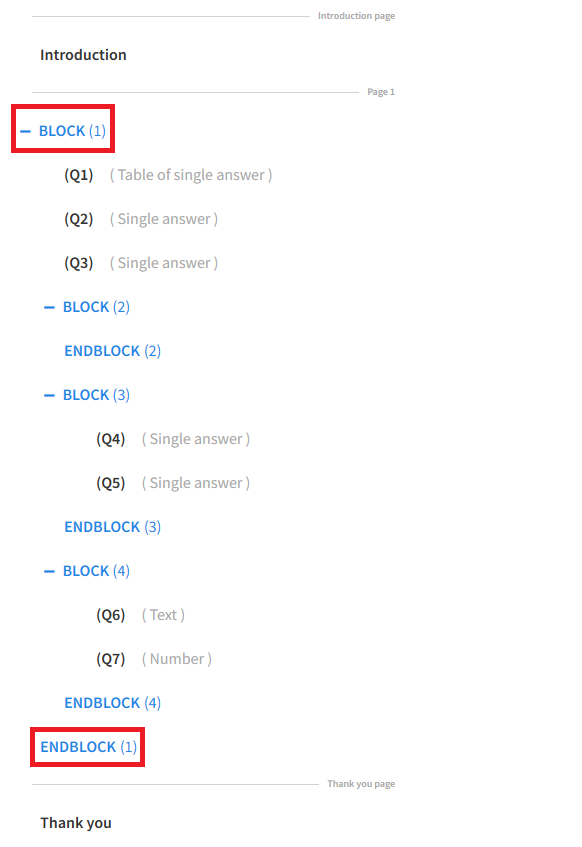
  • the main block must start before the first block and end after the last block - the layout of the blocks must therefore look like this;
  • after that, click on the toolbar of the main block and move to the editor;
  • under the 'Randomize block content' option, select 'Blocks'.

Such a block must not contain page breaks.

You can also use the 'Structuring Into Blocks' survey example from the survey library (section '1KA Surveys and Questions' - 'Conditions and Filters') as a template for a questionnaire structured into blocks, which you can copy and customize.

The structure of the questions in the blocks can be seen even more clearly if you use the 'Collapsed view' option, which is located above the questionnaire itself, on the right side.


The functionality is available for users of the 2KA and 3KA packages for individuals, and for users of the business packages for groups.


Related content

Setting up a Static First Page (Introduction)

When editing the questionnaire, you can specify a static display of the introduction in the introduction settings.

Settings of static intruduction

If a respondent clicks on the Introduction page and then leaves the survey without clicking anything else, the respondent is given a status of '3' and is recorded in the database as a non-valid unit. If this is not desired, we can enable static display of the introduction, which means that a respondent who clicks on the survey and is shown the introduction will not be recorded as a respondent until they click on the next page. In this case, the respondent will only be recorded in the database when they click on the next page.

Static display of the introduction is particularly recommended if the survey is published as an embed on a web page or to avoid false (computer-generated) clicks on the survey.

Additionally, to avoid fake clicks on the survey, the introduction can be set to display and verify with a CAPTCHA test, where the respondent must first prove that they are not a robot (program).

Example of a survey with CAPTCHA test >>


'Heatmap' Question Type

A 'Heatmap' is a question type that allows results to be presented graphically in the form of colors. In this question type, the respondent provides feedback on the image adjacent to the question, and it differs from the Hotspot question type in that the respondent is not limited to selecting predefined places in the image, but can mark all parts of the image (of course, we can also limit the areas if we wish). 

The 'Heatmap' question type can be found in the 'EDIT' – 'Questionnaire' tab. Select 'Heatmap' from the set of all questions in the 'Special questions' segment. Upload an image via the icon that appears within the question.

In the question settings (click on the question toolbar or on the 'pencil' icon), under 'Basic', you can specify the maximum number of possible answers or the 'Number of possible clicks'. If more than one click is allowed, you can also indicate whether to show a click counter ('Show clicks counter'). In addition, you can indicate whether to show clicks ('Show clicks') and select the color and size of the click indicators. For the shape of the click, there are two options to choose from: circle or square. If desired, we can also add a specific region to the image. This is done by clicking repeatedly on the desired part of the image and dragging the intersections of the resulting character as desired. Right-click to delete the points or intersections. You can also add a region name.

In the 'ANALYSE' – 'Statistics' tab we have the basic statistical calculations just like for the other question types. There is also a 'Heatmap' option, where you can graphically display the results on a selected image, or the density of the selected results, or the clicks (frequency) of respondents on a specific question.

Example of a survey with the 'Heatmap' question >>

Example of 'Heatmap' analysis >>

Graphical display of 'Heatmap' >>


The functionality is available for users of the 2KA and 3KA packages for individuals, and for users of the business packages for groups.


Related content

Image Hotspot Question Type

You can include the 'Image Hotspot' question type in the questionnaire, which can be found among the layout formats for the 'Categories - Single answer', 'Categories - Multiple answers' and 'Table - Single answer' question types. The question allows the question to be set in the form of an image and the respondent answers by marking one or more points or areas on the image.

Setting up an Image Hotspot question:

  • To create a Hotspot question, first select the 'Categories - Single answer' from the set of all questions.
  • On the right hand side of the question settings under 'Layout', select 'Image Hotspot'.
  • Upload an image using the icon that appears within the question.
  • In the question settings, the 'Add a region' button appears (under Regions - Answers).
  • This will open the edit zone window where you can use the left mouse click to highlight the region in the image. You can use the right mouse click to delete the region points you have already entered. By holding down the left mouse button, you can move the already entered region points. When you are happy with the region you have created, enter a name for the region and click 'Confirm'. You can add multiple regions.

Additional settings:

  • Color of selected region: specify how the region selected by the respondent should be colored.
  • Illumination: select the type of illumination or the way the regions are visible or invisible to the respondents.
    • Always: all set regions are visible;
    • On mouseover: the region is highlighted when the mouse is hovered over the region.
  • Hint: select the options for displaying hints (answers) with the names of the regions.
    • Show on mouseover: the hint is visible when hovering over the region;
    • Hide: the hint (answer or region name) is not visible.

Example of a survey using Image Hotspot >>


Related content


System Variables in Conditions

When inserting conditions into a questionnaire, we can also base them on some of the system variables in addition to the survey questions. In this way, conditions can be used to ensure that only certain persons answer certain questions, with a choice of: random groups, groups, respondent device, language and status.


Random groups

In the case of a longer questionnaire, some of the burden can be relieved from the respondents by applying a condition based on random groups, so that the respondents are randomly divided into e.g. two groups. The condition is then used to specify that some of the questions are shown to one group and not to the other.

  • To create a random groups condition, insert the condition by clicking on the blue IF icon located in the left side menu of the question types, or in the toolbar of each question.
  • Place the start of the condition (IF) before the first question that you want only a specific random group of respondents to see.
  • In the drop-down, select 'Random groups' and specify the number of groups. Then, under 'Group', you select which of the groups you want to see the questions you are going to place in the condition.
  • Finally, move the 'ENDIF' under the last question that you want to be included in the condition (to be answered by only one random group of respondents).


Groups

If you want to analyse specific groups of respondents, but do not want to ask questions to identify them, you can create groups before you send out the survey for completion. The procedure for creating respondent groups is described here.

Once you have created the groups, you can ask specific questions only to a specific group, which you do using conditions.

  • To create a random groups condition, insert the condition by clicking on the blue IF icon located in the left side menu of the question types, or in the toolbar of each question.
  • Place the start of the condition (IF) before the first question that you want only a specific group of respondents to see.
  • Select 'Groups' in the drop-down and then, under 'Select value', indicate to which group you want the questions in the condition to be displayed.
  • Finally, move the 'ENDIF' under the last question that you want to be included in the condition (to be answered by only one group of respondents).


Device

If you want only those who access the survey via a specific device to complete the survey or part of the survey, you can specify this using conditions.

  • To create a random groups condition, insert the condition by clicking on the blue IF icon located in the left side menu of the question types, or in the toolbar of each question.
  • Place the start of the condition (IF) before the first question that you want to only make visible to respondents using a specific device.
  • Select 'Device' in the drop-down and then select the type of device in the second drop-down: PC, phone, tablet or crawler.
  • Finally, move the 'ENDIF' under the last question that you want to be included in the condition (to be answered only by the respondents using the specified device).


Language

If you have a questionnaire in multiple languages, you can show certain questions only to those who complete the survey in a particular language. You must translate the questionnaire before setting the condition, otherwise this option will not appear when you set the conditions.

  • To create a random groups condition, insert the condition by clicking on the blue IF icon located in the left side menu of the question types, or in the toolbar of each question.
  • Place the start of the condition (IF) before the first question that you want to only make visible to respondents completing the survey in a specific language.
  • Select 'Language' in the drop-down and then select the language you want to make a condition for.
  • Finally, move the 'ENDIF' under the last question that you want to be included in the condition (to be answered only by the respondents completing the survey in a specific language).

The functionality is available for users of the 2KA and 3KA packages for individuals, and for users of the business packages for groups.


1KA is free to use for basic users