UREJANJE

Image Hotspot Question Type

You can include the 'Image Hotspot' question type in the questionnaire, which can be found among the layout formats for the 'Categories - Single answer', 'Categories - Multiple answers' and 'Table - Single answer' question types. The question allows the question to be set in the form of an image and the respondent answers by marking one or more points or areas on the image.

Setting up an Image Hotspot question:

  • To create a Hotspot question, first select the 'Categories - Single answer' from the set of all questions.
  • On the right hand side of the question settings under 'Layout', select 'Image Hotspot'.
  • Upload an image using the icon that appears within the question.
  • In the question settings, the 'Add a region' button appears (under Regions - Answers).
  • This will open the edit zone window where you can use the left mouse click to highlight the region in the image. You can use the right mouse click to delete the region points you have already entered. By holding down the left mouse button, you can move the already entered region points. When you are happy with the region you have created, enter a name for the region and click 'Confirm'. You can add multiple regions.

Additional settings:

  • Color of selected region: specify how the region selected by the respondent should be colored.
  • Illumination: select the type of illumination or the way the regions are visible or invisible to the respondents.
    • Always: all set regions are visible;
    • On mouseover: the region is highlighted when the mouse is hovered over the region.
  • Hint: select the options for displaying hints (answers) with the names of the regions.
    • Show on mouseover: the hint is visible when hovering over the region;
    • Hide: the hint (answer or region name) is not visible.

Example of a survey using Image Hotspot >>


Related content


System Variables in Conditions

When inserting conditions into a questionnaire, we can also base them on some of the system variables in addition to the survey questions. In this way, conditions can be used to ensure that only certain persons answer certain questions, with a choice of: random groups, groups, respondent device, language and status.


Random groups

In the case of a longer questionnaire, some of the burden can be relieved from the respondents by applying a condition based on random groups, so that the respondents are randomly divided into e.g. two groups. The condition is then used to specify that some of the questions are shown to one group and not to the other.

  • To create a random groups condition, insert the condition by clicking on the blue IF icon located in the left side menu of the question types, or in the toolbar of each question.
  • Place the start of the condition (IF) before the first question that you want only a specific random group of respondents to see.
  • In the drop-down, select 'Random groups' and specify the number of groups. Then, under 'Group', you select which of the groups you want to see the questions you are going to place in the condition.
  • Finally, move the 'ENDIF' under the last question that you want to be included in the condition (to be answered by only one random group of respondents).


Groups

If you want to analyse specific groups of respondents, but do not want to ask questions to identify them, you can create groups before you send out the survey for completion. The procedure for creating respondent groups is described here.

Once you have created the groups, you can ask specific questions only to a specific group, which you do using conditions.

  • To create a random groups condition, insert the condition by clicking on the blue IF icon located in the left side menu of the question types, or in the toolbar of each question.
  • Place the start of the condition (IF) before the first question that you want only a specific group of respondents to see.
  • Select 'Groups' in the drop-down and then, under 'Select value', indicate to which group you want the questions in the condition to be displayed.
  • Finally, move the 'ENDIF' under the last question that you want to be included in the condition (to be answered by only one group of respondents).


Device

If you want only those who access the survey via a specific device to complete the survey or part of the survey, you can specify this using conditions.

  • To create a random groups condition, insert the condition by clicking on the blue IF icon located in the left side menu of the question types, or in the toolbar of each question.
  • Place the start of the condition (IF) before the first question that you want to only make visible to respondents using a specific device.
  • Select 'Device' in the drop-down and then select the type of device in the second drop-down: PC, phone, tablet or crawler.
  • Finally, move the 'ENDIF' under the last question that you want to be included in the condition (to be answered only by the respondents using the specified device).


Language

If you have a questionnaire in multiple languages, you can show certain questions only to those who complete the survey in a particular language. You must translate the questionnaire before setting the condition, otherwise this option will not appear when you set the conditions.

  • To create a random groups condition, insert the condition by clicking on the blue IF icon located in the left side menu of the question types, or in the toolbar of each question.
  • Place the start of the condition (IF) before the first question that you want to only make visible to respondents completing the survey in a specific language.
  • Select 'Language' in the drop-down and then select the language you want to make a condition for.
  • Finally, move the 'ENDIF' under the last question that you want to be included in the condition (to be answered only by the respondents completing the survey in a specific language).

The functionality is available for users of the 2KA and 3KA packages for individuals, and for users of the business packages for groups.


Answer Suggestions

Answer suggestions can be used with the 'Categories - Single answer' and 'Table - Single answer' question types. They are set by opening the advanced question editor by clicking on the question toolbar or on the 'pencil' icon..

We can choose between eight prepared groups of answers:

  • true;
  • agree;
  • like;
  • speed;
  • quantity;
  • no - yes;
  • difficult;
  • satisfaction.

For example, if we choose the option 'agree' and the 'Number of answers - horizontally' is set to 5, labels will be shown in the following form: 'Strongly disagree', 'Disagree', 'Neutral', 'Agree' and 'Strongly agree'.

Related content


Your First Survey

After you have successfully registered on 1KA's website, you are able to create your first survey.

1. CREATING A SURVEY

You can create a survey in the 'My surveys' tab by clicking on 'Create Survey'. Choose a name for your survey, which will be displayed in your directory, as well as the name that will be visible when the survey is published (to the respondents) – the names can also be identical. You can also select the primary language for the respondents, i.e. which language the basic options should use (next page, back, end of survey …). In order to create a short survey, click on the option 'Survey'. If you wish to create a form, click on the option 'Form', while for voting you must click on the option 'Voting'.

When you select the desired survey type (Survey), you will be automatically redirected to a page where you can edit the survey, choose from the different types of questions, and later, when you have finished collecting data, can also access the data and the analysis.

To start with, you have the option of setting socio-demographic questions, which are already pre-set in the 1KA tool. These questions are standard and are used in scientific research. The selected demographic variables can be included in the questionnaire by ticking the box next to the desired variables. 1KA positions the selected socio-demographic questions into a separate block at the end of the questionnaire. Each variable comes in various types – you can select the desired question type in the 'Edit question' sub-tab. All possible question types are found in the dropdown menu in the upper right corner of the question editor. Select the chosen type and click 'Close'.

If you don't like the default Introduction, you can simply change it by clicking on the text and enter your own introduction. The introduction should not be too long but should serve to persuade the respondent to complete the survey. For more information on how to effectively write an introduction, consult our recommendations for writing the survey introduction.

Different types of questions are available on the left side of the screen, which can be easily inserted into your questionnaire. If you navigate the mouse over each question type, an example of the question formation is displayed. The questions can then be dragged and dropped to the desired position in the survey, or you can simply click on the question type, and the question will appear automatically at the bottom of the survey.

2. TESTING YOUR SURVEY

The 'TEST' – 'Diagnostics' tab warns you of any possible mistakes and offers recommendations to improve your survey. You can include Comments and Automatic entries in your survey. Comments are only available in the 3KA package. You can test the survey with the test entries icon, which can be found to the left of the survey URL and in the 'PUBLISH' – 'Settings' tab.

3. PUBLISHING YOUR SURVEY

When the survey has been successfully created, click on the 'PUBLISH' tab, where you can activate your survey and access the survey URL. More >>

By clicking on the 'Activate' option, which is found on the left side of the screen, the survey becomes active. A new window will appear; by default, the survey will be active for a period of three months, but the time period can be adjusted in the 'Activities settings can be changed here' optionYou can set the start and end date of the survey activity or choose to make the survey permanent. In addition to the time limit, you can also set a response limit or quota here. More >>

Survey activation is also possible above, to the right of the survey URL, by clicking the OFF button.

4. DATA REVIEW

In the 'DATA' tab, you can review the collected data, and can also review the answers for each individual unit with the 'Insight' option. By default, only valid units (i.e. units where the questionnaire was partly or fully completed) are displayed. The collected data can be exported in text format or into SPSS and Excel. Data export is only available to 2KA and 3KA private package users. More >>

5. OVERVIEW OF ANALYSIS

The 1KA tool merely generates tables according to the chosen question type. In the 'ANALYSE' – 'Statistics' tab, only basic statistical analyses are displayed, such as frequency, percent, number of units, etc. 2KA and 3KA private package users also have the option of advanced analysis. More >>

The 'ANALYSE' – 'Charts' tab allows access to the graphic presentation of data. Charts are only available to 2KA and 3KA private package users. The chart type is selected based on the question type, which you can also change. The colour of the charts can also be modified. More >>


 

Related content

Ranking a.k.a Sorting

'Ranking', also known as 'Sorting', is a special question type that allows the respondent to rank the answers in order of importance.

Ranking is a cognitively demanding survey question. The respondent is usually not able to rank more than 5 to 10 categories. It also has no major advantages compared to the rating scale (table) alternative (no possibility to calculate averages, variances, multivariate analyses, comparisons, etc.). Ranking is mainly used in situations where we want an exact order (in the case of a rating scale, several categories may have the same rating). Such situations are encountered in shopping decisions and other decision problems.

When using the 'Ranking' question type, the survey author can choose between the following sorting types in the settings:

  • Relocation, where respondents relocates a certain number of options from left to right;
  • Numbering, where respondents select a number next to each option in a drop-down list;
  • Moving, where respondents move the options vertically;
    Image hotspot, where respondents rank predefined areas in an image. 

It is also possible to set the number of responses that the respondent can rank.

Example of a survey: Please rank colors according to your fondness for the colours


The functionality is available for users of the 2KA and 3KA packages for individuals, and for users of the business packages for groups.


Related content


Display the List of Open Answers in the Survey

When editing the questionnaire in the ‘EDIT’ – ‘Questionnaire’ tab, you can edit the properties of the inserted ‘Text’ question type in the 'Edit question' window (on the right side). One of the functionalities is the ability to view respondents' previous answers.

Click on the 'Edit question' – 'Advanced' tab to find the Properties section, and tick the box next to the 'List of previous answers under the question' option. By enabling this setting, the answers of previous respondents who have already completed the survey will be displayed in the field below the selected text question.

A list of previous responses is visible to anyone who has access to the survey, but only includes up to 30 of the latest answers. By clicking on the 'More' option, you can request a display of all of the responses that were given so far.

Display the list of open answers in the survey >>


Related content


GDPR Survey Settings

In the 'EDIT' – 'Settings' – 'GDPR' tab, you have options for additional GDPR settings for each specific survey.

COLLECTION OF PERSONAL DATA IN THE SURVEY

In the first step, mark whether your survey collects personal data. If you select 'Yes', you will be presented with additional options where you can indicate what personal data is collected in the survey

  • Name;
  • Email;
  • Location;
  • Phone;
  • Online identifiers;
  • Other identifiers that you can enter in the input field.

Consent to collect personal information in the survey

In the second step, under the option 'Use GDPR 1KA template in the introduction', choose whether you want to use the 1KA template for respondents' consent to the collection of personal data. By default, the 'Yes' option is selected, which means that consent will be automatically displayed when respondents click on the survey link. If you do not want the consent to collect personal data to be displayed immediately at the beginning of the survey, you can select the 'No' option here and use the 'GDPR' question type (available from among All question types), which you can place anywhere in the survey and edit the text as you wish. In this case, you must also use conditions to ensure that the questions are only displayed to those who have given their consent. You can read more about consent to the collection of personal data in the survey here >>.

An example of a survey with 1KA consent to collect personal information in the survey >>.

Reminder: In case you do not use the default 1KA template to inform respondents about collecting personal data, you need to take care of it yourself!

Details about collecting personal data in the survey

The third step records the details of the data collection, which are displayed to respondents in the form of a pop-up window in the consent text. 1KA has prepared guidelines that you can use and adapt to your needs, especially in terms of the specific use (purpose) and retention of your personal data. They are described in the text:

  • Personal data;
  • Use and retention of data;
  • Data protection;
  • Erasure, alteration or access to personal data.

In the GDPR survey settings, you can change the following:

  • Data retention time;
  • Other users of personal data;
  • Specify the export of the data to foreign countries;
  • Provide the contact details of the data protection officer (by default the contact details of the author of the survey or the data protection contact previously provided);
  • Contact details of the author of the survey;
  • Your additional remarks.

For users of the 2KA and 3KA packages for individuals as well as users of the business packages for groups, two printouts (in .PDF, .DOC and preview formats) are produced under the GDPR settings based on the data entered above:

  • Printout of information given to the individual: information displayed to the respondent if the 1KA GDPR introduction is turned on. The printout can be provided in PDF or DOC format to respondents upon request. More >>
  • Printout of processing activity records: all information about the collection, storage and processing of personal data to be kept by organizations. More >>

Some of the functionalities described are only available for users of the 2KA and 3KA packages for individuals, and for users of the business packages for groups.


Related content


Visual Analog Scale

You can include the 'Visual analog scale' question type in the questionnaire, which can be found among the layout formats for the 'Categories - Single answer' question type.

The visual analog scale (VAS) allows you to display the answers on a scale in the form of visual responses (emoticons).

You can set up a VAS question by inserting a 'Categories - Single answer' question type in the questionnaire. In the question settings on the right-hand side, in the 'Basic' tab, under the 'Layout' setting, select the 'Visual analog scale' option.

You will then see the 'Number of answers' setting in the 'Answers' segment of the settings, where you can choose between 2 and 7 answers.

Example of a survey using the Visual Analogue Scale >>


Related content

Import Text - Copying Text Into 1KA

The 'Import text' option is located in the interface for creating a new survey. 

The interface has basic information about the survey at the top, where you can name the survey and save it in a folder (if you have enabled the folder display). Below the basic settings of the new survey, there are two fields that allow you to enter and preview text.

The text of the questions and answers can be typed or pasted in the box on the left and a preview of the questions (1KA question layout) is shown on the right.

When copying or pasting text, a few rules apply:

  • There must be an empty line between the questions;
  • For each question, the answer categories must be on their own line;
  • In the case of a table, each sub-question of the table is on its own line;
  • Using this interface, you can only import 'Categories - Single answer' and 'Text' (open question) question types into 1KA.
  • Other question types can be entered as 'Categories - Single answer' and subsequently changed (e.g. to 'Categories - Multiple answer', 'Table', etc.). 

Clicking on 'Next' will open the questionnaire in the 'EDIT' - 'Questionnaire' tab, where you can further customise or modify each question by clicking on the question and editing it accordingly in the question editor on the right hand side, where you can select a different question type.

Editing Answer Values

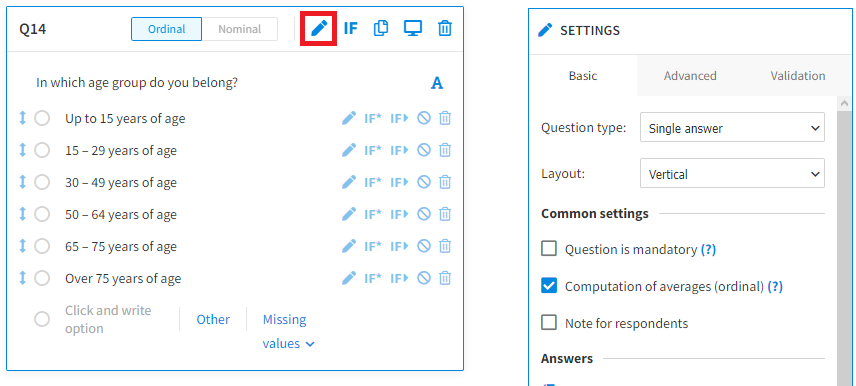
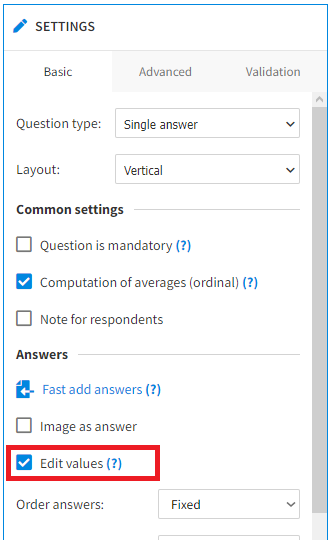
When editing a questionnaire in the ‘EDIT’ – ‘Questionnaire’ tab, the survey editor can edit and modify the answer values. Answer values can be edited by clicking on the question toolbar or the pencil icon, which will open the question settings on the right-hand side.

Within ‘Answers’, select the option ‘Edit values’. On the left side of the answer categories in the question, the answer values will now be displayed, which you can edit.

By default, response values are sorted in ascending order, starting with 1. Values can also be sorted in descending order (by selecting the 'Sort responses:' 'Descending' setting). 

The values of the answers can be changed. The following rules apply: 

  • Values must not be repeated (except if the Quiz module is enabled, which is only available for users of the 2KA and 3KA packages for individuals, and for users of the business packages for groups.);
  • Only whole numbers (without decimals) may be used;
  • The values -1, -2, -3, -4, -5, -6, -96, -97, -98, -99 are reserved to indicate missing values and must not be used as values for other answers.

Some of the functionalities described are only available for users of the 2KA and 3KA packages for individuals, and for users of the business packages for groups.


Related content

1KA is free to use for basic users