E-mail (Question Type)
The 'E-mail' question type is a text-based question specifically tailored to entering e-mail addresses.

Related content
Students, researchers, teachers and others with an ArnesAAI account can log in to 1KA.ARNES.SI , where you can use all advanced 1KA settings for free and unlimited .
Not sure if you have an AAI account? See instructions for obtaining an AAI account or frequently asked questions about using 1KA with ArnesAAI.
Students, researchers, teachers and others with AAI access can use 1KA for free and unlimited.
General users can sign in with their email address or Facebook or Gmail account.
 Google Sign In

 Google Registration
If you still have problems finding our confirmation e-mail, you can contact us by e-mail info@1ka.si.
You won't be able to login into this webpage until you confirm your registration through e-mail!

The 'E-mail' question type is a text-based question specifically tailored to entering e-mail addresses.
In the questionnaire, you can include the 'Electronic Signature' question type, which you can find among all question types on the left side of the screen. An electronic signature can be used for registrations, logins, confirmations, etc.
The question is displayed to the respondent in two parts - the first part is a field where the respondent signs their name graphically, and the second part is a 'Signature of' field where the respondent types in their name. It is advisable to remind respondents to fill in all fields.
The signature is recorded in the survey data in two parts: graphically (as a link to an image of the signature) and as text (what the respondent entered in the 'Signature of' field).
An example of an electronic signature survey >>
The functionality is available for users of the 2KA and 3KA packages for individuals, and for users of the business packages for groups.
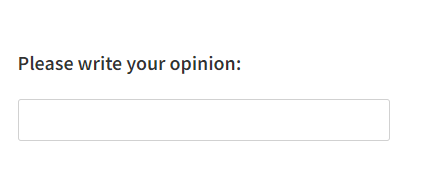
This question type is used to enter a short text message, but it can also be set to accept longer texts. This is an open question type, which is more demanding for analysis later on.
When editing the field, there are several settings available through which the text input field can be adjusted:
Example:
In the 'EDIT' - 'Settings' - 'Respondents access' tab, you can set cookies, restrict access to the survey and set a password to access the survey.
1) Completion options
You can set cookies in the 'EDIT' - 'Settings' - 'Respondents access' - 'Completion options' tab. A 'cookie' is a code that is placed on the respondent's computer by a server (e.g. 1KA), so that 1KA can identify the respondent when they try to complete the survey again. You can specify the cookie storage duration. Select the option 'The same respondent can complete the survey only once' under the 'Multiple responses:
Under the option 'Retaking the survey' you can also change where the respondent starts the survey when they return to the survey:
You can also allow a user who has already completed your survey (a user who has completed the survey) to edit their answers afterwards, but this means that the data and analyses will also change, so in most (but not all) cases, it is better to choose that respondents can not edit their answers.
Regardless of the cookies (whether the option "until the end of the questionnaire", "until the end of the browser session", "for 1 hour" or "for 1 month" is selected), you can also specify what the respondent's options are while they are answering the survey ('Editing responses after survey completion'):
2) IP recognition (IP address restrictions)
To prevent the same person from answering your questionnaire multiple times, you also have the option of blocking the IP address of the device from which the respondent is accessing the survey. You can do that in the 'EDIT' - 'Settings' - 'Respondents access' - 'IP recognition' tab. You can block it for 10 minutes, 20 minutes, 60 minutes, 12 hours or 24 hours. However, this means that you can unintentionally also block another person using the same computer from answering the survey. It only makes sense in rare cases, e.g. voting, where there is a risk that someone is submitting multiple responses with a bot or a script. Of course, respondents can also circumvent IP restrictions by using virtual IP addresses. In general, however, this is a risky option which does not solve the problem of duplicate responses, but generates the risk of preventing a large number of relevant users from completing the survey, as often whole organisations or departments have the same IP address, for which there are many computers and potential respondents. More >>
3) 1KA recognition
1KA also enables the recognition of respondents who are registered 1KA users, but they must be logged in to the 1KA installation while completing the survey. In the tab 'EDIT' - 'Settings' - 'Respondents access' - '1KA recognition' you have two options:
The above two cases are rare; the default option is of course that 1KA does not recognise the user of the 1KA installation. Turning this option on can have serious consequences. If the 'Yes, as data input' option is enabled, the user has additional settings available for Questionnaire Entry.
4) Access with password (password to access the survey)
Access to the survey can best be restricted via a password in the 'EDIT' - 'Settings' - 'Respondents access' - 'Access with password' tab. You can generate multiple passwords and thus create groups of respondents that can be separated in analyses or used as a basis for IF conditions. In this case, the password serves as a safeguard to ensure that only those you want to complete the survey do so. A single password can be created for all respondents, or a password for each respondent. If you want to enter several passwords at once, select the 'Password mass insert' option. The use of passwords is only available for users of the 2KA and 3KA packages for individuals, and for users of the business packages for groups
In the 'PUBLISH' - Invitations' tab, you can also set up personalised codes to access the survey, via the email invitation interface available to users of the 3KA package for individuals, and users of the business packages for groups. Usually this code is then used in the email invitation, preferably automatically (in the survey URL) so that it does not need to be entered by the respondent. Alternatively, we may ask the respondent to enter the code manually. Similarly, the code can be sent in other ways, e.g. in a letter, and the respondents can type it in. The generation and use of individual codes is described here.
The use of passwords is in principle stronger and overrides the other settings for respondent access restriction (cookie, IP number, registered user identification), but interference may occur, so we strongly recommend to use only one of the above mentioned ways to identify respondents: cookie, IP number, registered user identification or individual password.
Some of the functionalities described are only available for users of the 2KA and 3KA packages for individuals, and for users of the business packages for groups.
Random display of survey questions (randomization) is particularly useful for creating quizzes, tests, etc., where you want answers, questions or blocks of questions to appear in a different order to respondents. There are three options for this:
1. Random sorting of answers within a question
If you want the answers to a particular question to appear in random order, the procedure is as follows:
When respondents click on the survey, the answers to this question will be displayed in a different order each time: Example of a question with random sorting of answers >>
By using paradata, it is possible to track the order of questions a particular respondent was exposed to. This data is accessed in the 'DATA' - 'Browse' tab, where under '+ Show columns', you can tick the option 'Respondent paradata'. For each respondent, you can see in what order their answers were displayed.
2. Random sorting of questions within a block
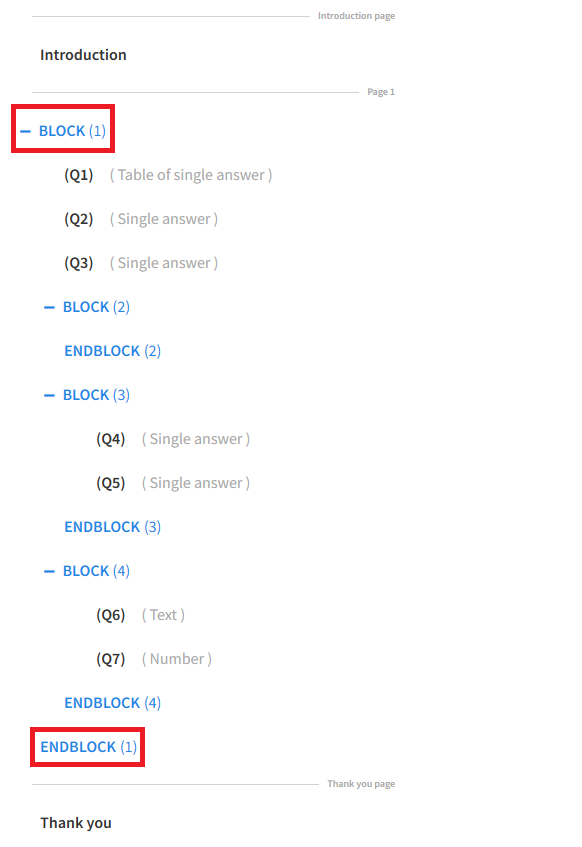
If we want the questions to appear in a random order within a block of questions:
Such a block must not contain page breaks.
We also have the additional option of setting the number of questions displayed. You can set to show all questions or just a part of them, e.g. a random 5 from a block of 10 questions. For more information and other detailed instructions on how to structure the questionnaire into blocks, see the Manual >>
3. Random sorting of blocks in a multi-block questionnaire
If you want a questionnaire with several blocks of questions to show these blocks randomly to the respondent, follow the procedure below:
Such a block must not contain page breaks.
You can also use the 'Structuring Into Blocks' survey example from the survey library (section '1KA Surveys and Questions' - 'Conditions and Filters') as a template for a questionnaire structured into blocks, which you can copy and customize.
The structure of the questions in the blocks can be seen even more clearly if you use the 'Collapsed view' option, which is located above the questionnaire itself, on the right side.
The functionality is available for users of the 2KA and 3KA packages for individuals, and for users of the business packages for groups.
In the 'EDIT' - 'Settings' tab, you can change the survey settings as you wish. You can edit the basic data, respondent and editor access, survey duration, standard words, notifications, comments, missing values, paradata, data display and groups.
Here you can customise the display of the 'Table' questions type for desktop and mobile devices. You can choose between the following types of customisation: grid, scrolling, unfolding and horizontal scrolling.
In addition to changing the language, 1KA also allows you to manually change the standard words. You can change the standard words in your survey as you wish, e.g. you can replace the 'End' button in the conclusion with 'Finish'.
Here you can set who can edit the survey besides you (the author). You will also see who are the users editing the survey: you can set certain restrictions for each editor, e.g. you can set that a user can only access the data and analysis, but cannot unlock the survey for editing.
You can give access to the survey to already registered users by entering their email address in the box under 'Add users that can edit the survey'. If adding more than one user, write each address in its own row. More >>
You can set cookies in the 'EDIT' - 'Settings' - 'Respondents access' - 'Completion options' tab. You can choose until when the cookies should be stored. The following options are available:
In this section, if cookies are enabled, you can set that when the user returns to the survey, they start from the beginning (in which case duplicate responses may occur as the first entries are already stored in the database) or that they continue where they left off, so the previous responses are already in the database and the same database entry just continues with further responses.
You can allow a user who has already completed your survey to edit their answers later, but this means that the data and analysis will also change, so it is better to select that they cannot subsequently edit their answers.
IP recognition: in the 'EDIT' - 'Settings' - 'Respondents access' - 'IP recognition' tab you can choose to block the completion of the survey in case of a repeated IP address, for a certain period of time.
1KA recognition: In the tab 'EDIT' - 'Settings' - 'Respondents access' - '1KA recognition' 1KA also allows you to identify respondents, but they must be registered users. Here you have three options:
If you want the recognized respondents to see their email address when answering the survey, select 'Show them their email' below.
In the 'EDIT' - 'Settings' - 'Respondents access' - 'Access with password' tab you can set Survey password (Access with password): you can generate several passwords to access the survey and thus also create groups of respondents that can be separated in the analyses. Passwords are only available for users of the 2KA and 3KA packages for individuals, and for users of the business packages for groups.
In the settings, you can also set up notifications for completed surveys, survey expiry, changes to activity and deletion. Notifications are only available for users of the 2KA and 3KA packages for individuals, and for users of the business packages for groups. You can find out more about the notification settings in the Notifications guide.
Here you can create groups of respondents, each with its own survey URL, if you want to analyse specific groups of respondents but do not want to ask them identification questions. Groups are only available for users of the 2KA and 3KA packages for individuals, and for users of the business packages for groups.
Before sending the survey to respondents, it is advisable to have it reviewed by the other editors of the survey, and it may also be reviewed by the respondents. Allow these people to comment, possibly on each question individually, or just on the survey as a whole. All this can be edited in the 'Comments' interface. Comments only available for users of the 3KA package for individuals, and for users of the business packages for groups.
You can turn on comments from editors and comments from respondents. There are also advanced settings for comments, which you can see in more detail in the Comments manual >>.
Here you can set the default display of the appropriate units, which will also be taken into account in the data table in the 'DATA' - 'Browse' tab and in the survey analyses.
Here you can configure the export of the questionnaire (numbering of questions, display of conditions, display of introduction) and the export of the respondents' answers. The extended PDF/RTF export is an export of the questionnaire as it is, while the short export is an export of the questionnaire with the results in a shortened form.
Here you can indicate whether the survey collects personal data (GDPR) and use the 1KA GDPR template in the introduction of the survey. More about GDPR >>
Some of the functionalities described are only available for users of the 2KA and 3KA packages for individuals, and for users of the business packages for groups.
Before making edits to the questionnaire or data, it is recommended that you create an archive version of the data in the 'DATA' - 'Archive' - 'Archives' - 'Data' tab. You can do so by clicking on the 'Create archive version of data' button. A list of archive versions of the data is automatically generated, showing the date of creation for each archive version aswell as the option of activating the archived version of the data.
The functionality is available for users of the 2KA and 3KA packages for individuals, and for users of the business packages for groups.
In the 'EDIT' - 'Archive' - 'Export to File (.1KA)' tab, you can save and download the archive file of the survey (questionnaire). You can export only the questionnaire, or the questionnaire together with the data.
In both cases, you can import the file back to 1KA at any time, and thus create the same survey. Import the survey back through the interface for creating a new survey. If you export a questionnaire and data, both questionnaire and data are transferred when importing the .1KA file. This way, you can copy the entire survey along with the data. This option is often used to download surveys from our site to your own installation or virtual domain and vice versa.
Video guide: 1KA Survey Import
When editing the questionnaire, you can specify a static display of the introduction in the introduction settings.
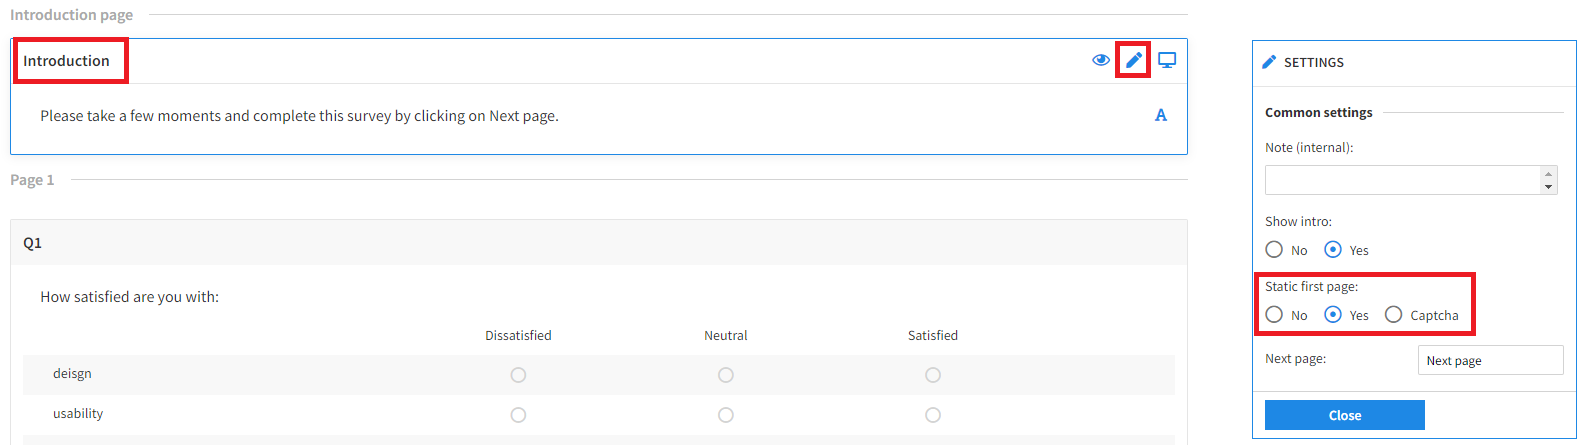
If a respondent clicks on the Introduction page and then leaves the survey without clicking anything else, the respondent is given a status of '3' and is recorded in the database as a non-valid unit. If this is not desired, we can enable static display of the introduction, which means that a respondent who clicks on the survey and is shown the introduction will not be recorded as a respondent until they click on the next page. In this case, the respondent will only be recorded in the database when they click on the next page.
Static display of the introduction is particularly recommended if the survey is published as an embed on a web page or to avoid false (computer-generated) clicks on the survey.
Additionally, to avoid fake clicks on the survey, the introduction can be set to display and verify with a CAPTCHA test, where the respondent must first prove that they are not a robot (program).
Example of a survey with CAPTCHA test >>
A 'Heatmap' is a question type that allows results to be presented graphically in the form of colors. In this question type, the respondent provides feedback on the image adjacent to the question, and it differs from the Hotspot question type in that the respondent is not limited to selecting predefined places in the image, but can mark all parts of the image (of course, we can also limit the areas if we wish).
The 'Heatmap' question type can be found in the 'EDIT' – 'Questionnaire' tab. Select 'Heatmap' from the set of all questions in the 'Special questions' segment. Upload an image via the icon that appears within the question.
In the question settings (click on the question toolbar or on the 'pencil' icon), under 'Basic', you can specify the maximum number of possible answers or the 'Number of possible clicks'. If more than one click is allowed, you can also indicate whether to show a click counter ('Show clicks counter'). In addition, you can indicate whether to show clicks ('Show clicks') and select the color and size of the click indicators. For the shape of the click, there are two options to choose from: circle or square. If desired, we can also add a specific region to the image. This is done by clicking repeatedly on the desired part of the image and dragging the intersections of the resulting character as desired. Right-click to delete the points or intersections. You can also add a region name.
In the 'ANALYSE' – 'Statistics' tab we have the basic statistical calculations just like for the other question types. There is also a 'Heatmap' option, where you can graphically display the results on a selected image, or the density of the selected results, or the clicks (frequency) of respondents on a specific question.
Example of a survey with the 'Heatmap' question >>
Example of 'Heatmap' analysis >>
Graphical display of 'Heatmap' >>
The functionality is available for users of the 2KA and 3KA packages for individuals, and for users of the business packages for groups.