Website Evaluation
The video tutorial shows how to create a 1KA survey where the respondents will be shown a certain website on half of the screen and the survey we created in 1KA on the other half.
Students, researchers, teachers and others with an ArnesAAI account can log in to 1KA.ARNES.SI , where you can use all advanced 1KA settings for free and unlimited .
Not sure if you have an AAI account? See instructions for obtaining an AAI account or frequently asked questions about using 1KA with ArnesAAI.
Students, researchers, teachers and others with AAI access can use 1KA for free and unlimited.
General users can sign in with their email address or Facebook or Gmail account.
 Google Sign In

 Google Registration
If you still have problems finding our confirmation e-mail, you can contact us by e-mail info@1ka.si.
You won't be able to login into this webpage until you confirm your registration through e-mail!

The video tutorial shows how to create a 1KA survey where the respondents will be shown a certain website on half of the screen and the survey we created in 1KA on the other half.
The advanced 'Voting' module supports the process of conducting a completely anonymous vote, with all paradata turned off and without any possibility of linking data to email addresses and other identifiers.
The module allows sending invitations within the 1KA system, but only the information that the invitation has been sent is recorded, not the status (whether the person has opened the poll, whether they have responded).
To use the 'Voting' module, click 'Voting' in the left hand side menu in the 'EDIT' - 'SETTINGS' - 'Advanced Modules' tab, then select the checkbox to enable the module.
The questions you want to include can be edited in the 'EDIT' - 'Questionnaire' tab.
The recipients of the invitations and the message to invite respondents to the poll can be edited in the interface for sending invitations in the 'PUBLISH' - 'Invitations' tab.
Specific features when using the Voting module
The functionality is available for users of the 3KA package for individuals, and for users of the business packages for groups.
Since a large number of completed surveys are collected in fieldwork, the process of data entry can often be a lengthy process, which can be shortened by using the 1KA tool.
The surveys that were collected during offline fieldwork are entered into a web survey that is customised for data entry. The web survey can be created in the standard form, or it can be supplemented with the 'Administrative data input' options, which can be found under 'EDIT' - 'Settings' - 'Respondent access' - '1KA recognition'.
The surveys completed by respondents during offline fieldwork are entered into an online survey that is specially adapted for data entry. Under '1KA recognition', select the option 'Recognize registered 1KA user as data input'. This means that entrants must register in the 1KA application, and when entering questionnaires, the application itself detects who is entering an individual survey, which allows greater control over data entry.
The option 'Show them their: email' and the 'Administrative data input' section enable the creation of a customized questionnaire, where only the values of the answers are entered into the questionnaire, and also enable the identification of inputs or respondents. Additionally, we have the option to enable 'Mass (fast) survey input'. Mass completion of the survey is recommended in the case of extensive and numerous questionnaires. The function forms the questionnaire in such a way that the data inputs, instead of clicking through the questionnaire, only enter the values of the answers in individual fields in combination with the 'TAB' key, greatly shortening the process of entering completed surveys.
Entering questionnaires in the 1KA application has several advantages. It enables:
The data are ready for export in various formats, and we can also export reports on statistical analyses and graphical representations of individual variables.
The 1KA tool also offers support for telephone surveys with its advanced modules. Follow the steps below to set up a telephone survey:
1. First, create a standard survey by clicking on 'Create survey'.
2. Enter all the questions of the telephone survey in the 'EDIT' – 'Questionnaire' tab.
3. To activate the telephone survey module, click on 'EDIT' – 'Settings' and then click on Telephone Survey in the left menu under the Advanced Modules category. Tick the 'Telephone survey' checkbox to enable the module.
4. To conduct a telephone survey, you need to enter the respondents or persons who will answer the questionnaire. Add respondents by clicking on the '1 - Add' tab. For the variables, select 'Phone', but you can also add 'First name' (or other additional variables). A maximum of 100 characters can be entered in the 'Custom' field. In the case of the 'Phone' and 'First name' variables, insert the respondents by first writing their 'Phone number' then their 'First name', separated by a comma. The order of the variables or data entered must be the same as the order of the selected variables (the order of the variables can be changed by clicking and dragging the variables). Each respondent must be entered in its own line.
5. You can add respondents by clicking on 'Add', or you can create different lists of respondents. The list can be saved by clicking on 'Save profile' or saved as a new profile by clicking on 'Save as new profile'.
6. In the 'Profile name' window, enter the desired name for the respondent list, e.g. 'Directory'. Then click 'Save'.
7. In the '2 - Recipients' tab you can review the complete list of respondents you have entered. You can filter the list (it works like a search engine), edit, delete respondents, check their status (Busy, Unavailable, etc.) and other information (interviewer, date).
8. In the '3 - Start' tab, click on the 'Start calling' button and the telephone survey interface will open.
9. The phone numbers you have entered are displayed in random order (default). You can change the dialling order of the phone numbers in the Settings tab on the right. The dialling order can be random (default), fixed, A-Z or Z-A. To the left of the number, you have the 'Call overview', which shows you whether the user has been contacted and any comments they may have made. To the right of the number, you have the 'Call status and comment' window, where you can enter any comments you may have for the number displayed. If the person agrees to answer the survey, click on 'Open surveys and start'. If the survey does not open, please check if you may have the 'Block pop-ups' option enabled in your browser. Once the respondent has answered the survey questions, click 'U - Survey completed successfully, go to next call'. In case of an unsuccessful call, choose between the following status options:
You can then call another number ('Next number') or end the telephone survey ('Exit calling').
If you complete a survey for a particular phone number (select the status 'U – Survey successfully completed, go to the next call'), the interface will no longer show you that phone number. If you would still like to call the unit or change the status, you can find it in the '2 - Recipients' tab and open it by clicking on the call icon. When the survey is closed, the option 'Delete last respondent status ('U')' is available, which allows you to re-survey the unit and change the status.
10. The 'Waiting list' tab displays two lists. The first, Waiting List, lists all those respondents who have been assigned the status Z, N, T, P or D, in the order in which they will be queued for dialling. This way we can immediately see which respondents we have e.g. arranged to call and when. The second list, Calling List, shows all the numbers of the respondents we have not yet called, in the order we have set in the settings.
11. In the 'Settings' tab you can change the following settings:
12. In the 'Analysis' tab (far right ) there is a summary overview of the telephone survey, where you can see the number of all units with a telephone number, all units called and the number of units by status (Busy, Unreachable, etc.). Here you can also see an overview of the call status by interviewer, where you can see how many calls each interviewer has made. You can filter the overview of the status by interviewer by period using the calendar at the top of the page to see how many calls each interviewer has made in a given period.
13. You can add other users to the survey in the 'EDIT' - 'Settings' - 'Editor access' tab by entering the user's email address in the field for adding users to edit the survey. Once the user is added, they are shown on the 'Users With Access to Survey' list above. Clicking on the pencil next to the user's name will show additional options, where you select the last one - 'Is phone interviewer (only telephone survey)'. All other options are then unchecked, which means that a user with the status 'interviewer' will not be able to edit this survey and access the other survey tabs. The interviewer accesses the dialling interface in the 'My Surveys' tab, where a new 'Telephone Surveys' tab will appear with a list of the surveys in which they have interviewer status. Clicking on a survey will open the calling interface.
The functionality is available for users of the 3KA package for individuals, and for users of the business packages for groups.
A simpler way of evaluating websites is provided by the advanced module which divides the browser window into two parts - one where the respondent views the website and the other where the respondent completes the questionnaire. This avoids the constant switching from the questionnaire to the website.
The evaluation process is more efficient if each survey question is on its own page, so that you can use a different web address for each page.
Once the questionnaire has been created, click on the 'EDIT' - 'Settings' navigation tab (or the wheel icon at the top) and select the 'Website evaluation (split screen)' option from the left menu under the 'Advanced Modules' category.
By activating the 'Website Evaluation' module, you enable the display of settings where you can specify which websites will be opened during the evaluation.
2. Evaluation of a single website
Enter the URL of the website in the 'Link to the website you wish to evaluate (split screen):' input field of the 'Website evaluation' tab.
This way, the content of the top part of the browser window remains unchanged while the respondent scrolls through the pages of the questionnaire.
If they wish, they can click on the content of the web page in the top half of the browser window while completing the survey.
3. Evaluation of various different sub-pages (or different websites)
You can ask questions about different websites or subpages by entering the URLs for each website or subpage.
This can be done in the 'Additional pages' section of the 'Website evaluation' tab in the input fields 'Page 1:', 'Page 2:', etc.
The functionality is available for users of the 3KA package for individuals, and for users of the business packages for groups.
You need to check with your panel provider:
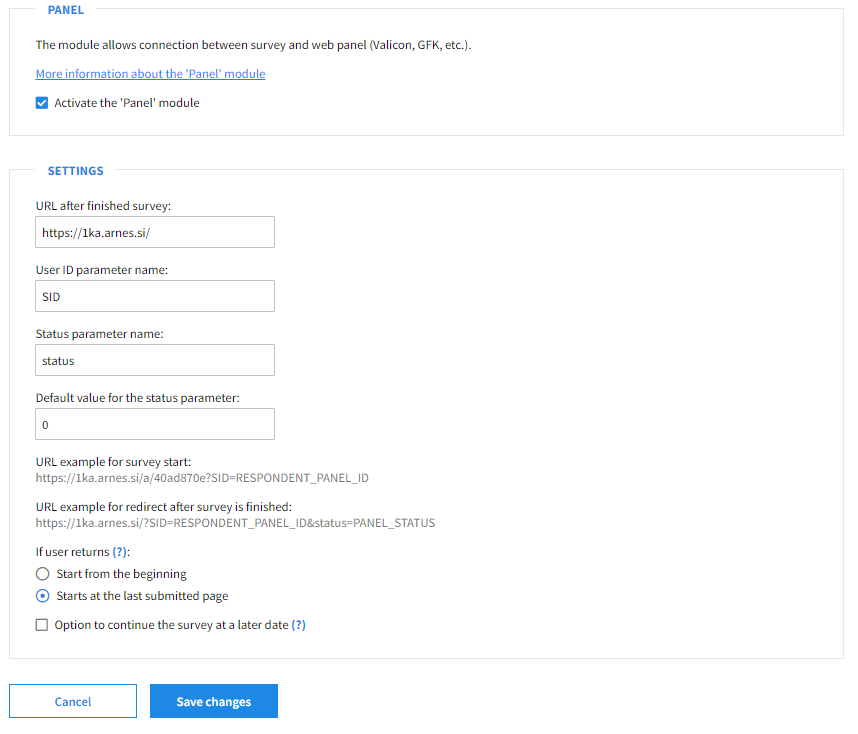
1KA module settings for panel integration:
Activate the Panel module in the 'EDIT' - 'Settings' - 'Advanced Modules' - 'Panel' tab. Once the Panel module is enabled in 1KA to recruit respondents via a commercial panel, the default settings are triggered to link the panel data to the 1KA data. For most cases, the default settings are sufficient and we recommend that you do not change them.
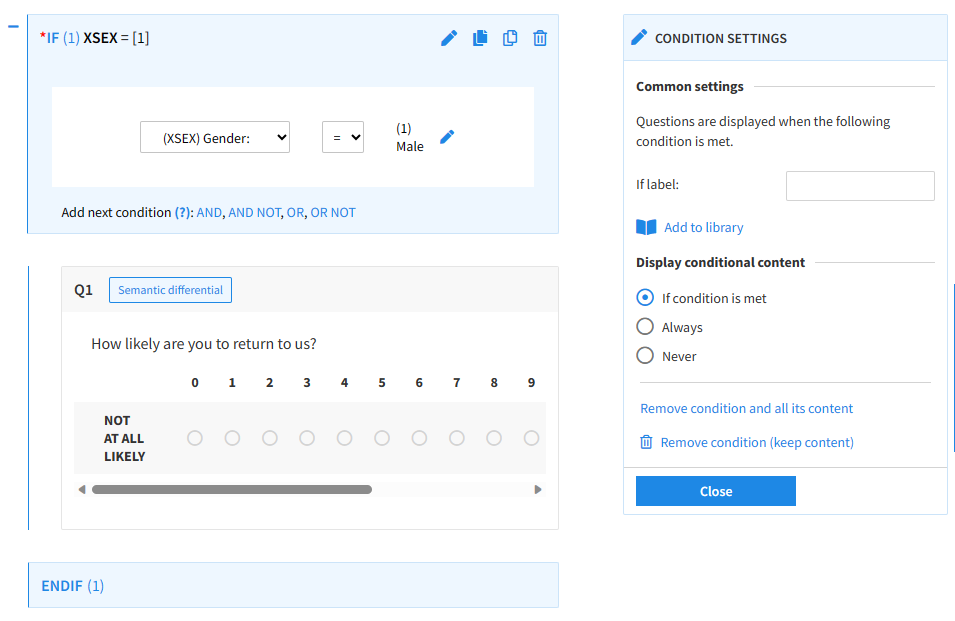
Conditions settings (for panelist status)
If the Panel module is active, when editing the questionnaire, an additional setting 'If condition is true set panelist status value:' will appear in the condition settings on the right-hand side.
You can enter different statuses in the field (e.g. if the respondent answers Q1 with 1 (e.g. male respondent), the status 1 is returned in the URL).
The functionality is only available for users of the 3KA package for individuals, and for users of the business packages for groups.
Protecting user data is one of 1KA's top priorities. Access to data is limited to the author (editor) of the survey and additional co-editors, which are added by the author of the survey.
1KA's helpdesk and the website administrator of www.1KA.si do not have access to surveys and data without the explicit consent of the user.
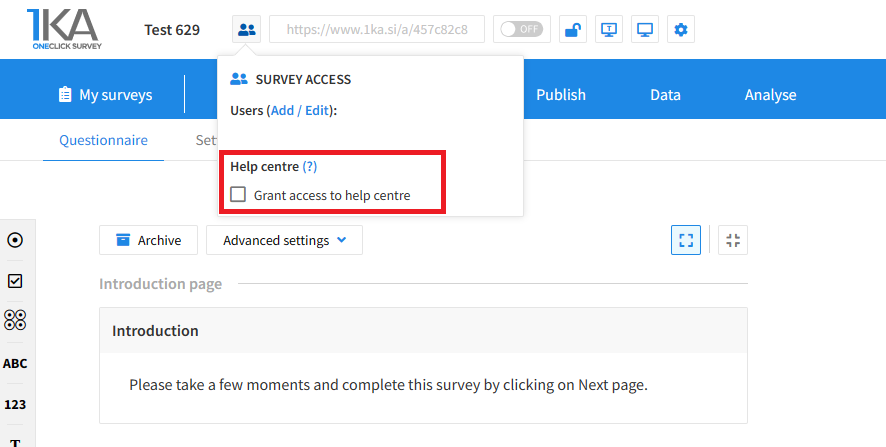
In case the user requires assistance from 1KA’s administrators, the user must grant temporary access to 1KA's helpdesk (until the issue is resolved). Despite granted access, administrators are still committed to the highest standards of privacy protection, as defined in the Terms of Use.
Each survey has an icon in the top left corner which enables you to grant access to 1KA's helpdesk and administrators. You have to click 'Grant access to help centre'.
The author can add co-editors in the tab 'EDIT' – 'Settings' – 'Editor access'.
The video guide shows how to copy an existing survey in 1KA.
Each survey we previously created or have access to edit can be copied and reused to collect data.
The video tutorial shows how to share a survey with other editors in 1KA.
The advanced module 'Panel' module is a feature of the 1KA application that allows you to recruit respondents directly from an external commercial panel (e.g., IPSOS). Based on this, you can link contact information from the external panel with responses in a 1KA survey. This functionality must be clearly distinguished from the '1KA panel'  service, which refers to an infrastructure for ordering and conducting survey research based on individuals recruited from the Population Register. The '1KA panel' is thus a probability-based web panel of individuals, whereas the advanced 'Panel' module is merely a feature of the 1KA tool that facilitates the recruitment of respondents from commercial online panels. In the case of recruiting respondents from the '1KA panel', the additional 'Panel' functionality is unnecessary, as the '1KA panel' is already inherently integrated with the 1KA tool.
In principle, with all the major web panel providers in Slovenia, an agreement has been reached for the use of respondents from panels in the survey created with the 1KA tool. To obtain panellists from Slovenian panels, you must agree directly with the panel provider. For more information and about turning on the Panel module, please contact us via this form>>. Using the existing module Panel on page 1KA is free of charge, in the case of necessary extensions and upgrades, the development is charged according to the published price list.
Related content:
The functionality is available for users of the 3KA package for individuals, and for users of the business packages for groups.