Nastavitve

Comments

Below is a description of how you can add and manage comments in 1KA, how survey editors add comments and how respondents add comments.

1. Comment settings

To enable comments, go to the 'EDIT' – 'Settings' – 'Comments' tab. You can also access comments by clicking on the dialog box via the blue icon on the right (under your profile name) or in 'TEST' – 'Comments'.

In the comment settings, we have the option to turn on comments:

  • general editor comments,
  • editor comments for each question,
  • general comments of respondents in the test survey,
  • respondent comments for each question in the test survey.

By clicking on the 'Show advanced settings' button, you can also set the default settings for the preview and test input, the input field for authors' comments on the survey, the notes for each question in the comments tab, the input field for authors' comments on each question, an additional window under the questions for respondents' comments, additional settings for respondents' comments and the comments in general. After selecting the settings, you should always click the 'Save changes' button. In this section, you can also delete all comments from your survey.

In the 'MY SURVEYS' - 'SETTINGS' - 'User settings' tab, users can set comments to be on by default when creating a new survey. More >>

2. Adding comments

Comments can be added in the test view of the survey, which can be accessed via the blue icon (screen with the letter T) to the right of the survey URL at the top of the screen and in the 'TEST' – 'Diagnostics' tab.

Depending on your settings, you will see boxes to enter comments: either under each question or for the whole survey. If you want comments from the respondents, you need to provide them with the URL of the test view of the survey. Editors can add comments to questions in the 'EDIT' – 'Questionnaire' tab. Under a question, condition or block, click 'Add comment', write your comment in the box and click 'Comment'.

3. Viewing comments

To see the comments on the survey, click on the 'TEST' – 'Comments' tab. You can also access the comments by clicking on the speech bubble icon located on the right hand side under your profile name.

You will see all the questions that have comments, with editors' comments on the left and respondents' comments on the right. You can edit and correct questions in the interface by simply clicking on them. You can also reply to comments here. Once the comments have been reviewed and possibly taken into account, you can 'Resolve' them to hide them from the default view of only unresolved comments. By clicking on 'Add a question comment', you can respond to comments made by the survey editors.


The functionality is available for users of the 3KA package for individuals, and for users of the business packages for groups.


Related content

Respondent Access Settings: Cookies, IP Addresses, Passwords, Registered User Recognition

In the 'EDIT' - 'Settings' - 'Respondents access' tab, you can set cookies, restrict access to the survey and set a password to access the survey.


1) Completion options 

You can set cookies in the 'EDIT' - 'Settings' - 'Respondents access' - 'Completion options' tab. A 'cookie' is a code that is placed on the respondent's computer by a server (e.g. 1KA), so that 1KA can identify the respondent when they try to complete the survey again. You can specify the cookie storage duration. Select the option 'The same respondent can complete the survey only once' under the 'Multiple responses:

  • 'Until the end of the browser session', where the cookie will be deleted as soon as the respondent closes their browser (Internet Explorer, Mozilla Firefox, Opera, etc.); therefore, if the respondent comes back within the same session, they can make further corrections. Caution: if a second respondent enters in the same session after the first respondent, the cookie will still be saved from the first respondent, which will cause issues with the survey!;
  • 'For 1 hour' means that the cookie will be deleted after one hour from the first time the respondent clicked on the survey URL. The same warning as above (browser session) applies;
  • 'For 1 month', the cookie will be deleted one month after the respondent first clicked on the survey. The same warning as above (browser session) applies.

Under the option 'Retaking the survey' you can also change where the respondent starts the survey when they return to the survey:

  • Starts from the beginning, with the respondent seeing the answers they have already given;
  • Starts at the last submitted page, i.e. returns to the page where they left the survey.

You can also allow a user who has already completed your survey (a user who has completed the survey) to edit their answers afterwards, but this means that the data and analyses will also change, so in most (but not all) cases, it is better to choose that respondents can not edit their answers.

Regardless of the cookies (whether the option "until the end of the questionnaire", "until the end of the browser session", "for 1 hour" or "for 1 month" is selected), you can also specify what the respondent's options are while they are answering the survey ('Editing responses after survey completion'):

  • Can subsequently edit their answers: when they return to the previous page, they can change their answers. These then overwrite the previously entered values in the database when clicking on 'Next page'. 
  • Cannot subsequently edit their answers: even if they click on 'Previous page' or on the 'Back' button in the browser, they can only see their answers but cannot change them.


2) IP recognition (IP address restrictions)

To prevent the same person from answering your questionnaire multiple times, you also have the option of blocking the IP address of the device from which the respondent is accessing the survey. You can do that in the 'EDIT' - 'Settings' - 'Respondents access' - 'IP recognition' tab. You can block it for 10 minutes, 20 minutes, 60 minutes, 12 hours or 24 hours. However, this means that you can unintentionally also block another person using the same computer from answering the survey. It only makes sense in rare cases, e.g. voting, where there is a risk that someone is submitting multiple responses with a bot or a script. Of course, respondents can also circumvent IP restrictions by using virtual IP addresses. In general, however, this is a risky option which does not solve the problem of duplicate responses, but generates the risk of preventing a large number of relevant users from completing the survey, as often whole organisations or departments have the same IP address, for which there are many computers and potential respondents. More >>


3) 1KA recognition

1KA also enables the recognition of respondents who are registered 1KA users, but they must be logged in to the 1KA installation while completing the survey. In the tab 'EDIT' - 'Settings' - 'Respondents access' - '1KA recognition' you have two options:

  • 1KA recognises the user as a respondent, i.e. a person (logged in to the 1KA installation) who answers your survey. This setting is suitable for internal administrative processes, e.g. when members of a collective fill in some data (e.g. address, contact) and can always correct their answers;
  • 1KA recognises the user as a person entering other respondent's answers (data input), i.e. an interviewer entering answers, for which 1K provides the appropriate interface adjustments. This option is particularly useful in the case of mass entries, or when a field survey is carried out and then interviewers enter the collected answers, to see who has entered which answers. The same applies to telephone surveys.

The above two cases are rare; the default option is of course that 1KA does not recognise the user of the 1KA installation. Turning this option on can have serious consequences. If the 'Yes, as data input' option is enabled, the user has additional settings available for Questionnaire Entry.


4) Access with password (password to access the survey)

Access to the survey can best be restricted via a password in the 'EDIT' - 'Settings' - 'Respondents access' - 'Access with password' tab. You can generate multiple passwords and thus create groups of respondents that can be separated in analyses or used as a basis for IF conditions. In this case, the password serves as a safeguard to ensure that only those you want to complete the survey do so. A single password can be created for all respondents, or a password for each respondent. If you want to enter several passwords at once, select the 'Password mass insert' option. The use of passwords is only available for users of the 2KA and 3KA packages for individuals, and for users of the business packages for groups

In the 'PUBLISH' - Invitations' tab, you can also set up personalised codes to access the survey, via the email invitation interface available to users of the 3KA package for individuals, and users of the business packages for groups. Usually this code is then used in the email invitation, preferably automatically (in the survey URL) so that it does not need to be entered by the respondent. Alternatively, we may ask the respondent to enter the code manually. Similarly, the code can be sent in other ways, e.g. in a letter, and the respondents can type it in. The generation and use of individual codes is described here.

The use of passwords is in principle stronger and overrides the other settings for respondent access restriction (cookie, IP number, registered user identification), but interference may occur, so we strongly recommend to use only one of the above mentioned ways to identify respondents: cookie, IP number, registered user identification or individual password.


Some of the functionalities described are only available for users of the 2KA and 3KA packages for individuals, and for users of the business packages for groups.


Survey Settings

In the 'EDIT' - 'Settings' tab, you can change the survey settings as you wish. You can edit the basic data, respondent and editor access, survey duration, standard words, notifications, comments, missing values, paradata, data display and groups.

1. Basic settings

  • Basic info: here you can change the internal name of the survey, the published name of the survey, add a note to the survey. You can also  enable the display of the survey progress indicator, hide the title of the survey from respondents, enable the option to continue the survey later, show/hide the 'Previous page' button, enable hints to be shown to the respondent as they complete the survey
  • Language settings: you can change the language for the editors of the survey and for the respondents. There is also a 'Survey translations' functionality, which allows you to translate the survey into other languages. This functionality is only available for users of the 2KA and 3KA packages for individuals, and for users of the business packages for groups. More information on language settings can be found here >>.
  • Privacy policy: set the privacy policy to be displayed at the beginning of the survey (if you select the checkbox option, the respondent can only continue with the survey if they agree to the terms and conditions).
  • Library: save the survey in a folder in the library.
  • Alerts:  set or remove reminders for questions.
  • Numbering: you can specify how the questions in the survey should be numbered (without, with a sequence number, with the name of a variable, with the name and sequence number of a variable).


2. Table settings

Here you can customise the display of the 'Table' questions type for desktop and mobile devices. You can choose between the following types of customisation: grid, scrolling, unfolding and horizontal scrolling.


3. Standard words

In addition to changing the language, 1KA also allows you to manually change the standard words. You can change the standard words in your survey as you wish, e.g. you can replace the 'End' button in the conclusion with 'Finish'.


4. Editor access

Here you can set who can edit the survey besides you (the author). You will also see who are the users editing the survey: you can set certain restrictions for each editor, e.g. you can set that a user can only access the data and analysis, but cannot unlock the survey for editing.

You can give access to the survey to already registered users by entering their email address in the box under 'Add users that can edit the survey'. If adding more than one user, write each address in its own row. More >>


5. Respondent access

You can set cookies in the 'EDIT' - 'Settings' - 'Respondents access' - 'Completion options' tab. You can choose until when the cookies should be stored. The following options are available:

  • 'Until the end of browser session', where the cookie will be deleted as soon as the respondent closes their browser (Internet Explorer, Mozilla Firefox, Opera ...);
  • 'For 1 hour' means that the cookie will be deleted after 1 hour from the first time the respondent clicked on the survey URL;
  • 'For 1 month', the cookie will be deleted after 1 month from the first time the respondent clicked on the survey URL;

In this section, if cookies are enabled, you can set that when the user returns to the survey, they start from the beginning (in which case duplicate responses may occur as the first entries are already stored in the database) or that they continue where they left off, so the previous responses are already in the database and the same database entry just continues with further responses.

You can allow a user who has already completed your survey to edit their answers later, but this means that the data and analysis will also change, so it is better to select that they cannot subsequently edit their answers.

IP recognition: in the 'EDIT' - 'Settings' - 'Respondents access' - 'IP recognition' tab you can choose to block the completion of the survey in case of a repeated IP address, for a certain period of time.

1KA recognition: In the tab 'EDIT' - 'Settings' - 'Respondents access' - '1KA recognition' 1KA also allows you to identify respondents, but they must be registered users. Here you have three options:

  1. 1KA recognises the registered user as a respondent, i.e. the person answering your survey,
  2. 1KA recognises the registered user as the person doing data insertion, i.e. entering other people's answers (e.g. when digitizing paper surveys)
  3. Alternatively, you can choose that 1KA does not recognise the registered user.

If you want the recognized respondents to see their email address when answering the survey, select 'Show them their email' below.


In the  'EDIT' - 'Settings' - 'Respondents access' - 'Access with password' tab you can set Survey password (Access with password): you can generate several passwords to access the survey and thus also create groups of respondents that can be separated in the analyses. Passwords are only available for users of the 2KA and 3KA packages for individuals, and for users of the business packages for groups.


6. Notifications

In the settings, you can also set up notifications for completed surveys, survey expiry, changes to activity and deletion. Notifications are only available for users of the 2KA and 3KA packages for individuals, and for users of the business packages for groups. You can find out more about the notification settings in the Notifications guide.


7. Activity/quotas

  • You can set the duration of the survey as you wish by clicking on the calendar icon to the right of the date window and selecting the start date, i.e. 'from', and then repeat the same for the end date, i.e. 'to'.
  • You can also select the 'Permanent survey' option, which means that the survey does not have a fixed deactivation date.
  • You can also set a limit (quota) on the number of responses for all units or only for the valid units. If you select 'yes' for quotas, then you must also provide a number which indicates after how many responses the survey should be deactivated.
  • You can read more here >>


8. Groups

Here you can create groups of respondents, each with its own survey URL, if you want to analyse specific groups of respondents but do not want to ask them identification questions. Groups are only available for users of the 2KA and 3KA packages for individuals, and for users of the business packages for groups.


9. Comments

Before sending the survey to respondents, it is advisable to have it reviewed by the other editors of the survey, and it may also be reviewed by the respondents. Allow these people to comment, possibly on each question individually, or just on the survey as a whole. All this can be edited in the 'Comments' interface. Comments only available for users of the 3KA package for individuals, and for users of the business packages for groups.


You can turn on comments from editors and comments from respondents. There are also advanced settings for comments, which you can see in more detail in the Comments manual >>.


10. Data display

Here you can set the default display of the appropriate units, which will also be taken into account in the data table in the 'DATA' - 'Browse' tab and in the survey analyses.


11. Paradata

  • Storing and displaying paradata: you can set to store the respondent's browser version, referral (respondent redirects) and the time of answering the survey questions. This information will be displayed in the 'DATA' - 'Browse' tab if you select the 'Respondent paradata' option from the '+ Display columns' menu.
  • IP address: here you can configure the storage of the respondents' IP address. IP numbers are stored in the database and also displayed in the STATUS tab, but are not linked to the survey data as IP is treated as personal data.


12. PDF/RTF exports

Here you can configure the export of the questionnaire (numbering of questions, display of conditions, display of introduction) and the export of the respondents' answers. The extended PDF/RTF export is an export of the questionnaire as it is, while the short export is an export of the questionnaire with the results in a shortened form.


13. GDPR

Here you can indicate whether the survey collects personal data (GDPR) and use the 1KA GDPR template in the introduction of the survey. More about GDPR >>


Some of the functionalities described are only available for users of the 2KA and 3KA packages for individuals, and for users of the business packages for groups.

Related content

GDPR Survey Settings

In the 'EDIT' – 'Settings' – 'GDPR' tab, you have options for additional GDPR settings for each specific survey.

COLLECTION OF PERSONAL DATA IN THE SURVEY

In the first step, mark whether your survey collects personal data. If you select 'Yes', you will be presented with additional options where you can indicate what personal data is collected in the survey

  • Name;
  • Email;
  • Location;
  • Phone;
  • Online identifiers;
  • Other identifiers that you can enter in the input field.

Consent to collect personal information in the survey

In the second step, under the option 'Use GDPR 1KA template in the introduction', choose whether you want to use the 1KA template for respondents' consent to the collection of personal data. By default, the 'Yes' option is selected, which means that consent will be automatically displayed when respondents click on the survey link. If you do not want the consent to collect personal data to be displayed immediately at the beginning of the survey, you can select the 'No' option here and use the 'GDPR' question type (available from among All question types), which you can place anywhere in the survey and edit the text as you wish. In this case, you must also use conditions to ensure that the questions are only displayed to those who have given their consent. You can read more about consent to the collection of personal data in the survey here >>.

An example of a survey with 1KA consent to collect personal information in the survey >>.

Reminder: In case you do not use the default 1KA template to inform respondents about collecting personal data, you need to take care of it yourself!

Details about collecting personal data in the survey

The third step records the details of the data collection, which are displayed to respondents in the form of a pop-up window in the consent text. 1KA has prepared guidelines that you can use and adapt to your needs, especially in terms of the specific use (purpose) and retention of your personal data. They are described in the text:

  • Personal data;
  • Use and retention of data;
  • Data protection;
  • Erasure, alteration or access to personal data.

In the GDPR survey settings, you can change the following:

  • Data retention time;
  • Other users of personal data;
  • Specify the export of the data to foreign countries;
  • Provide the contact details of the data protection officer (by default the contact details of the author of the survey or the data protection contact previously provided);
  • Contact details of the author of the survey;
  • Your additional remarks.

For users of the 2KA and 3KA packages for individuals as well as users of the business packages for groups, two printouts (in .PDF, .DOC and preview formats) are produced under the GDPR settings based on the data entered above:

  • Printout of information given to the individual: information displayed to the respondent if the 1KA GDPR introduction is turned on. The printout can be provided in PDF or DOC format to respondents upon request. More >>
  • Printout of processing activity records: all information about the collection, storage and processing of personal data to be kept by organizations. More >>

Some of the functionalities described are only available for users of the 2KA and 3KA packages for individuals, and for users of the business packages for groups.


Related content


Adding Editorial Access on 1KA.arnes.si

As on www.1KA.si, you can also assign editorial access to the survey to other users on 1KA.arnes.si. General instructions on how to grant access to the survey to another user that apply to all 1KA installations and domains are described here.

When adding editors to the survey on 1KA.arnes.si, keep in mind that you can only grant access to users who have the option of accessing AAI services, which allows them to log in to 1KA.arnes.si.

Users with administrator status can grant access to the survey to users who haven't registered on 1KA.arnes.si yet, which will then receive a notification of the granted access to the email address provided by the administrator. Please note that if the user to whom you have granted access to the survey does not have an AAI identity, they will not be able to log in to 1KA.Arnes.si.

If you want to give a non-AAI user access to the survey, you can provide the user with:


Granting Survey Access to 1KA Helpdesk

Protecting user data is one of 1KA's top priorities. Access to data is limited to the author (editor) of the survey and additional co-editors, which are added by the author of the survey.

1KA's helpdesk and the website administrator of www.1KA.si do not have access to surveys and data without the explicit consent of the user.

In case the user requires assistance from 1KA’s administrators, the user must grant temporary access to 1KA's helpdesk (until the issue is resolved). Despite granted access, administrators are still committed to the highest standards of privacy protection, as defined in the Terms of Use.

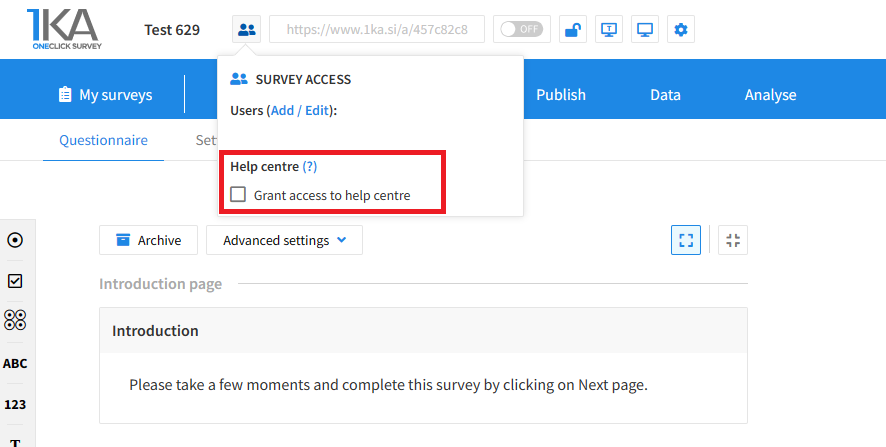
Each survey has an icon in the top left corner which enables you to grant access to 1KA's helpdesk and administrators. You have to click 'Grant access to help centre'.

Grant access to help centre
 

The author can add co-editors in the tab 'EDIT' – 'Settings' – 'Editor access'.

Related content

1KA is free to use for basic users