

 Google Sign In

Kako začeti?
Merging Data
In the 'DATA' – Import' – 'Merge data' tab, you can merge data from different sources based on a common key.
Of course, the key must be different between the units - different units must not have the same key. For data merging, it is essential that the 1KA file has the same key (identifier) as the additional file, e.g. sequence number, code, email, phone, etc.
Example: the Q1 variable in the 1KA database contains names of respondents and you wish to add e-mail address (E-MAIL) and age (AGE) for each respondent. In the 'EDIT' - 'Questionnaire' tab, you can create two new variables (for the e-mail address and age) and then go the 'DATA' – 'Import' – 'Merge data' tab, where you can choose all three fields: Q1, E-MAIL, AGE. Each unit has to be in its own row and variables have to be separated with a comma.
It is important to maintain the order of the variables, which can be determined by moving the fields around.
It is very important to mark the Q1 variable as the key in this example. The system will then add the email address and age from the additional file (e.g. Ana, ana.novak@1ka.si, 33) to the units in addition to the names (Q1) already in the 1KA database.
You can also export the e-mail addresses and names from an external file (Excel).
Please pay attention! If you are using a loop functionality or have activated the advanced Social Networks module, we advise against using the merge or add data function, as the data will be imported incompletely or incorrectly.
The functionality is available for users of the 3KA package for individuals, and for users of the business packages for groups.
Related content
Your First Survey
After you have successfully registered on 1KA's website, you are able to create your first survey.
1. CREATING A SURVEY
You can create a survey in the 'My surveys' tab by clicking on 'Create Survey'. Choose a name for your survey, which will be displayed in your directory, as well as the name that will be visible when the survey is published (to the respondents) – the names can also be identical. You can also select the primary language for the respondents, i.e. which language the basic options should use (next page, back, end of survey …). In order to create a short survey, click on the option 'Survey'. If you wish to create a form, click on the option 'Form', while for voting you must click on the option 'Voting'.
When you select the desired survey type (Survey), you will be automatically redirected to a page where you can edit the survey, choose from the different types of questions, and later, when you have finished collecting data, can also access the data and the analysis.
To start with, you have the option of setting socio-demographic questions, which are already pre-set in the 1KA tool. These questions are standard and are used in scientific research. The selected demographic variables can be included in the questionnaire by ticking the box next to the desired variables. 1KA positions the selected socio-demographic questions into a separate block at the end of the questionnaire. Each variable comes in various types – you can select the desired question type in the 'Edit question' sub-tab. All possible question types are found in the dropdown menu in the upper right corner of the question editor. Select the chosen type and click 'Close'.
If you don't like the default Introduction, you can simply change it by clicking on the text and enter your own introduction. The introduction should not be too long but should serve to persuade the respondent to complete the survey. For more information on how to effectively write an introduction, consult our recommendations for writing the survey introduction.
Different types of questions are available on the left side of the screen, which can be easily inserted into your questionnaire. If you navigate the mouse over each question type, an example of the question formation is displayed. The questions can then be dragged and dropped to the desired position in the survey, or you can simply click on the question type, and the question will appear automatically at the bottom of the survey.
2. TESTING YOUR SURVEY
The 'TEST' – 'Diagnostics' tab warns you of any possible mistakes and offers recommendations to improve your survey. You can include Comments and Automatic entries in your survey. Comments are only available in the 3KA package. You can test the survey with the test entries icon, which can be found to the left of the survey URL and in the 'PUBLISH' – 'Settings' tab.
3. PUBLISHING YOUR SURVEY
When the survey has been successfully created, click on the 'PUBLISH' tab, where you can activate your survey and access the survey URL. More >>
By clicking on the 'Activate' option, which is found on the left side of the screen, the survey becomes active. A new window will appear; by default, the survey will be active for a period of three months, but the time period can be adjusted in the 'Activities settings can be changed here' option. You can set the start and end date of the survey activity or choose to make the survey permanent. In addition to the time limit, you can also set a response limit or quota here. More >>
Survey activation is also possible above, to the right of the survey URL, by clicking the OFF button.
4. DATA REVIEW
In the 'DATA' tab, you can review the collected data, and can also review the answers for each individual unit with the 'Insight' option. By default, only valid units (i.e. units where the questionnaire was partly or fully completed) are displayed. The collected data can be exported in text format or into SPSS and Excel. Data export is only available to 2KA and 3KA private package users. More >>
5. OVERVIEW OF ANALYSIS
The 1KA tool merely generates tables according to the chosen question type. In the 'ANALYSE' – 'Statistics' tab, only basic statistical analyses are displayed, such as frequency, percent, number of units, etc. 2KA and 3KA private package users also have the option of advanced analysis. More >>
The 'ANALYSE' – 'Charts' tab allows access to the graphic presentation of data. Charts are only available to 2KA and 3KA private package users. The chart type is selected based on the question type, which you can also change. The colour of the charts can also be modified. More >>
Related content
Organization of Virtual Domain Users
Manager status
The main person in charge of the virtual domain is automatically given the status of a manager, who receives login details (e.g. a temporary password) from the 1KA administration immediately after the virtual domain is set up, to the e-mail address provided in the request.
By default, an organisation has one manager. In this case, the organisation can also opt for a generic name (e.g. manager@company.com or info@company.com), which greatly simplifies adjustments in case of a change of the person in charge.
In principle, there can be several managers, but this must be ordered separately and technically arranged with the 1KA administration. Additional managers are charged according to the current price list. The manager also has the responsibility to ensure that all surveys are carried out within limitations, in accordance with ethical standards and in compliance with the contract and the law. In the case of a large number of managers, all of them should take this responsibility, but in such a case it is recommended that one manager is the main manager and has access to the other managers.
Managers can add new users to a virtual domain. Each normal user of a virtual domain is therefore assigned to a specific manager. Additional users cannot register themselves in your virtual domain.
If there are several managers, they may or may not be mutually assigned to each other. If a manager is not assigned to anyone, this means that no one else has access to the surveys of that manager. Any change of access can only be made by 1KA administration on the basis of a formal request from the organisation, which must also comply with the applicable privacy legislation of the responding organisation. 1KA administration can only access surveys for the purposes of user assistance with the express permission of the author of the specific survey.
A manager has access to all surveys of a user (or manager) assigned to that manager. However, it is important to note that this access cannot be abused, because every survey author or user can see all accesses, insights and changes made by anyone (author, co-authors, managers, administrators) to their survey.
Access to individual surveys
Each manager has access to the entire profile of their assigned users and thus to all the user's surveys. The manager's administrative access to users should not be confused with users' access to edit a specific survey. Each user (not only the manager) can independently add any user of the virtual domain as a co-editor. In this case, a user is only granted access to that individual survey.

Controlling access to surveys
In the 'EDIT' - 'Archive' - 'Track changes' tab, the user and manager can see all instances of access to the survey: both insights and any changes to the questionnaire (who, when, what). The archive also includes any accesses and interventions made by the 1KA administration or Helpdesk.
Adding a new user
In the 'Users' - 'Add users' tab, there is a window for adding users, which will be assigned to you as their manager. Here the manager enters the user's e-mail, first name, last name and password. Both the manager and the user are notified by e-mail that a corresponding account has been created on the virtual domain:

Overview of users
Managers can see their assigned users in the 'Users' - 'My users' tab.
The manager can also see all the surveys of their assigned users in the survey overview in the 'My Surveys' tab. By clicking on the 'Filter' button, you can choose to display all surveys, or to display only your own surveys.

By clicking on edit (pencil) icon next to a user, the manager can see the full list of surveys for that user and their profile.

Here, the manager also has the option of editing the user's information (e.g. changing the password). In the user's survey list, the manager can change the user's permissions for each survey by clicking on the survey.

Adding an existing user to the overview
If a user is already registered to a virtual domain, you cannot assign them to your overview as a manager. In this case, please contact us at enklikanketa@gmail.com and we will manually assign the user to you.
Removing a user from your overview
A manager can remove a user in the 'Users' - 'My Users' tab. Clicking on the 'pencil' icon next to the user will open a pop-up window where the user can be removed:

After removing a user from the overview of a specific manager, the user will be removed from the corresponding virtual domain, but their surveys will still be visible to the manager in the 'My Surveys' tab.
Related content
Granting Survey Access to 1KA Helpdesk
Protecting user data is one of 1KA's top priorities. Access to data is limited to the author (editor) of the survey and additional co-editors, which are added by the author of the survey.
1KA's helpdesk and the website administrator of www.1KA.si do not have access to surveys and data without the explicit consent of the user.
In case the user requires assistance from 1KA’s administrators, the user must grant temporary access to 1KA's helpdesk (until the issue is resolved). Despite granted access, administrators are still committed to the highest standards of privacy protection, as defined in the Terms of Use.
Each survey has an icon in the top left corner which enables you to grant access to 1KA's helpdesk and administrators. You have to click 'Grant access to help centre'.
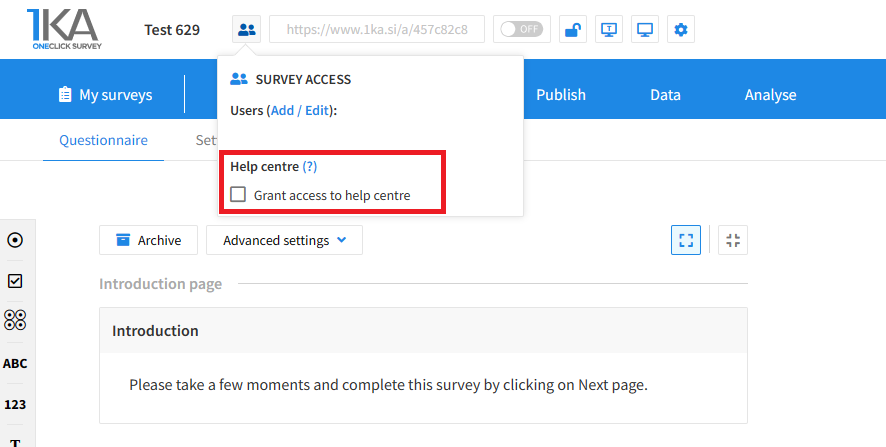
The author can add co-editors in the tab 'EDIT' – 'Settings' – 'Editor access'.
Related content
Importing Questions
This video shows how to import questions from a questionnaire, we have already created in another text editing program, into One Click Survey.
Exporting Questionnaire and Data to PDF and Word
The video guide shows how to use the 1KA application to export the questionnaire and respondents’ answers to PDF or Word, and how to change the PDF and Word export settings.
Library
The video guide shows how to use the survey library, and how to use the questions library in 1KA.
When using the 1KA public library, please follow the Principles of 1KA public library use.