

Modify

Manual Coding

With manual coding in the 'DATA' – 'Computations' – Manual coding' tab, you can choose a variable (column) that you wish to code, and then click on any unit (values in rows). A new window will open in which you can click the 'New coding variable' button. Name the newly created variable and then click 'Add'. Then add possible answers/categories to the variable (confirm by pressing the '+' button). When you are satisfied with the number of new answers, select the values you want to recode the answer to and then click the 'Save' button. When you click on the content of the same variable for other respondents, the recoding options created here will be automatically displayed.

To display the recoded values, you must then click on the 'Run calculate for all recoded variables' button that appears at the top of the page.

To change the response type of a new variable, click on the pencil icon next to the variable name in the new pop-up window. Of course you can also modify the new variable in the 'EDIT' – 'Questionnaire' tab.

Using this functionality, open-ended answers can, for example, be coded into values 1 (negative comments), 2 (neutral comments) and 3 (positive comments).

Manual coding also allows you to correct automatic coding.


The functionality is available for users of the 3KA package for individuals, and for users of the business packages for groups.

Recoding

You can recode numeric and categorical values of variables in 1KA, i.e. change their values. You can access this option in the 'DATA' – 'Computations' – 'Recoding' tab.

The following recoding functions are available:

  • Add – opens a window for adding variables where you want to change old values to new ones.
  • Edit – opens a window for editing the recoding of a variable.
  • Remove – removes or completely deletes the recoding of a variable.
  • Enabled – enables or disables the recoding of a variable.
  • Visible – sets the visibility of the recoded variable to respondents in the questionnaire.

Below the table, you can see a list of recoded values by variable by clicking on '+ Recent recoding'.


Recoding to the same variable:

  • Recode all answers that have e.g. the values 2 and 3 to another value (e.g. 11) of the same variable,
  • or define them as a missing value, e.g. 'did not answer (-1)'.


Recoding into a new variable:

  • Recode the responses of the selected variable into new values, where the values of the old variable Q1 (e.g. 1 and 2) are assigned a new value (e.g. 12) in the variable Q2.
  • When recoding into a new variable, the values can also be defined as a missing value.
  • Similarly, you can recode categorical variables, e.g. to change Q1 with a scale of 1-5 to Q2 with a scale of 1-3. You recode the values 1 and 2 of Q1 into the value 1 of Q2; you recode the value 3 of Q1 into the value 2 of Q2; and you recode the values 4 and 5 of Q1 into the value 3 of Q2. You can also perform this transformation by calculating Q2 = 1/2 + 1/2*Q1, where Q2 will of course still have five values, but on the interval 1-3.


Outputs

For each variable you have added to the recoding list, you can output the  frequencies, pooled frequencies, descriptive statistics and a graph with a single click. These can then be printed or exported to PDF, Word or Excel formats.


The functionality is available for users of the 3KA package for individuals, and for users of the business packages for groups.


Computations

During the creation of the questionnaire, in the 'EDIT' – 'Questionnaire' tab, you can use a calculation to define automatically calculated values based on the respondents' answers.

This feature is especially useful with quizzes and tests, where you are interested in the score (number of points) based on the values of individual answers. An example of use in a survey would be the calculation of a respondent’s age based on their year of birth.

You can add a calculation in the 'EDIT' – 'Questionnaire' tab by clicking on the blue plus icon in the left-hand menu, which will open All question types. Select 'Calculation' from the 'Advanced features' category. This will open a pop-up window for editing the calculation:

  • First, choose a variable from the dropdown menu (e.g. Q1);
  • Then specify the desired operation, where you can choose between addition, subtraction, division and multiplication;
  • Select another variable from the next dropdown menu. For example, you can set the calculation of Q1 + Q2;
  • If you wish to include several operations and variables, repeat these steps.

The following advanced settings can also be used when editing calculations:

  • If you select the option 'Number' instead of the variable, this allows you to perform calculations with constants (e.g. multiply the variable Q1 by 10);
  • You can change the order of the variables by clicking on the vertical double-headed arrow icon on the left and dragging the variables to the desired position. You can also remove a variable from the calculation by clicking on the trashcan icon to the right of the variable;
  • To the left and the right of each variable, you will find plus and minus-shaped icons (Brackets), which allow you to edit brackets and ensure the correct order of arithmetic operations with complex calculations;
  • In the bottom left corner ('Variable name'), you can rename the calculation. In the question text, you can also insert the value of the calculation by entering #computation_name#;
  • In the bottom left corner (under the 'Variable name' field), you can determine the number of decimals for the calculation (from 0 to 10).

With quizzes and tests, you might want to set the value of individual answers (e.g. 1 for correct answers and 0 for incorrect answers) before you set up calculations. To change the answer values, click on the advanced editing icon, select the option 'Edit values' and enter the appropriate value to the left of the individual answer (e.g. 1 for correct answer and 0 for incorrect answer).

A calculation is the same as a computed value, which is available in the 'DATA' – 'Computations' – 'Computed values' tab.


The functionality is available for users of the 3KA package for individuals, and for users of the business packages for groups.


Related content

Granting Survey Access to 1KA Helpdesk

Protecting user data is one of 1KA's top priorities. Access to data is limited to the author (editor) of the survey and additional co-editors, which are added by the author of the survey.

1KA's helpdesk and the website administrator of www.1KA.si do not have access to surveys and data without the explicit consent of the user.

In case the user requires assistance from 1KA’s administrators, the user must grant temporary access to 1KA's helpdesk (until the issue is resolved). Despite granted access, administrators are still committed to the highest standards of privacy protection, as defined in the Terms of Use.

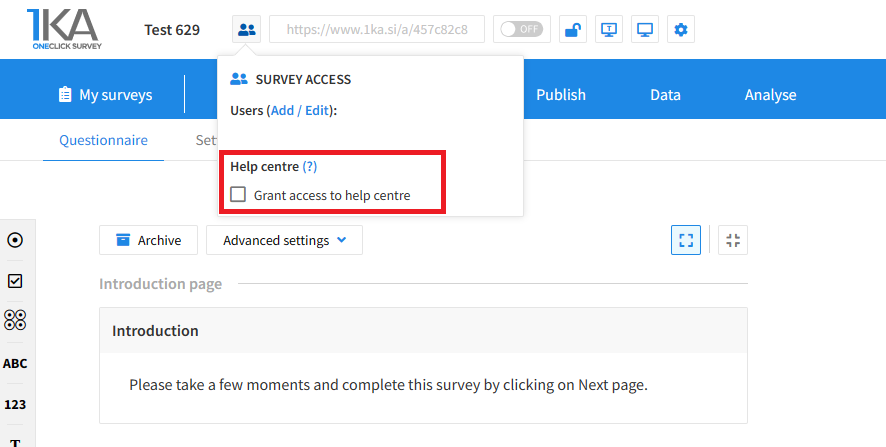
Each survey has an icon in the top left corner which enables you to grant access to 1KA's helpdesk and administrators. You have to click 'Grant access to help centre'.

Grant access to help centre
 

The author can add co-editors in the tab 'EDIT' – 'Settings' – 'Editor access'.

Related content

1KA is free to use for basic users