

 Google Sign In

Creating a new survey
Voting
The "Voting" survey type supports the process of anonymous voting. Voting is a one-question survey ("Categories - Single answer") which allows the immediate display of the statistics of the answers. In a "Voting" survey, there is only one question, so there is no testing and no test data entries. The data also can't be edited or deleted.
1. Voting survey creation
Voting can be created by clicking on the 'Create survey' option and selecting the 'Voting' survey type.
2. Editing the voting survey
By default, there is no introduction, the exit page is hidden, and there is a pre-set question with a single answer. Here you can enter the desired question and possible answers, as well as set additional voting preferences in the left-hand window.
3. Voting survey settings
- You can choose if the voting will be an independent survey, which the respondents can access via an URL link, or if it will be embedded in a website.
- You can also select the option of the respondents selecting their gender;
- Within the 'Show intro / conclusion' section, you can set if the respondents see the intro and the exit pages;
- A graphic representation of the answers can be configured in the 'Display statistic' section. The statistics can be shown to all respondents or to administrators only.
Additional settings are displayed by clicking on the 'More settings' option:
- Survey duration or 'Survey start' and 'Survey end';
- Theme (design) choice for the survey; if you want to embed the voting in a website, then select the 'Embed' theme from the drop-down list.
If you want to prevent a respondent from voting multiple times, you need to use the 1KA system for sending email invitations:
4. Sending voting invitations using the 1KA system
In the 'PUBLISH' - 'Invitations' tab, enable the 1KA system for invitations.
Set the Settings for Email Server. Then, choose the right General invitations settings:
- Set the 'Personalized invitationst' to 'Yes';
- Leave the 'Type of invitations' as the default 'Send emails' option
- Leave the 'Code entry' as the default 'Automatically in the URL' option
- Leave the 'Enable the access to the survey without individualized invitation code' as the default unchecked option
- Click the 'Save' button

In the second step ('Add'), add the recipients: select the desired fields, and be sure to enter the email addresses. Then format the e-mail message, and send it.
In the third step ('View/Edit'), we can view the list of email addresses and whether the invitation was sent, as well as the respondent's survey status (non-answer, completed survey, ...).
5. Voting results
Voting results can be viewed in the 'ANALYSE' - 'Statistics' tab or, you want a graphical display of results, in the 'ANALYSE' - 'Graphs' tabs.
Related content
Registration Form
A registration form is a type of survey that incorporates one or more variables. You can include only an email address, or it can incorporate other variables in which you are interested.
You can create a registration form by clicking the 'Create survey' option. A new window will appear, where you can enter the name of the registration form, select the 'Form' questionnaire type, and click 'Next'.
Variables can be added in two ways:
1. Insert the desired question types and edit them. If you want to have the variables 'name' and 'email', first select the 'Text' question type and write 'Name' into the text question. For the email, navigate the mouse to the menu on the left and click 'Add question' , where all the available question types are listed. Under the category 'Standard input', select the 'E-mail' option.
- If you wish to use the two variables later in notifications, you must define them as system variables. This can be done in the individual question editor, in the 'Advanced' tab, where you select the category 'System variable';
- You should also rename the variables in the same tab, under the category 'Variable'; enter 'Name' under 'Variable name' for the first variable, and 'Email' under 'Variable name' for the second variable, so that the system will automatically detect the variables for notifications.
2. To the right of the question editor, you will find the option of Alerts from responses quick settings, where you select the recipients of the notifications. You can choose between the authors of the survey, additional recipients and respondents.
If you select a respondent, the variable 'E-mail' is entered into the form, which is by default a system variable and can be used for notifications without further settings.
You can add the other variables in the same way as with a standard survey. If you wish to use them in notifications, you must define them as system variables.
Notifications are only available to users with 2KA and 3KA payable package.
System variables
Each variable that you wish to include in the notification message must be defined as a system variable. In the question editor of each question, in the 'Advanced' tab, you can select the option 'System variable'.
Enter #variable_name# into the notification message.
Example: The participants must select a date in the registration form. The date variable is named Q1 in the question editor. you should enter in the message, for example: “you have chosen the date #Q1# for the workshop.”
If the registration form is to be embedded on a website, we recommend that you select the 'Embed' design, which can be selected in the 'EDIT' – 'Design' tab.
Insight into the registration database
The 1KA system enables you a quick insight into the registration database. If you are a 3KA private package user you can also create a URL link to the database and forward it to selected individuals. The list can also be exported in PDF, MS Word and Excel formats, as well as printed if you are a user with 2KA or 3KA payable package user.
Some of the functionalities described are only available for users of the 2KA and 3KA packages for individuals, and for users of the business packages for groups.
Related content
Granting Survey Access to 1KA Helpdesk
Protecting user data is one of 1KA's top priorities. Access to data is limited to the author (editor) of the survey and additional co-editors, which are added by the author of the survey.
1KA's helpdesk and the website administrator of www.1KA.si do not have access to surveys and data without the explicit consent of the user.
In case the user requires assistance from 1KA’s administrators, the user must grant temporary access to 1KA's helpdesk (until the issue is resolved). Despite granted access, administrators are still committed to the highest standards of privacy protection, as defined in the Terms of Use.
Each survey has an icon in the top left corner which enables you to grant access to 1KA's helpdesk and administrators. You have to click 'Grant access to help centre'.
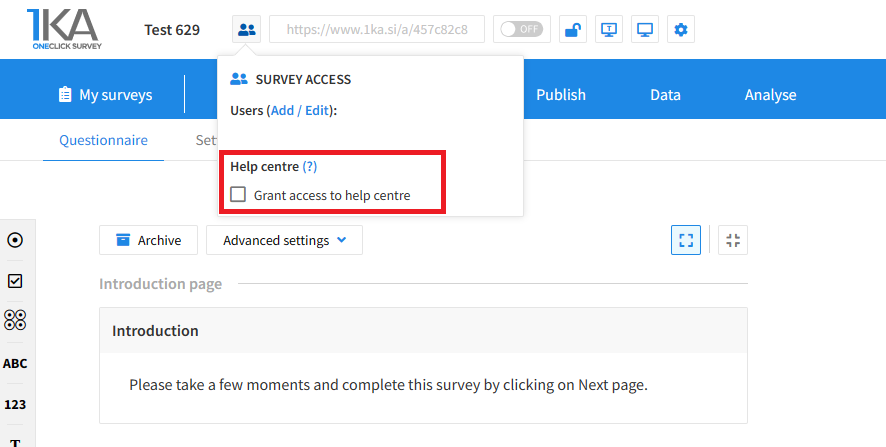
The author can add co-editors in the tab 'EDIT' – 'Settings' – 'Editor access'.
Related content
Importing Questions
This video shows how to import questions from a questionnaire, we have already created in another text editing program, into One Click Survey.
Exporting Questionnaire and Data to PDF and Word
The video guide shows how to use the 1KA application to export the questionnaire and respondents’ answers to PDF or Word, and how to change the PDF and Word export settings.
Multilingual Survey
The video guide shows how to customize the language in 1KA.
The application currently supports virtually 43 world languages. This means that standard words (such as 'Next Page') will be automatically translated into the selected language. The corresponding font (e.g., Cyrillic, Greek, Chinese, Arabic, etc.) is also automatically switched on. For the font in Hebrew and Arabic, the text format is set from right to left.
1KA Survey Import
This video guide shows you how to import the survey and data into the 1KA tool. The functionality is most often used when either transferring a survey from one installation to another version of the 1KA installation or when transferring a survey from one user account to another.
The following should be considered when transferring:
- When copying the survey, not all advanced settings (e.g., validations) are transferred, the survey is not activated, etc. After downloading, therefore, make sure that all settings are the same as on the original.
- The original version of the survey and a copy of the survey do not have the same URL. In case the original version of the survey is still active, you have 2 options:
- You change the link to the survey on the pages where you published the survey (if you sent e-mail invitations, you must send the invitations again if you want the data to be collected in a new copied database);
- You do not download the survey or data until you have finished collecting the data. Otherwise, you will not have new entries on the copy of the survey.