
Za začetnike

Advanced Module: Voting

The advanced 'Voting' module supports the process of conducting a completely anonymous vote, with all paradata turned off and without any possibility of linking data to email addresses and other identifiers.

The module allows sending invitations within the 1KA system, but only the information that the invitation has been sent is recorded, not the status (whether the person has opened the poll, whether they have responded).

To use the 'Voting' module, click 'Voting' in the left hand side menu in the 'EDIT' - 'SETTINGS' - 'Advanced Modules' tab, then select the checkbox to enable the module.

The questions you want to include can be edited in the 'EDIT' - 'Questionnaire' tab.

The recipients of the invitations and the message to invite respondents to the poll can be edited in the interface for sending invitations in the 'PUBLISH' - 'Invitations' tab.

  1. First, edit the mail server settings.
  2. Add recipients.
  3. Format the message and send it.

Specific features when using the Voting module

  1. Once you have enabled the 'Voting' module, it is no longer possible to disable it. If you want to carry out a normal survey and you have accidentally switched on the 'Voting' module, then a new survey (or a copy of the current survey) must be created.
  2. When sending invitations, personalised invitations (codes) are used, but these are personalised for the purpose of sending invitations only. Invitation settings (manual entry, access without code, etc.) cannot be changed.
  3. The overview of added recipients only contains information on whether the invitation has been sent, when the recipient was added, who added them and which list they are in. There is no information on the status of the respondent in the overview.
  4. The last step shows all e-mail addresses to which the invitation has not yet been sent. If you would like to send a reminder, this means that you have to add the same recipients again and send them the invitation. However, this means that the person can complete the survey twice (if they receive the invitation with the link to the survey twice). If you send to the same email addresses multiple times, each entry from the same recipient will be recorded as a new entry.
  5. Once the invitations have been sent, linking between the email address and the respondent's answers is not possible.
  6. If the 'Voting' module is enabled, the respondents' access settings and the settings of the paradata cannot be changed. By default, the settings are arranged so that no paradata is recorded and no cookies are stored, which allows a fully anonymised survey to be carried out.

The functionality is available for users of the 3KA package for individuals, and for users of the business packages for groups.

Recommendations for Online Surveys on Mobile Phones

When creating an online survey, it is important to take into account that respondents can also access the survey via mobile devices (e.g. smartphones and tablets). In 2021, almost 60% of 1KA's respondents completed the survey via smartphone.

Therefore, when designing the questions in the survey, mobile respondents should be taken into account, both in the actual writing of the questions and in ensuring that the questions are displayed correctly regardless of the type of device used by the respondent. If surveys are not adapted to mobile devices, there may be problems related to data quality, e.g. incorrect recording of responses, satisficing, respondents skipping questions, etc. If respondents become dissatisfied, mobile respondents are much more likely to leave and not complete the survey.

To avoid these problems, PEW has developed eight recommendations for creating a survey that is also mobile-friendly:


1. Software must be optimised for mobile devices

Mobile optimisation means that the software automatically detects the device used by the respondent, in particular the screen size, and adjusts the layout of the survey accordingly. Fonts, spacing and buttons should be large enough so that respondents do not need to enlarge the screen. There should also be no horizontal scrolling, but vertical scrolling is acceptable.

2. Shorter is better

This refers to both the number of questions and the scope of the question. The longer the survey, the more likely respondents are to disengage - this is true for all types of surveys, but even more so for mobile surveys. This is because of the small screen sizes of smartphones, which can be solved by shorter questions and answers, which will make it easier for respondents to read and complete the survey, and should improve the quality of the data itself.

3. Avoid more advanced features

When creating a survey, it is important to try to keep it simple and not complicate things by including more advanced functionality such as sliders and the like. Research shows that respondents on mobile devices have difficulty using these features correctly as they require a high level of skill. It can also take more time than simpler formats. Thus, radio buttons, checkboxes or text boxes are the most recommended if possible.

4. Avoid tables

Surveys presented in table form are designed to make efficient use of space by formatting questions and response categories in a table or matrix. However, the use of tables on all devices has certain drawbacks. For example, researchers have found that with tables, respondents often choose the same, usually middle, answer for each item in the table, leading to non differentiation, also known as straightlining. This data quality problem is even more pronounced on mobile devices, as tables often require horizontal scrolling in addition to vertical scrolling, which can mean that all questions and answers may not be visible at the same time. This may cause respondents to leave the survey.

To avoid problems associated with tables, many online survey tools, including 1KA, allow you to optimize the table question type for mobile devices. More >>

5. Multiple questions on the same screen

As tables are not ideal for mobile surveys, it is better to ask multiple questions on the same screen. In the past, it was popular for online surveys to have each question on its own page or screen. However, due to slower page loading on mobile phones, this can put unnecessary strain on respondents. This can be avoided by putting questions about the same topic on the same page or screen.

6. Making the most of the smartphone screen

Smartphones have limited screen space, which makes it even more valuable. Avoid embedding logos, advertising and graphics (which also take longer to load), as this can saturate the screen. Navigation buttons should be at the bottom of the screen to force respondents to scroll past all the questions and answer options; this way they do not miss anything.

7. Survey invitations should contain a unique URL

Respondents should not be required to enter an access code or password to complete the survey. This creates another barrier to completing the survey, which is especially true for respondents on smartphones, as entering the code means that they will have to switch between the survey invitation received in their email inbox and the mobile web browser. For a better user experience, it is preferable to use individualized URLs for each respondent, so that when the respondent clicks on the URL in the invitation, the survey will open directly and the respondent can start completing the survey right away.

8. Invite respondents to complete the survey by SMS

In case we have the explicit consent of the respondents to send text messages, in addition to invitations by email, we can also send an invitation to complete the survey by SMS. We include the URL to the survey in the message and the respondent just clicks on the URL in the message.

For further reading on this topic, see the report by the American Association for Public Opinion Research (AAPOR).


Related content

Recommendation For Users Following 1KA Tool Upgrades

The 1KA tool is constantly being upgraded and improved. As new features are added during the upgrade process, some features may not display correctly or at all.

We therefore recommend that all users refresh and reload the website using the CTRL + F5 command.

Minor improvements can be made by deleting files and images from the cache using the CTRL + SHIFT + DELETE command:


Related content

Your First Survey

After you have successfully registered on 1KA's website, you are able to create your first survey.

1. CREATING A SURVEY

You can create a survey in the 'My surveys' tab by clicking on 'Create Survey'. Choose a name for your survey, which will be displayed in your directory, as well as the name that will be visible when the survey is published (to the respondents) – the names can also be identical. You can also select the primary language for the respondents, i.e. which language the basic options should use (next page, back, end of survey …). In order to create a short survey, click on the option 'Survey'. If you wish to create a form, click on the option 'Form', while for voting you must click on the option 'Voting'.

When you select the desired survey type (Survey), you will be automatically redirected to a page where you can edit the survey, choose from the different types of questions, and later, when you have finished collecting data, can also access the data and the analysis.

To start with, you have the option of setting socio-demographic questions, which are already pre-set in the 1KA tool. These questions are standard and are used in scientific research. The selected demographic variables can be included in the questionnaire by ticking the box next to the desired variables. 1KA positions the selected socio-demographic questions into a separate block at the end of the questionnaire. Each variable comes in various types – you can select the desired question type in the 'Edit question' sub-tab. All possible question types are found in the dropdown menu in the upper right corner of the question editor. Select the chosen type and click 'Close'.

If you don't like the default Introduction, you can simply change it by clicking on the text and enter your own introduction. The introduction should not be too long but should serve to persuade the respondent to complete the survey. For more information on how to effectively write an introduction, consult our recommendations for writing the survey introduction.

Different types of questions are available on the left side of the screen, which can be easily inserted into your questionnaire. If you navigate the mouse over each question type, an example of the question formation is displayed. The questions can then be dragged and dropped to the desired position in the survey, or you can simply click on the question type, and the question will appear automatically at the bottom of the survey.

2. TESTING YOUR SURVEY

The 'TEST' – 'Diagnostics' tab warns you of any possible mistakes and offers recommendations to improve your survey. You can include Comments and Automatic entries in your survey. Comments are only available in the 3KA package. You can test the survey with the test entries icon, which can be found to the left of the survey URL and in the 'PUBLISH' – 'Settings' tab.

3. PUBLISHING YOUR SURVEY

When the survey has been successfully created, click on the 'PUBLISH' tab, where you can activate your survey and access the survey URL. More >>

By clicking on the 'Activate' option, which is found on the left side of the screen, the survey becomes active. A new window will appear; by default, the survey will be active for a period of three months, but the time period can be adjusted in the 'Activities settings can be changed here' optionYou can set the start and end date of the survey activity or choose to make the survey permanent. In addition to the time limit, you can also set a response limit or quota here. More >>

Survey activation is also possible above, to the right of the survey URL, by clicking the OFF button.

4. DATA REVIEW

In the 'DATA' tab, you can review the collected data, and can also review the answers for each individual unit with the 'Insight' option. By default, only valid units (i.e. units where the questionnaire was partly or fully completed) are displayed. The collected data can be exported in text format or into SPSS and Excel. Data export is only available to 2KA and 3KA private package users. More >>

5. OVERVIEW OF ANALYSIS

The 1KA tool merely generates tables according to the chosen question type. In the 'ANALYSE' – 'Statistics' tab, only basic statistical analyses are displayed, such as frequency, percent, number of units, etc. 2KA and 3KA private package users also have the option of advanced analysis. More >>

The 'ANALYSE' – 'Charts' tab allows access to the graphic presentation of data. Charts are only available to 2KA and 3KA private package users. The chart type is selected based on the question type, which you can also change. The colour of the charts can also be modified. More >>


Related content

Reporting a Survey That Violates the General Terms and Conditions of 1KA Online Surveying Tool

When using 1KA, you must comply with the General Terms and Conditions of the 1KA online survey tool. The Privacy Policy, Cookie Policy and Anti-spam Policy also form an integral part of these terms and conditions.

Survey methodology standards (inspired by AAPOR) must be respected, therefore online questionnaires that are not intended for data collection (voting, administrative forms, survey research) are not allowed. This is mainly for the following purposes:

  • any fundraising;
  • wherever the collection of data is merely a means or a backdrop for sales, PR, marketing or promotion, including political push-polling;
  • surveys where personal data is collected and then used for purposes the respondent did not explicitly consent to.

If you come across a survey that violates the General Terms and Conditions of online surveying on 1KA, you can report it to the author of the survey or contact SI-CERT.

You can also let us know so that we can contact the author. In the event of a breach of the 1KA Terms and Conditions, we will take appropriate action (delete the survey and block the offending user).

Related content

Facebook or Google Login Troubleshooting

If you have problems logging in with your Facebook or Gmail account (e.g. login does not work), you can log in to www.1KA.si using the normal login.

In the E-mail field, please enter the e-mail address you are using for the Facebook or Gmail account with which you registered on www.1KA.si. Then click on the 'Did you forget your password?' option. You will receive a new password at the email address you entered. You can change the password yourself later in your profile.

If you do not receive an email with your new password, please wait a few minutes and check your spam.


Sending Invitations via 1KA's SMTP E-mail System or via a Gmail User Account (Server)

Gmail SMTP can be used by any user with a Gmail account, but there are some limitations, especially on the number of emails sent per day. More information is available here.

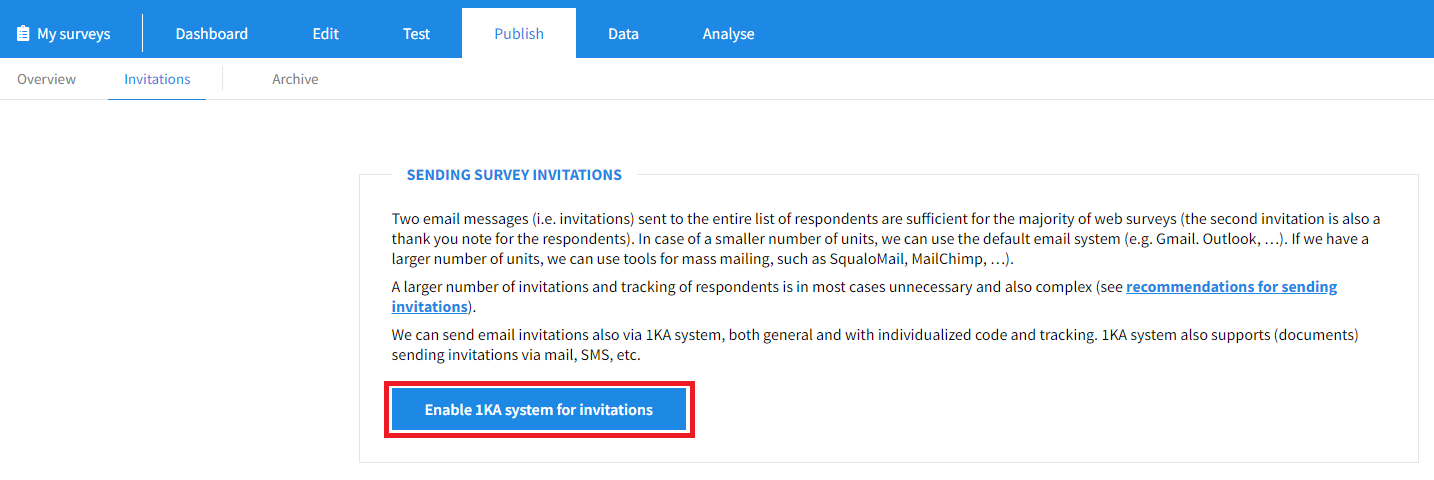
In the 'PUBLISH' – 'Invitations', you first need to enable the system by clicking on the 'Enable 1KA system for invitations' button:

Doing so opens the '1 - Settings' step, where you can edit 'General invitations settings' and 'Settings for Email Server'

To send email invitations via the SMTP settings of your Gmail email address, please follow the instructions below:

  • Sign in to your Google account and check your settings:
    • Make sure you have your IMAP access turned on:
      • Open Gmail on your computer.
      • Click the settings icon in the upper right corner → Show all settings.
      • Click the Forward tab, then on POP/IMAP.
      • In the 'IMAP access' section, select 'Enable IMAP'.
      • Click 'Save changes'.
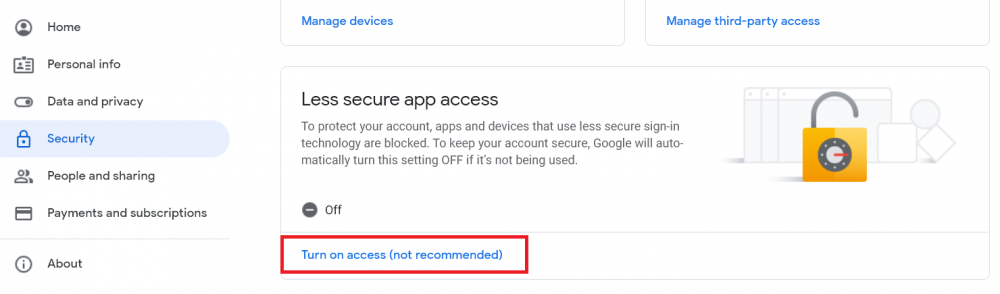
    • Allow access for less secure applications. Open your Google account and from the menu on the left, select the Security tab → Access for less secure applications → Turn on access:
  • Turn on 2-step verification:
    • Open your Google account.
    • In the navigation panel choose Security.
    • Under 'Sign in to Google', select 2-step verification → Get started.
    • Follow the instructions on the screen.
  • Create a password to access the application:
    • Open your Google account.
    • Select Security.
    • Under 'Sign in to Google', select 'App passwords'. You may need to sign up.
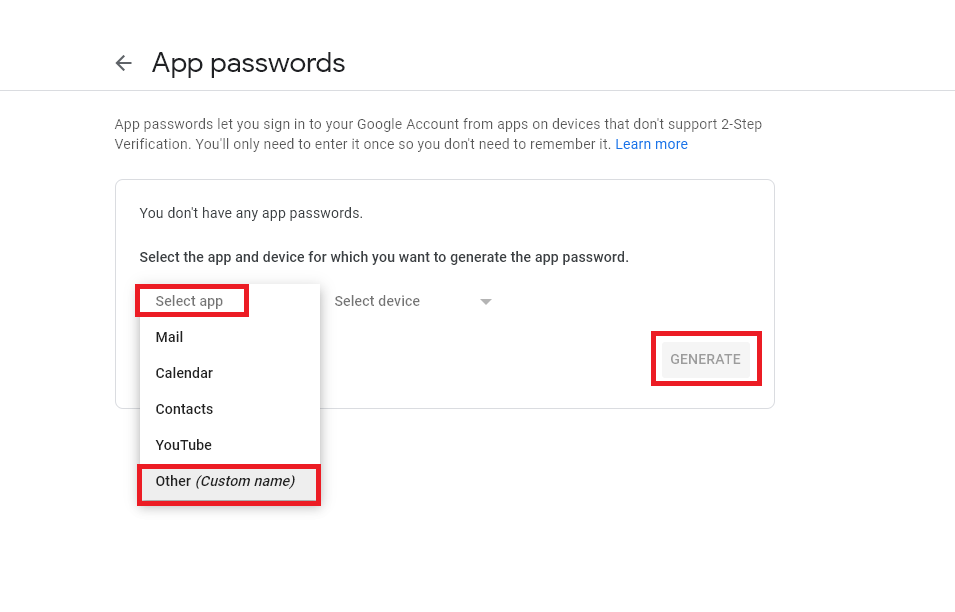
    • At the bottom, select: 'Select app' and then enter the application, select 'Other' → name as desired (e.g. 1KA) → Generate.
    • Follow the instructions to enter the password to access the application. The password to access the application is a 16-digit code in the yellow bar on the device.
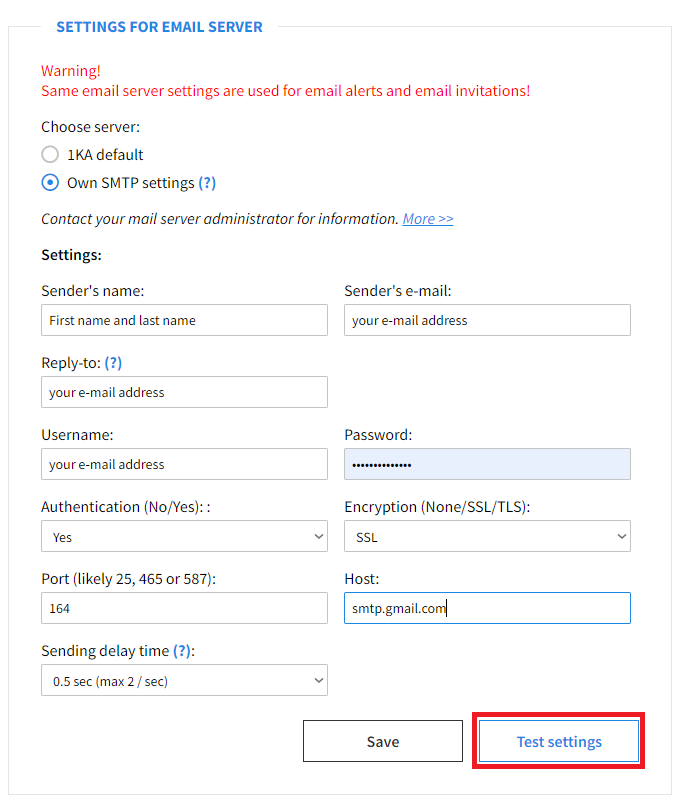
  • In the 'PUBLISH' - 'Invitations' - 'Settings' tab - 'Settings for Email Server' you must enter the following information:
    • Sender's name: name and surname
    • Sender's email: your email address
    • Reply-to: your email address
    • Username: your email address
    • Password: 16-digit code you set as the application access password (Step: Create application access password)
    • Authentication (No/Yes): Yes
    • Encryption (None/SSL/TLS): SSL
    • Port: 465
    • Host: smtp.gmail.com
  • Click 'Test settings' below. You will receive a test message to your email address:


  • If the test is successful, then Save the settings.


Keep in mind that Gmail is constantly updating its settings. These instructions for setting up invitations via the Gmail server were last tested in September 2023, so we advise you to check the current settings in Gmail's documentation before sending invitations.

1KA system for sending invitations at 1KA.arnes.si

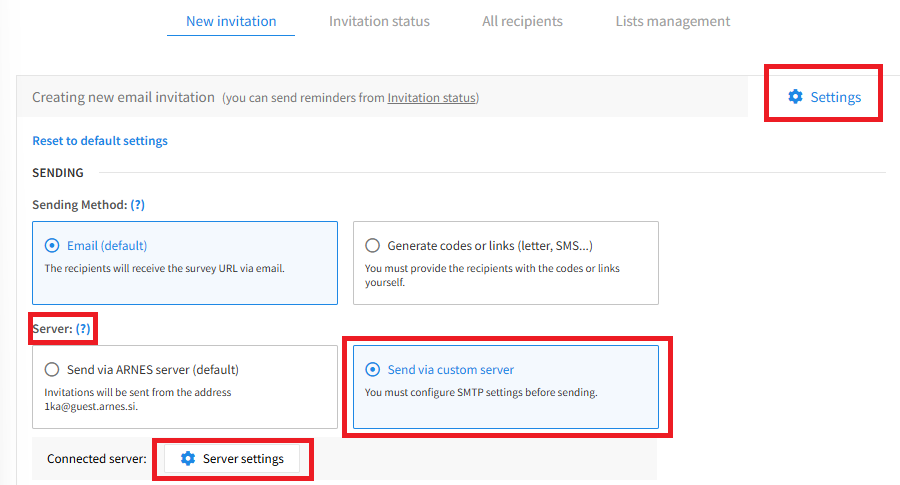
On 1KA.arnes.si, there is a new, redesigned interface for sending email invitations. If you want to activate the use of the 1KA system for sending invitations, you need to enable the system in the 'PUBLISH' - 'Invitations' tab by clicking on the 'Enable 1KA system for invitations' button. In the 'PUBLISH' - 'Invitations' - 'Settings' tab, you can edit the general settings of the invitations and the settings of the email server. When setting up the server, select 'Send via custom server' and then click on the 'Server settings' button.

After clicking on the 'Server Settings' button, you will be taken to the window, where you can enter the same information as above.


The functionality is available for users of the 3KA package for individuals, and for users of the business packages for groups.


Related content

Granting Survey Access to 1KA Helpdesk

Protecting user data is one of 1KA's top priorities. Access to data is limited to the author (editor) of the survey and additional co-editors, which are added by the author of the survey.

1KA's helpdesk and the website administrator of www.1KA.si do not have access to surveys and data without the explicit consent of the user.

In case the user requires assistance from 1KA’s administrators, the user must grant temporary access to 1KA's helpdesk (until the issue is resolved). Despite granted access, administrators are still committed to the highest standards of privacy protection, as defined in the Terms of Use.

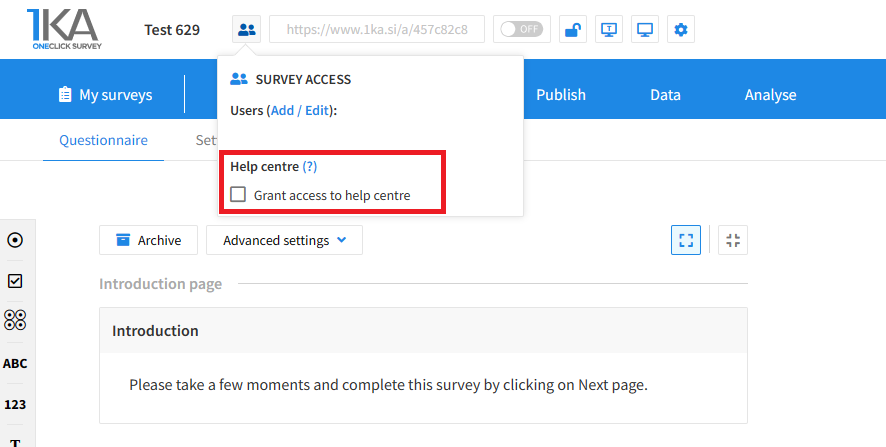
Each survey has an icon in the top left corner which enables you to grant access to 1KA's helpdesk and administrators. You have to click 'Grant access to help centre'.

Grant access to help centre
 

The author can add co-editors in the tab 'EDIT' – 'Settings' – 'Editor access'.

Related content

1KA is free to use for basic users