1KA vabila

Using the 1KA system to send invitations

A new, redesigned interface for sending email invitations is now available.

The 'PUBLISH' - 'Invitations' system is designed for users who want to send a link to a survey to a large number of email addresses and track which respondents have answered the survey and which have not. This is particularly advantageous when sending reminders to those respondents who have not completed the survey. In addition, the 1KA system also supports (documents) the sending of invitations by post, SMS, etc. 

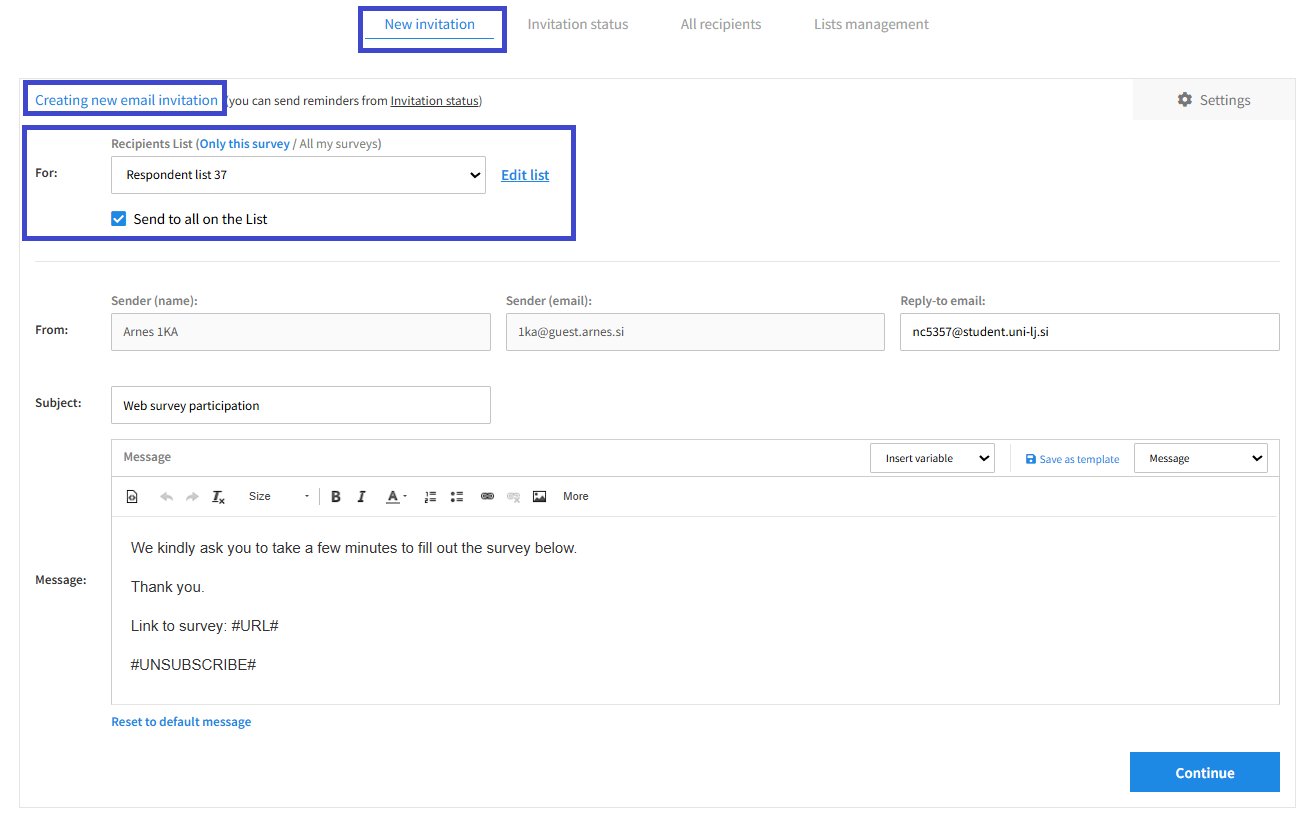
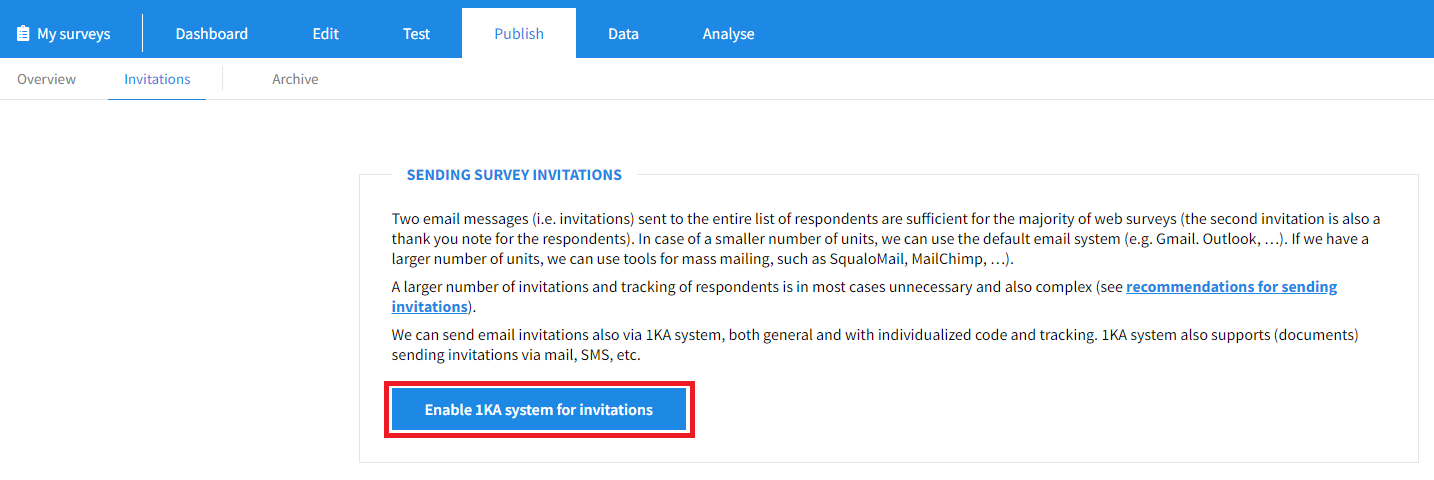
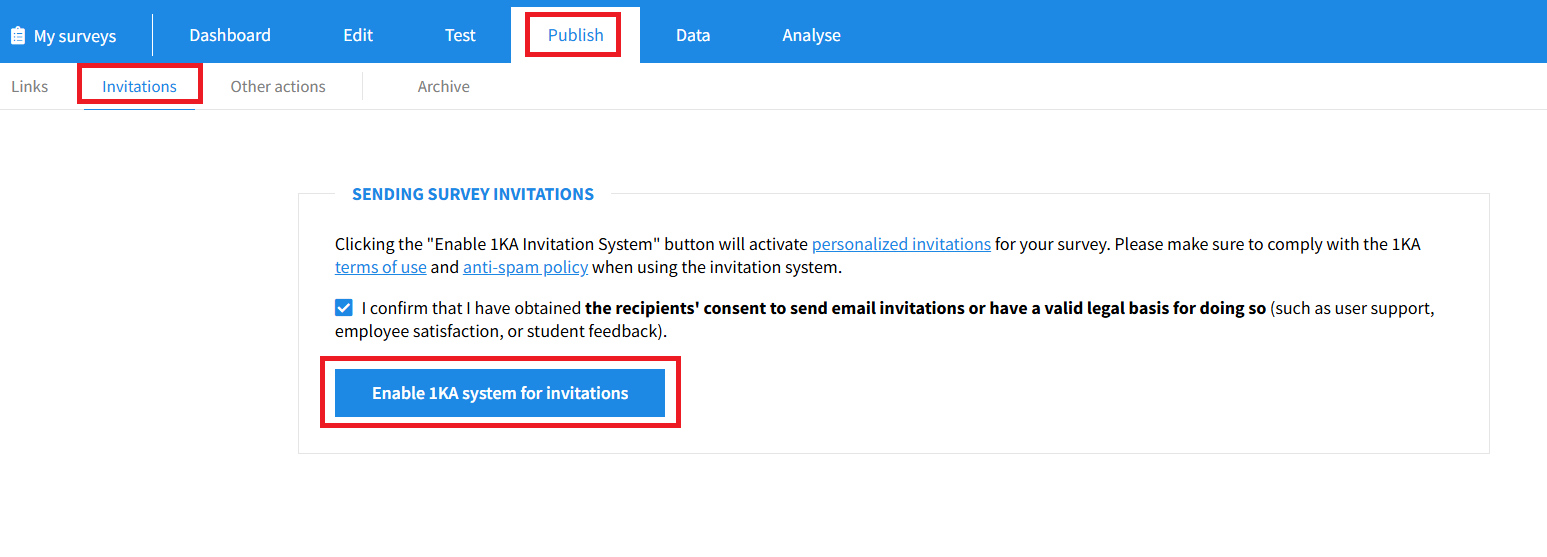
If you want to activate the use of the 1KA system for sending invitations, you need to enable the system in the 'PUBLISH' - 'Invitations' tab by clicking on the 'Enable 1KA system for invitations' button. The tab 'PUBLISH' - 'Invitations' - 'New invitation' - 'Creating new email invitation' opens.

*


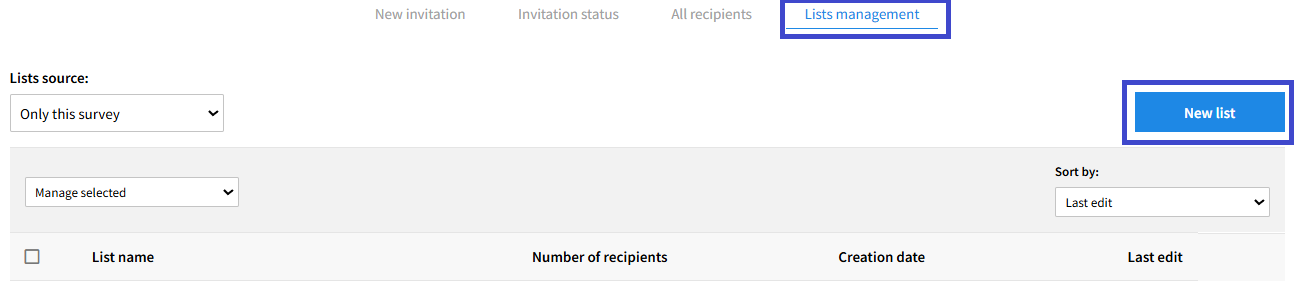
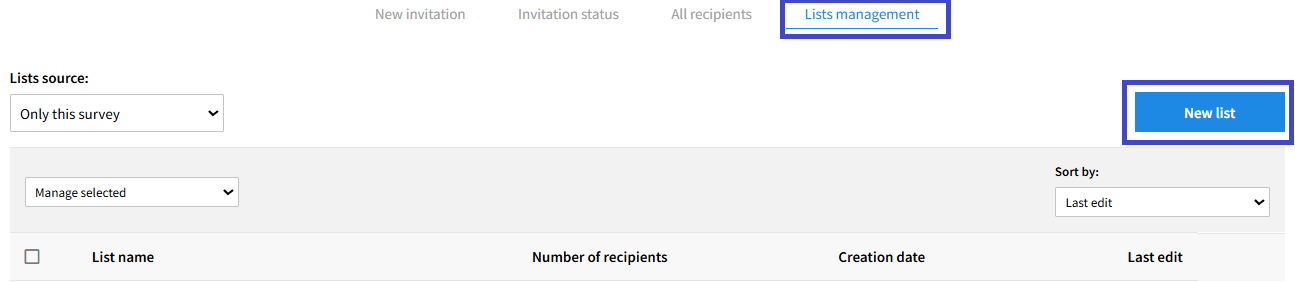
In the Recipient list field, select the previously created recipient list. You can edit and add lists in the 'Lists management' tab. Clicking on 'New list' will open the interface for creating a new list.

*

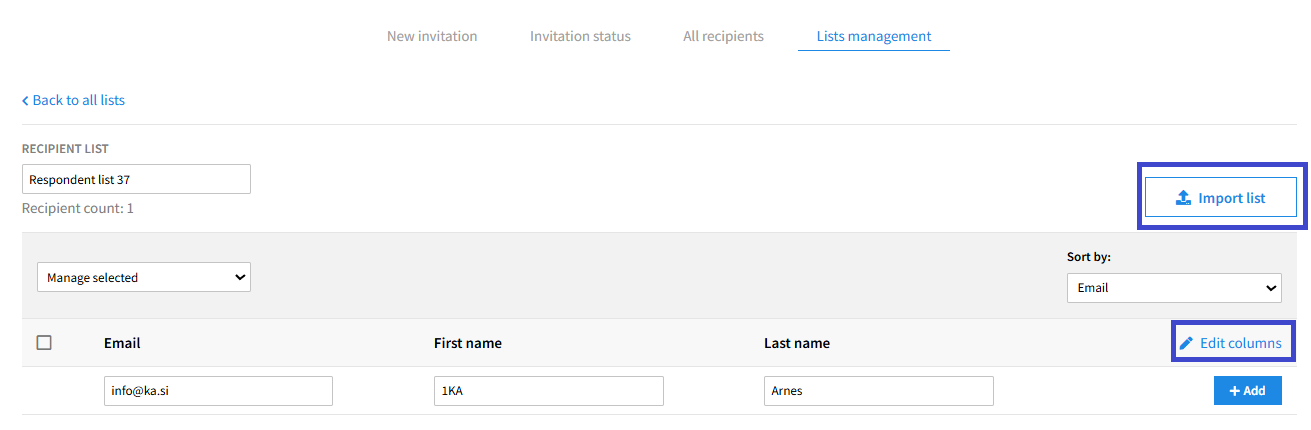
Click on the 'Edit columns' button to select the fields you want to add - email, first name, last name, password, title, phone or other. You can enter recipients manually in the fields or import them by clicking on the 'Import list' button. If you are entering recipients manually, you can add them by clicking on the plus icon 'Add' to the right of the last recipient.

*

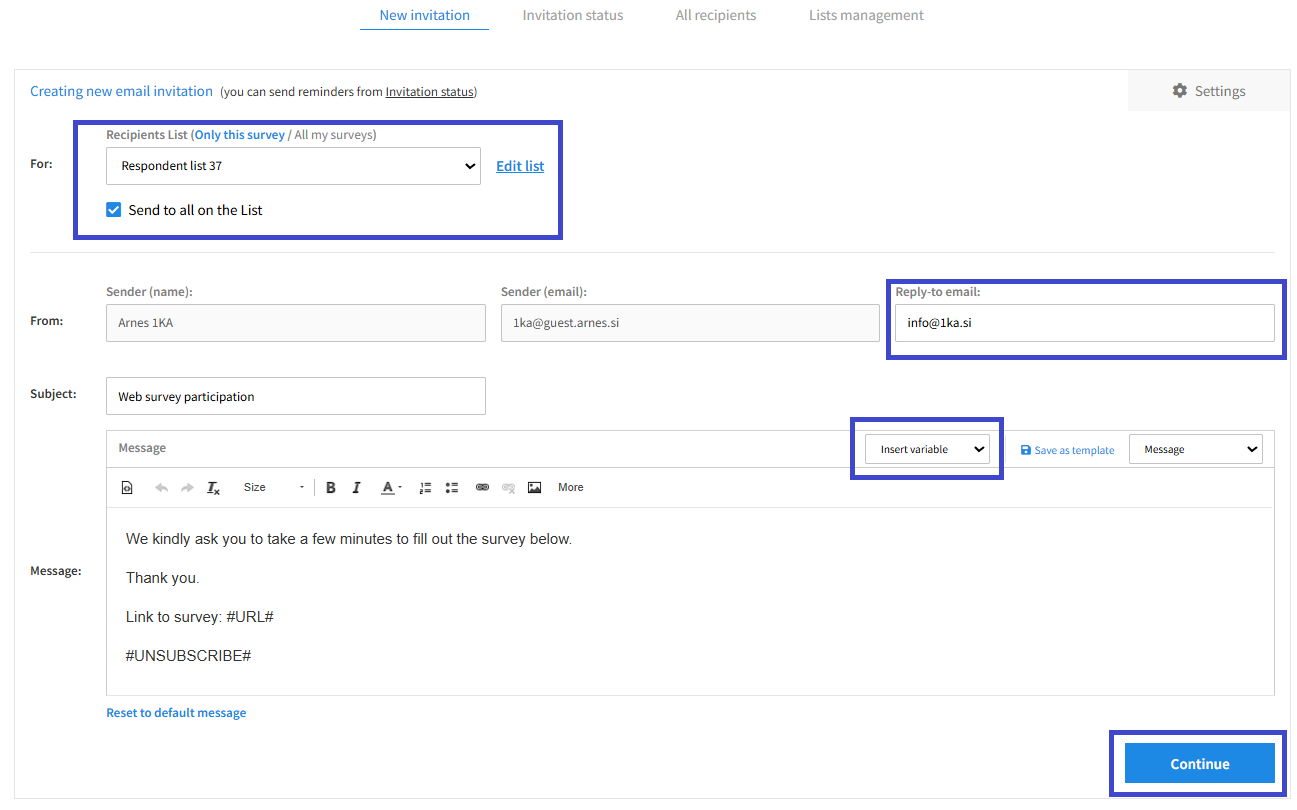
Once you have created a list of recipients, you select it when you send it, in the 'New invitation' tab. The sender of the invitation is configured according to the selected mail server, which can be edited in the invitation settings. You can change the reply to email field as you wish.

Below the 'Creating new email invitation' tab, you will find the window for creating the message. Insert variables such as a link to complete the survey, a tracking code and an unsubscribe link by clicking on the 'Insert variable' checkbox. You can also save the message as a template by clicking on the 'Save as template' button.

*

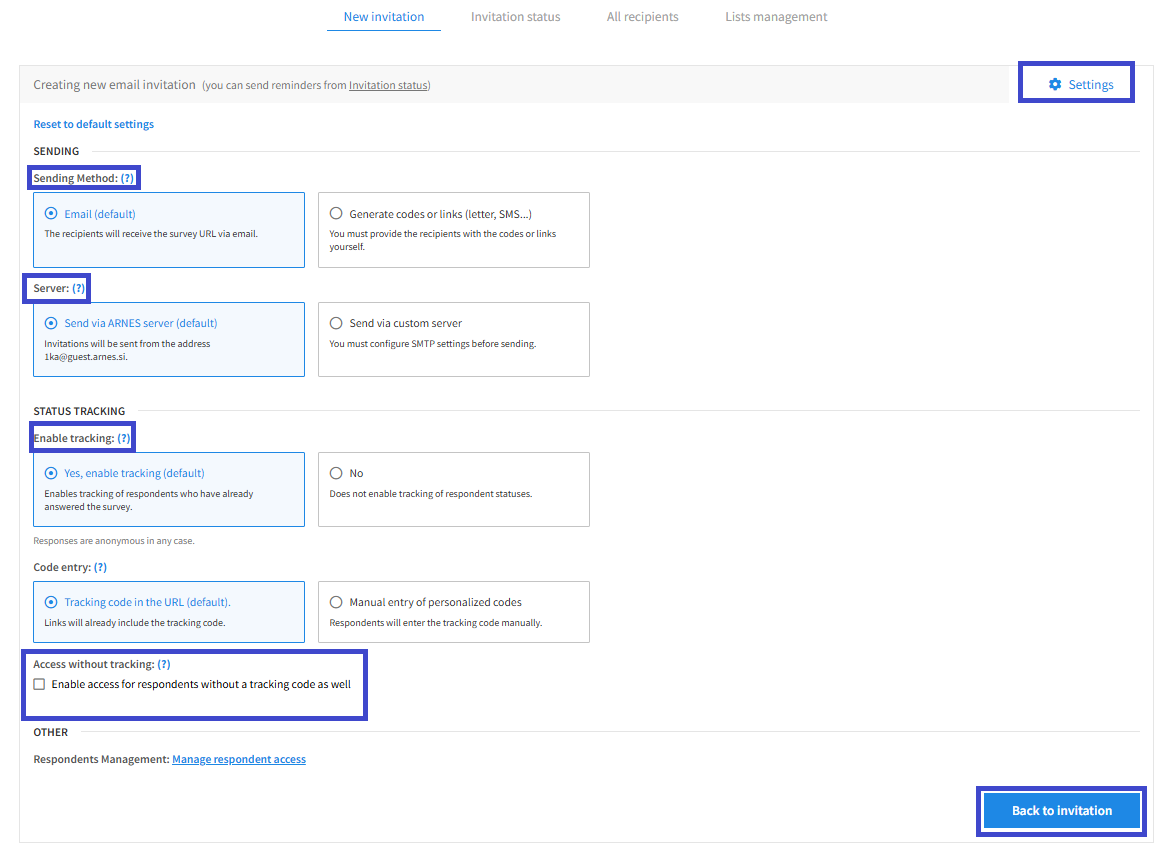
In the right tab 'Settings', you can edit the following invitation settings:

  • Sending method: email or code generation, for sending by letter, SMS,...;
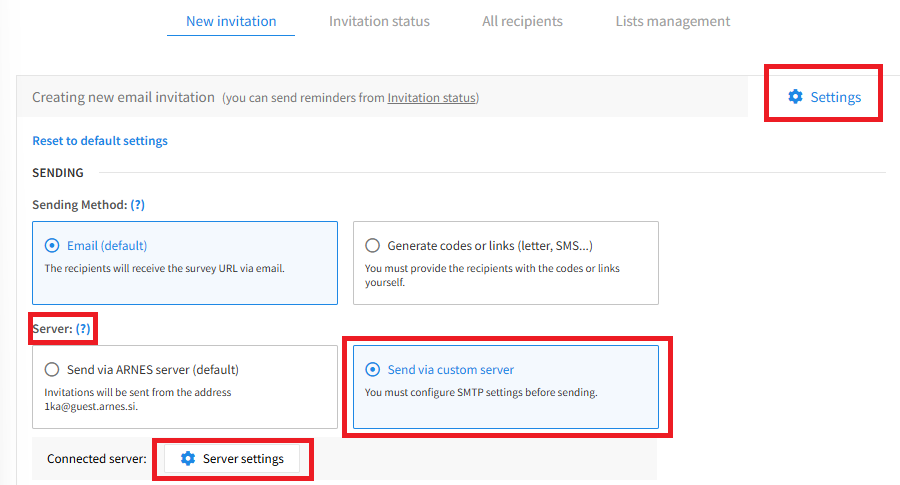
  • Sending server: 1KA Arnes or your own server;
  • Status tracking: whether you want to track respondents - in this case each respondent receives their own personalised code;
  • Code entry method: in URL or manual entry.

*

In addition, you can use the settings to allow access to the survey without a code - only to the survey author or to everyone.

An overview of the invitations sent can be found in the 'Invitation status' tab and a list of all recipients in the 'All recipients' tab. You can also send a reminder or a thank you to respondents in the 'Invitation status' tab next to each list, or in the 'All Recipients' tab, where you can send a reminder or a thank you to all recipients of a particular survey. You can specify that the reminder or thank you is sent to everyone, or only to certain statuses of recipients (e.g. those who have not yet completed the survey).

Advanced Module: Voting

The advanced 'Voting' module supports the process of conducting a completely anonymous vote, with all paradata turned off and without any possibility of linking data to email addresses and other identifiers.

The module allows sending invitations within the 1KA system, but only the information that the invitation has been sent is recorded, not the status (whether the person has opened the poll, whether they have responded).

To use the 'Voting' module, click 'Voting' in the left hand side menu in the 'EDIT' - 'SETTINGS' - 'Advanced Modules' tab, then select the checkbox to enable the module.

The questions you want to include can be edited in the 'EDIT' - 'Questionnaire' tab.

The recipients of the invitations and the message to invite respondents to the poll can be edited in the interface for sending invitations in the 'PUBLISH' - 'Invitations' tab.

  1. First, edit the mail server settings.
  2. Add recipients.
  3. Format the message and send it.

Specific features when using the Voting module

  1. Once you have enabled the 'Voting' module, it is no longer possible to disable it. If you want to carry out a normal survey and you have accidentally switched on the 'Voting' module, then a new survey (or a copy of the current survey) must be created.
  2. When sending invitations, personalised invitations (codes) are used, but these are personalised for the purpose of sending invitations only. Invitation settings (manual entry, access without code, etc.) cannot be changed.
  3. The overview of added recipients only contains information on whether the invitation has been sent, when the recipient was added, who added them and which list they are in. There is no information on the status of the respondent in the overview.
  4. The last step shows all e-mail addresses to which the invitation has not yet been sent. If you would like to send a reminder, this means that you have to add the same recipients again and send them the invitation. However, this means that the person can complete the survey twice (if they receive the invitation with the link to the survey twice). If you send to the same email addresses multiple times, each entry from the same recipient will be recorded as a new entry.
  5. Once the invitations have been sent, linking between the email address and the respondent's answers is not possible.
  6. If the 'Voting' module is enabled, the respondents' access settings and the settings of the paradata cannot be changed. By default, the settings are arranged so that no paradata is recorded and no cookies are stored, which allows a fully anonymised survey to be carried out.

The functionality is available for users of the 3KA package for individuals, and for users of the business packages for groups.


Combining Lists of Email Invitations

1KA allows you to merge lists of existing emails at any time:

  1. Add and save lists of respondents in the 'PUBLISH' - 'Invitations' - 'Add' tab;
  2. In the 'PUBLISH' - 'Invitations' - 'Lists' tab, you will find an overview of all saved lists, where you can choose between 1) lists of respondents for the current survey, 2) lists of respondents of all your surveys, 3) sending archives;
  3. If you wish to combine respondents of multiple lists and include them in a new survey, you can select the desired lists and then check 'Editing' on the right-hand side. The system will open a new list of all selected email addresses of respondents, which you need to save again.

When generating a new list, the system will filter out duplicate records or email addresses. In a new survey, where you want to use such a merged list of respondents, you must select the option to see the respondent lists of all your surveys (as explained in bullet 2).


The functionality is available for users of the 3KA package for individuals, and for users of the business packages for groups.


Related content

Sending Email Invitations

Standard ways of conducting online surveys

Two emails or untracked invitations sent to the entire list of respondents are almost always sufficient, as follows:

  • In the first email, you invite all potential respondents in the form "I invite you to complete the survey ...".
  • The second email should follow 2-3 days after the first, but no more than a week. In it, you should again address the entire list of potential respondents (both those who have already completed the questionnaire and those who have not yet done so) with the same salutation to the effect: "A few days ago you were invited to complete the survey .... We sincerely thank all those who have responded. For those of you who have not yet responded to the survey, we once again invite you to do so ..."

The two messages are sent to the entire list of potential respondents in the usual way of sending emails, where you send an email invitation with the URL of the survey in your client (Gmail, Yahoo, MS Outlook, Thunderbird, etc.). It is true, however, that there are restrictions that need to be taken into account, as in some places there is a limit on the number of emails sent per day (e.g. Gmail has a limit of 500 addresses for individuals in 2023 when sending via the web application). This can be solved by spreading the sending of your invitations across several days, or by sending from several different email accounts.


Special cases:

When you want to send a large number of invitations (three, four, etc.) or when you have a list containing thousands of people, you most likely need a system to send invitations.
When using the 1KA e-mail system for sending invitations, which is available for users of the 3KA package for individuals and for users of the business packages for groups, the following should be taken into account:

  • Using 1KA to send invitations is usually not necessary, especially if there are only a few hundred addresses, as it is quicker and easier to send email invitations from your own email account (Gmail, Yahoo, MS Outlook, Thunderbird ...).
  • The system allows tracking the status of the respondent or non-respondent and related reminders to the remaining non-respondents.
  • It is worth considering whether we really need a third or fourth e-mail reminder. It has been shown that a third and fourth reminder only minimally increases the participation rate, while complicating and prolonging the data collection phase.
  • It should be noted that the use of e-mail addresses for the purposes of the survey is not allowed without the addressee's permission. You may therefore only send survey invitations to addressees who have given their prior consent or whose email addresses have been collected in a related administrative process of an organisation where you have the authority and permission to send email invitations, as it is undeniably clear from the context of the survey that this is a specific internal evaluation of users. It is therefore the user's responsibility to ensure that they do not abuse respondents' privacy by using the 1KA system, e.g. for the purposes of spam invitations or for any other purpose, as also defined in the terms of use and the anti-spam policy.
  • If you do not need to track the status of the respondents, we advise you to send the same (non-individualized) survey URL in the invitation, which should also be mentioned in the invitation, e.g. "We guarantee you complete privacy of your answers, so the survey URLs are not individualized...". This helps to increase the response rate, as many respondents are increasingly annoyed by the fact that they receive an individualized URL, knowing that this in principle gives insight into the individual response.


The right to use the 1KA email system and the Terms of Use

The user may obtain the right to use the 1KA invitation system by purchasing a 3KA package for individuals or by purchasing a business package for groups, whereby the 1KA invitation system may only be used with the user's own SMTP server settings. In doing so, the user agrees that in accordance with the terms of use and the anti-spam policy, invitations will only be sent to known recipients who have either previously explicitly agreed to participate in the study, or to recipients where it is clear that this is an evaluation of a group for which the user has administrative responsibilities and data (members of an association, course attendees, subscribers, personal network, etc.)

On 1KA.Arnes.si, a new, redesigned interface for sending email invitations is available. More >>


Some of the functionalities described are only available for users of the 3KA package for individuals, and for users of the business packages for groups.


Adding Respondents When Sending Email Invitations

When using the 1KA system to send email invitations in the 'PUBLISH' - 'Invitations' tab, you must first add the respondents. There are no limitations for adding new respondents, so you can add any number of respondents at once.

You can create the list of respondents yourself according to your sample and enter it in the box in the 'Add' step. The respondents can also be inserted via manual entry, from an external CSV file, or from the existing system variables.

The preset selected variables (ie. respondents' data) are email, first name and last name. You can also choose the variables password, salutation, phone and custom variable. The order of variables can be changed via drag and drop. You should separate the variables using an appropriate operator. By default, the selected operator is a comma (,) but you can also use the 1KA separator (| ~ |), semicolon (;) or a pipe (|). When adding respondents, add each respondent in a new row.

Example: We add two respondents manually, with all default settings:

john.smith@gmail.com,John,Smith

mary.smith@gmail.com,Mary,Smith

Invitation system at 1KA.arnes.si

On 1KA.Arnes.si, there is a new, redesigned interface for sending email invitations. In the 'PUBLISH' - 'Invitations' tab, you must first activate the 1KA invitation system by clicking on the 'Enable 1KA system for invitations' button.

You can edit and add recipient lists in the 'Lists management' tab. By clicking on 'New list', you will be taken to the interface for creating a new list.


The functionality is available for users of the 3KA package for individuals, and for users of the business packages for groups.


Related content

Respondent Access Settings: Cookies, IP Addresses, Passwords, Registered User Recognition

In the 'EDIT' - 'Settings' - 'Respondents access' tab, you can set cookies, restrict access to the survey and set a password to access the survey.


1) Completion options 

You can set cookies in the 'EDIT' - 'Settings' - 'Respondents access' - 'Completion options' tab. A 'cookie' is a code that is placed on the respondent's computer by a server (e.g. 1KA), so that 1KA can identify the respondent when they try to complete the survey again. You can specify the cookie storage duration. Select the option 'The same respondent can complete the survey only once' under the 'Multiple responses:

  • 'Until the end of the browser session', where the cookie will be deleted as soon as the respondent closes their browser (Internet Explorer, Mozilla Firefox, Opera, etc.); therefore, if the respondent comes back within the same session, they can make further corrections. Caution: if a second respondent enters in the same session after the first respondent, the cookie will still be saved from the first respondent, which will cause issues with the survey!;
  • 'For 1 hour' means that the cookie will be deleted after one hour from the first time the respondent clicked on the survey URL. The same warning as above (browser session) applies;
  • 'For 1 month', the cookie will be deleted one month after the respondent first clicked on the survey. The same warning as above (browser session) applies.

Under the option 'Retaking the survey' you can also change where the respondent starts the survey when they return to the survey:

  • Starts from the beginning, with the respondent seeing the answers they have already given;
  • Starts at the last submitted page, i.e. returns to the page where they left the survey.

You can also allow a user who has already completed your survey (a user who has completed the survey) to edit their answers afterwards, but this means that the data and analyses will also change, so in most (but not all) cases, it is better to choose that respondents can not edit their answers.

Regardless of the cookies (whether the option "until the end of the questionnaire", "until the end of the browser session", "for 1 hour" or "for 1 month" is selected), you can also specify what the respondent's options are while they are answering the survey ('Editing responses after survey completion'):

  • Can subsequently edit their answers: when they return to the previous page, they can change their answers. These then overwrite the previously entered values in the database when clicking on 'Next page'. 
  • Cannot subsequently edit their answers: even if they click on 'Previous page' or on the 'Back' button in the browser, they can only see their answers but cannot change them.


2) IP recognition (IP address restrictions)

To prevent the same person from answering your questionnaire multiple times, you also have the option of blocking the IP address of the device from which the respondent is accessing the survey. You can do that in the 'EDIT' - 'Settings' - 'Respondents access' - 'IP recognition' tab. You can block it for 10 minutes, 20 minutes, 60 minutes, 12 hours or 24 hours. However, this means that you can unintentionally also block another person using the same computer from answering the survey. It only makes sense in rare cases, e.g. voting, where there is a risk that someone is submitting multiple responses with a bot or a script. Of course, respondents can also circumvent IP restrictions by using virtual IP addresses. In general, however, this is a risky option which does not solve the problem of duplicate responses, but generates the risk of preventing a large number of relevant users from completing the survey, as often whole organisations or departments have the same IP address, for which there are many computers and potential respondents. More >>


3) 1KA recognition

1KA also enables the recognition of respondents who are registered 1KA users, but they must be logged in to the 1KA installation while completing the survey. In the tab 'EDIT' - 'Settings' - 'Respondents access' - '1KA recognition' you have two options:

  • 1KA recognises the user as a respondent, i.e. a person (logged in to the 1KA installation) who answers your survey. This setting is suitable for internal administrative processes, e.g. when members of a collective fill in some data (e.g. address, contact) and can always correct their answers;
  • 1KA recognises the user as a person entering other respondent's answers (data input), i.e. an interviewer entering answers, for which 1K provides the appropriate interface adjustments. This option is particularly useful in the case of mass entries, or when a field survey is carried out and then interviewers enter the collected answers, to see who has entered which answers. The same applies to telephone surveys.

The above two cases are rare; the default option is of course that 1KA does not recognise the user of the 1KA installation. Turning this option on can have serious consequences. If the 'Yes, as data input' option is enabled, the user has additional settings available for Questionnaire Entry.


4) Access with password (password to access the survey)

Access to the survey can best be restricted via a password in the 'EDIT' - 'Settings' - 'Respondents access' - 'Access with password' tab. You can generate multiple passwords and thus create groups of respondents that can be separated in analyses or used as a basis for IF conditions. In this case, the password serves as a safeguard to ensure that only those you want to complete the survey do so. A single password can be created for all respondents, or a password for each respondent. If you want to enter several passwords at once, select the 'Password mass insert' option. The use of passwords is only available for users of the 2KA and 3KA packages for individuals, and for users of the business packages for groups

In the 'PUBLISH' - Invitations' tab, you can also set up personalised codes to access the survey, via the email invitation interface available to users of the 3KA package for individuals, and users of the business packages for groups. Usually this code is then used in the email invitation, preferably automatically (in the survey URL) so that it does not need to be entered by the respondent. Alternatively, we may ask the respondent to enter the code manually. Similarly, the code can be sent in other ways, e.g. in a letter, and the respondents can type it in. The generation and use of individual codes is described here.

The use of passwords is in principle stronger and overrides the other settings for respondent access restriction (cookie, IP number, registered user identification), but interference may occur, so we strongly recommend to use only one of the above mentioned ways to identify respondents: cookie, IP number, registered user identification or individual password.


Some of the functionalities described are only available for users of the 2KA and 3KA packages for individuals, and for users of the business packages for groups.


Sending Invitations via 1KA's SMTP E-mail System or via a Gmail User Account (Server)

Gmail SMTP can be used by any user with a Gmail account, but there are some limitations, especially on the number of emails sent per day. More information is available here.

In the 'PUBLISH' – 'Invitations', you first need to enable the system by clicking on the 'Enable 1KA system for invitations' button:

Doing so opens the '1 - Settings' step, where you can edit 'General invitations settings' and 'Settings for Email Server'

To send email invitations via the SMTP settings of your Gmail email address, please follow the instructions below:

  • Sign in to your Google account and check your settings:
    • Make sure you have your IMAP access turned on:
      • Open Gmail on your computer.
      • Click the settings icon in the upper right corner → Show all settings.
      • Click the Forward tab, then on POP/IMAP.
      • In the 'IMAP access' section, select 'Enable IMAP'.
      • Click 'Save changes'.
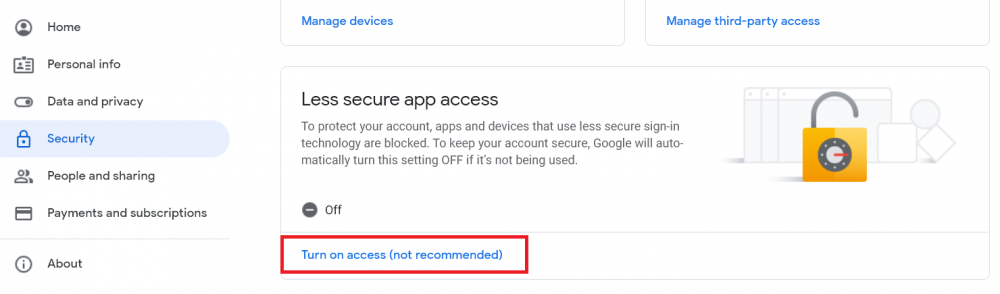
    • Allow access for less secure applications. Open your Google account and from the menu on the left, select the Security tab → Access for less secure applications → Turn on access:
  • Turn on 2-step verification:
    • Open your Google account.
    • In the navigation panel choose Security.
    • Under 'Sign in to Google', select 2-step verification → Get started.
    • Follow the instructions on the screen.
  • Create a password to access the application:
    • Open your Google account.
    • Select Security.
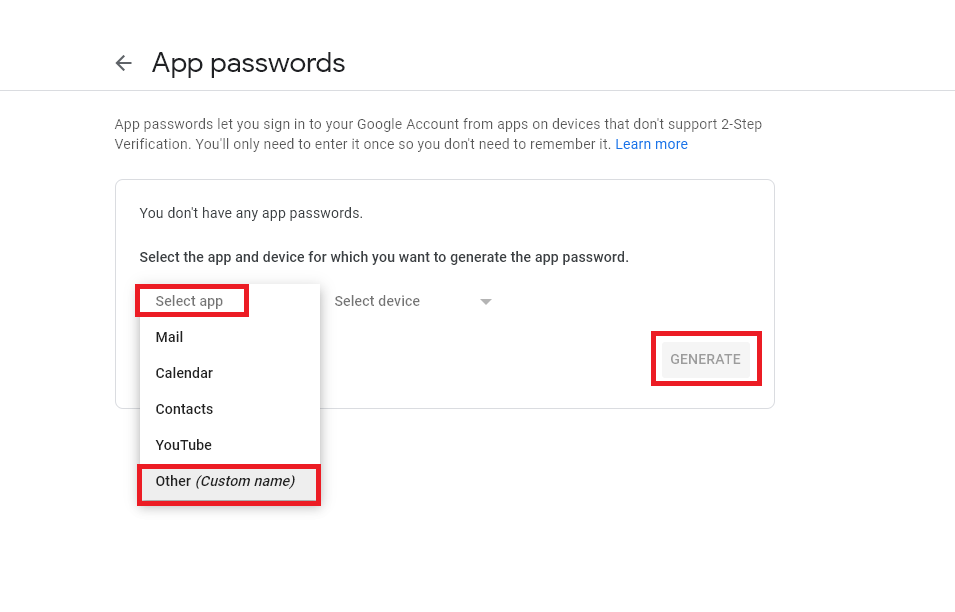
    • Under 'Sign in to Google', select 'App passwords'. You may need to sign up.
    • At the bottom, select: 'Select app' and then enter the application, select 'Other' → name as desired (e.g. 1KA) → Generate.
    • Follow the instructions to enter the password to access the application. The password to access the application is a 16-digit code in the yellow bar on the device.
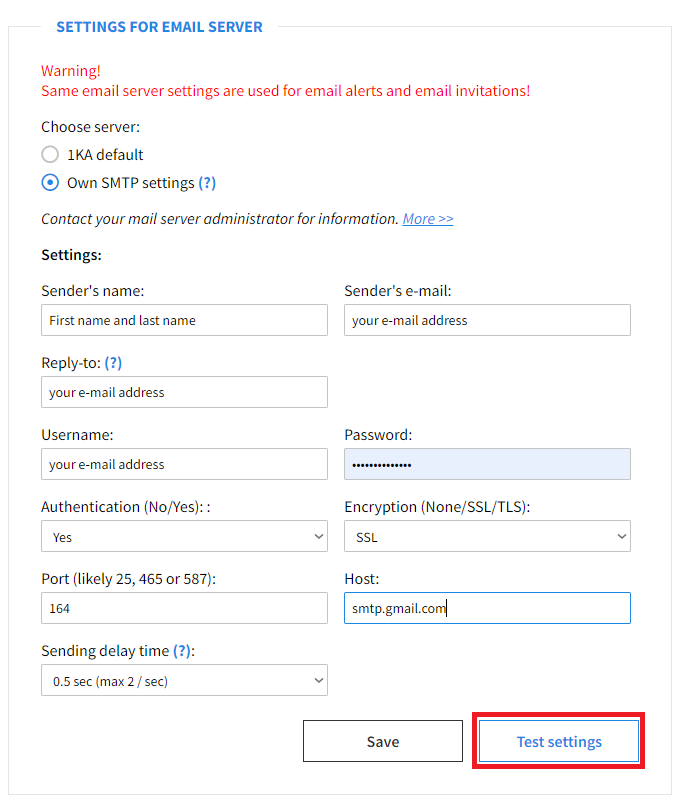
  • In the 'PUBLISH' - 'Invitations' - 'Settings' tab - 'Settings for Email Server' you must enter the following information:
    • Sender's name: name and surname
    • Sender's email: your email address
    • Reply-to: your email address
    • Username: your email address
    • Password: 16-digit code you set as the application access password (Step: Create application access password)
    • Authentication (No/Yes): Yes
    • Encryption (None/SSL/TLS): SSL
    • Port: 465
    • Host: smtp.gmail.com
  • Click 'Test settings' below. You will receive a test message to your email address:


  • If the test is successful, then Save the settings.


Keep in mind that Gmail is constantly updating its settings. These instructions for setting up invitations via the Gmail server were last tested in September 2023, so we advise you to check the current settings in Gmail's documentation before sending invitations.

1KA system for sending invitations at 1KA.arnes.si

On 1KA.arnes.si, there is a new, redesigned interface for sending email invitations. If you want to activate the use of the 1KA system for sending invitations, you need to enable the system in the 'PUBLISH' - 'Invitations' tab by clicking on the 'Enable 1KA system for invitations' button. In the 'PUBLISH' - 'Invitations' - 'Settings' tab, you can edit the general settings of the invitations and the settings of the email server. When setting up the server, select 'Send via custom server' and then click on the 'Server settings' button.

After clicking on the 'Server Settings' button, you will be taken to the window, where you can enter the same information as above.


The functionality is available for users of the 3KA package for individuals, and for users of the business packages for groups.


Related content

Granting Survey Access to 1KA Helpdesk

Protecting user data is one of 1KA's top priorities. Access to data is limited to the author (editor) of the survey and additional co-editors, which are added by the author of the survey.

1KA's helpdesk and the website administrator of www.1KA.si do not have access to surveys and data without the explicit consent of the user.

In case the user requires assistance from 1KA’s administrators, the user must grant temporary access to 1KA's helpdesk (until the issue is resolved). Despite granted access, administrators are still committed to the highest standards of privacy protection, as defined in the Terms of Use.

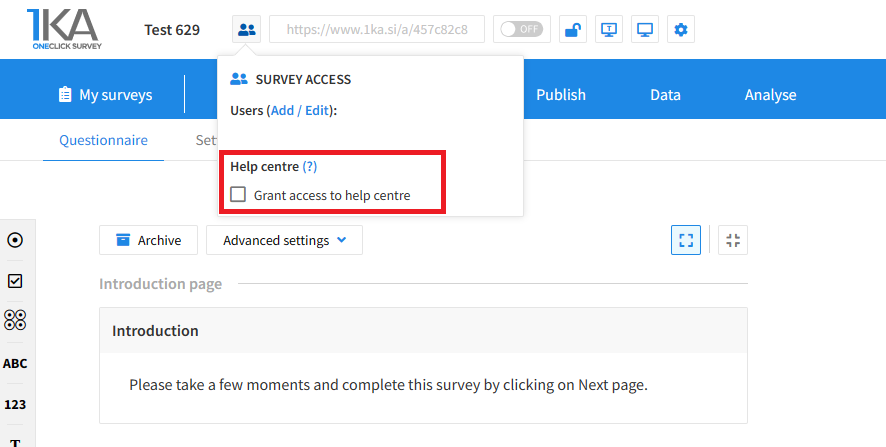
Each survey has an icon in the top left corner which enables you to grant access to 1KA's helpdesk and administrators. You have to click 'Grant access to help centre'.

Grant access to help centre
 

The author can add co-editors in the tab 'EDIT' – 'Settings' – 'Editor access'.

Related content

1KA is free to use for basic users