
 Google Sign In

Povezava (URL)
Setting a Custom Survey URL
When you create a survey in 1KA, it is assigned a random string of numbers and letters, which then appear in the survey URL; for example www.1ka.si/a/4669.
In the 'PUBLISH' – 'Links' tab, you can click on the 'Create custom URL' button to add a URL that is more engaging and appealing to respondents. You can use a minimum of three characters (č, ć, š, ž, đ characters can not be used). The system distinguishes between upper and lower case letters.
The functionality is available for users of the 2KA and 3KA packages for individuals, and for users of the business packages for groups.
Related content
Sending Invitations via 1KA's SMTP E-mail System or via a Gmail User Account (Server)
Gmail SMTP can be used by any user with a Gmail account, but there are some limitations, especially on the number of emails sent per day. More information is available here.
In the 'PUBLISH' – 'Invitations', you first need to enable the system by clicking on the 'Enable 1KA system for invitations' button:
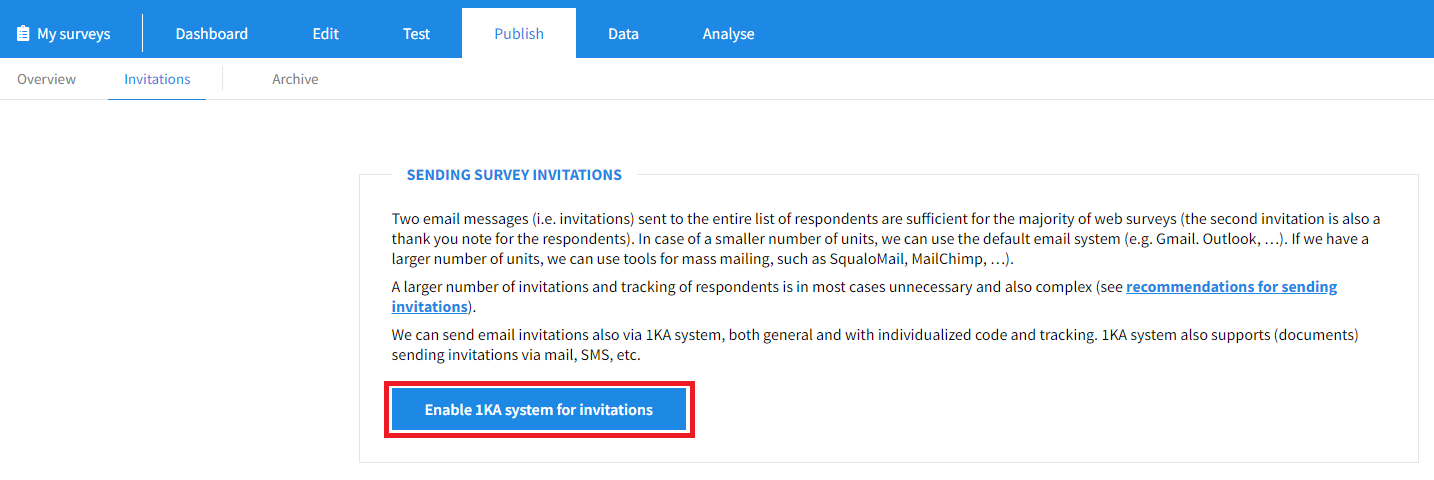
Doing so opens the '1 - Settings' step, where you can edit 'General invitations settings' and 'Settings for Email Server'
To send email invitations via the SMTP settings of your Gmail email address, please follow the instructions below:
- Sign in to your Google account and check your settings:
- Make sure you have your IMAP access turned on:
- Open Gmail on your computer.
- Click the settings icon in the upper right corner → Show all settings.
- Click the Forward tab, then on POP/IMAP.
- In the 'IMAP access' section, select 'Enable IMAP'.
- Click 'Save changes'.
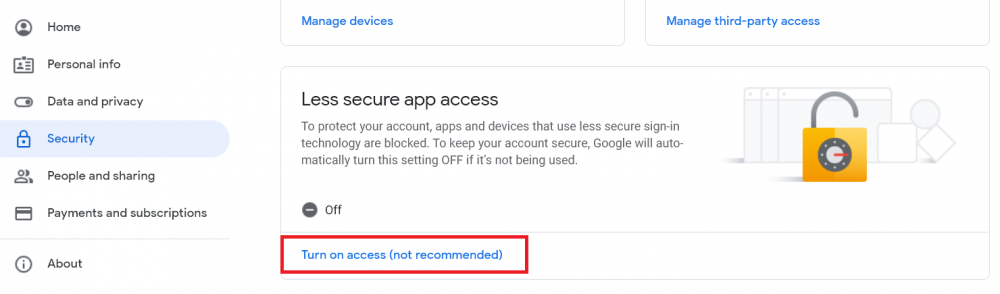
- Allow access for less secure applications. Open your Google account and from the menu on the left, select the Security tab → Access for less secure applications → Turn on access:
- Make sure you have your IMAP access turned on:
- Turn on 2-step verification:
- Open your Google account.
- In the navigation panel choose Security.
- Under 'Sign in to Google', select 2-step verification → Get started.
- Follow the instructions on the screen.
- Create a password to access the application:
- Open your Google account.
- Select Security.
- Under 'Sign in to Google', select 'App passwords'. You may need to sign up.
- At the bottom, select: 'Select app' and then enter the application, select 'Other' → name as desired (e.g. 1KA) → Generate.
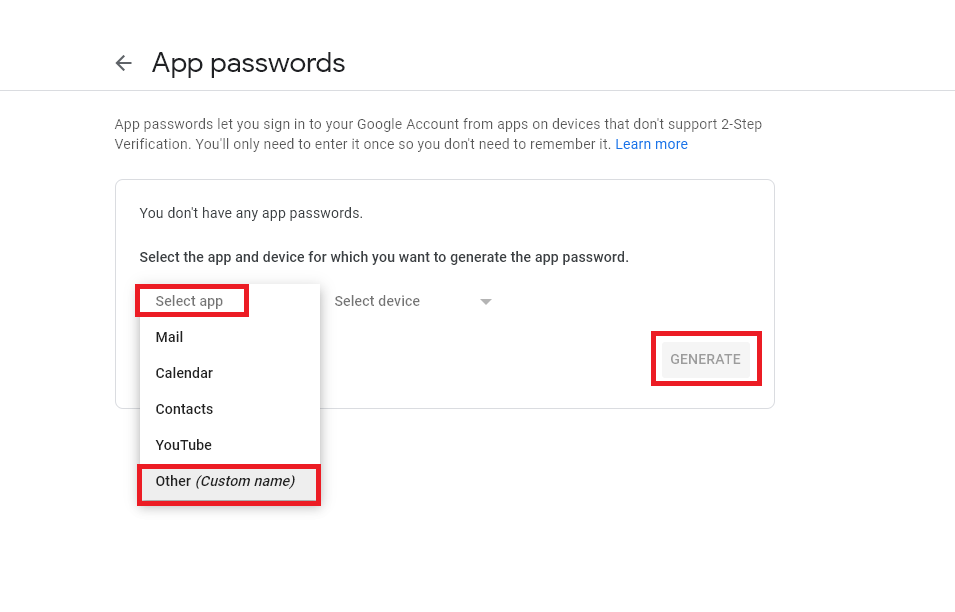
- Follow the instructions to enter the password to access the application. The password to access the application is a 16-digit code in the yellow bar on the device.
- In the 'PUBLISH' - 'Invitations' - 'Settings' tab - 'Settings for Email Server' you must enter the following information:
- Sender's name: name and surname
- Sender's email: your email address
- Reply-to: your email address
- Username: your email address
- Password: 16-digit code you set as the application access password (Step: Create application access password)
- Authentication (No/Yes): Yes
- Encryption (None/SSL/TLS): SSL
- Port: 465
- Host: smtp.gmail.com
- Click 'Test settings' below. You will receive a test message to your email address:
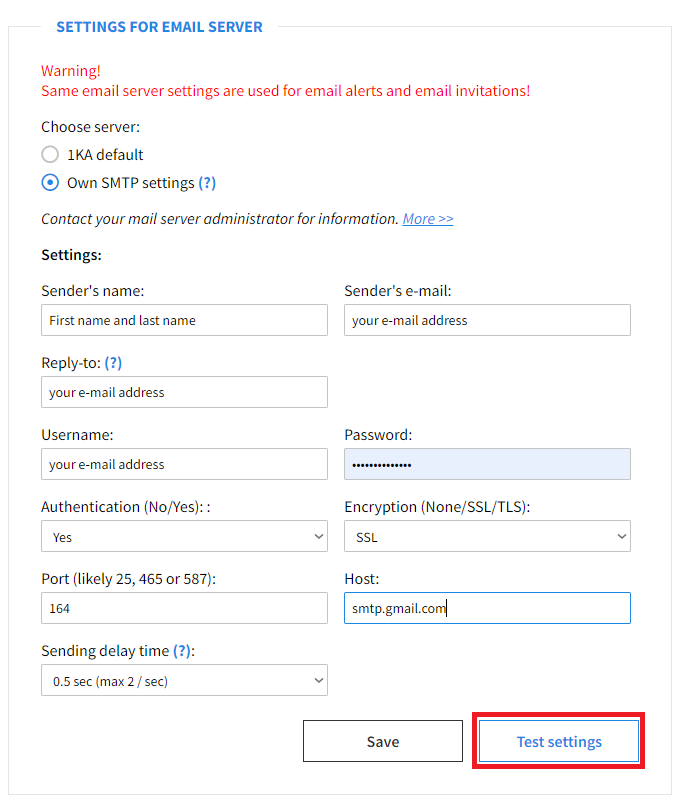
- If the test is successful, then Save the settings.
Keep in mind that Gmail is constantly updating its settings. These instructions for setting up invitations via the Gmail server were last tested in September 2023, so we advise you to check the current settings in Gmail's documentation before sending invitations.
1KA system for sending invitations at 1KA.arnes.si
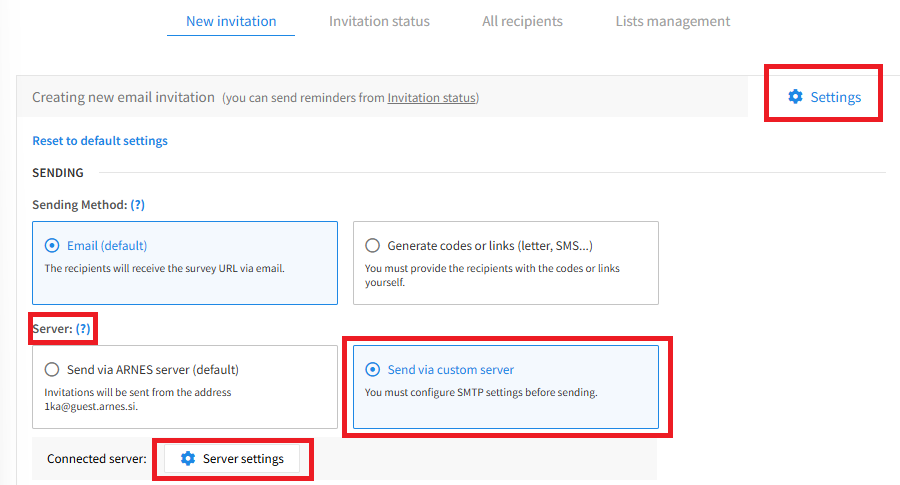
On 1KA.arnes.si, there is a new, redesigned interface for sending email invitations. If you want to activate the use of the 1KA system for sending invitations, you need to enable the system in the 'PUBLISH' - 'Invitations' tab by clicking on the 'Enable 1KA system for invitations' button. In the 'PUBLISH' - 'Invitations' - 'Settings' tab, you can edit the general settings of the invitations and the settings of the email server. When setting up the server, select 'Send via custom server' and then click on the 'Server settings' button.
After clicking on the 'Server Settings' button, you will be taken to the window, where you can enter the same information as above.
The functionality is available for users of the 3KA package for individuals, and for users of the business packages for groups.
Related content
Granting Survey Access to 1KA Helpdesk
Protecting user data is one of 1KA's top priorities. Access to data is limited to the author (editor) of the survey and additional co-editors, which are added by the author of the survey.
1KA's helpdesk and the website administrator of www.1KA.si do not have access to surveys and data without the explicit consent of the user.
In case the user requires assistance from 1KA’s administrators, the user must grant temporary access to 1KA's helpdesk (until the issue is resolved). Despite granted access, administrators are still committed to the highest standards of privacy protection, as defined in the Terms of Use.
Each survey has an icon in the top left corner which enables you to grant access to 1KA's helpdesk and administrators. You have to click 'Grant access to help centre'.
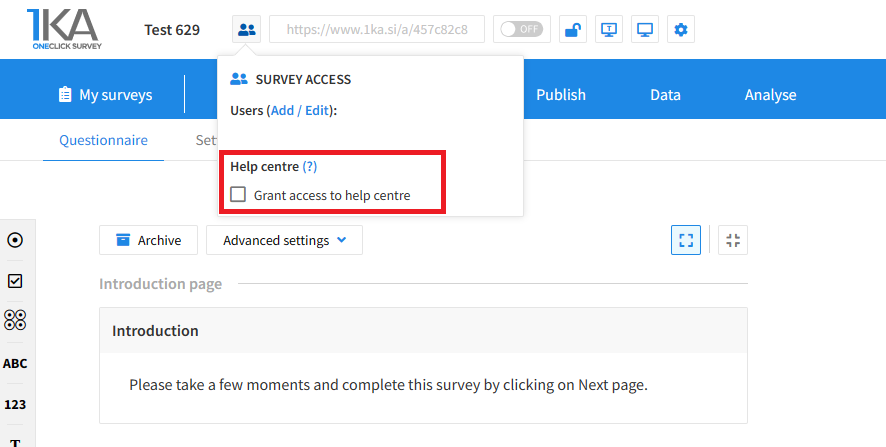
The author can add co-editors in the tab 'EDIT' – 'Settings' – 'Editor access'.
Related content
Copying the Survey
The video guide shows how to copy an existing survey in 1KA.
Each survey we previously created or have access to edit can be copied and reused to collect data.
Adding Additional Survey Editors
The video tutorial shows how to share a survey with other editors in 1KA.
Embedding the Survey on a Website
In the 'PUBLISH' - 'Overview' tab, you can access the code to embed the survey in the website, where it becomes an integrated part of the page and does not need to be accessed from a separate address. It can be generated with or without JavaScript.
There are two ways to embed a survey on a web page:
- With normal embedding, where the survey is an integrated part of the page;
- By displaying the survey in a pop-up window within the same browser window. In this case, due to modern security standards, it is not possible to directly copy the code to display it as a pop-up window on your website, but it has to be programmed manually. You can do this yourself or contact us for help, but the service comes at a fee. You can order the service via the form >>
Copy this code on your website and, if necessary, set the height of the window (parameter 'height=') in which the survey will be displayed.
For the best possible appearance of the embedded survey, it is recommended not to use the survey progress indicator (it is turned off by default). In case you have enabled it, you can turn it off in the 'EDIT' - Design' tab. To do this, click on 'Customize' on the selected theme and then set 'Show bar/progress indicator:' to 'No'.
Related content